Monthly Archives: February 2014

Adding .guru domains to Office 365 (Always use PowerShell!)

A couple of weeks ago, general availability for the .guru tld was announced. The new tld means that geeks like me can show off their ‘expertise’ by having a cool domain!

Now to the problem. When trying to add the new cool domain to my Office 365 tenant, I tried to do it in the Admin Center, as I usually do when adding single domain.
Unfortunately they have not yet added support for the new cool .guru tld in Admin Center.
o365.guru-admincenter

Fortunately, when adding the domain with the New-MsolDomain cmdlet, it went through with no problems.
2014-02-27 21-13-59

So, a friendly reminder to all of you geeks out there with .guru domains –
Whenever possible, use PowerShell! 🙂

/Johan

Exchange Online: Pre-populate language and time zone on new mailboxes

When a new Exchange Online mailbox is created the user is prompted to set language and time zone at first logon. This information is possible to pre-populate to make the experience smoother for the end users. This is particularly useful in a migration scenario.

2014-02-08 21-18-09

These settings are set with the cmdlet Set-MailboxRegionalConfiguration.

Example:

Set-MailboxRegionalConfiguration -identity "aaron.beverly@365lab.net" `
    -TimeZone "W. Europe Standard Time" -Language "sv-SE" -confirm:$false

Some useful links:

/ Andreas

Fix broken shortcuts during file server migrations

During a file server migration several problems arise. Most of them are eliminated by using DFS Namespaces. With DFS all paths are kept the same even though the file server itself is changed. Having that in mind, I really hope that everyone is using DFS for file servers.

In scenarios where UNC paths that points directly to the file server are used we have to find a way to minimize problems for the end users when the paths are changed.

It is very common that end users have shortcuts on their desktops that point to folders and documents on the server. I will give you a simple script that will replace the path for you.

This script is written in VBScript. The first two lines defines the old path, and what to replace it with.

'Define paths
strFind = "\\oldserver\share1\"
strReplace = "\\newserver\share2\"

Set objWsh = CreateObject("WScript.Shell")
Set objWshSysEnv = objWsh.Environment("PROCESS")
strProfilePath = objWshSysEnv("USERPROFILE")

Set objFSO = CreateObject("Scripting.FileSystemObject")
Set objFolder = objFSO.GetFolder(strProfilePath & "\Desktop")

'Loop through all files on the desktop
For Each file In objFolder.Files
	if right(file.Name,3)="lnk" then
		'If a shortcut is found
		Set objLink = objWsh.CreateShortcut(file.Path)

		objLink.Arguments = Replace(objLink.Arguments,strFind,strReplace,1,-1,1)
		objLink.TargetPath = Replace(objLink.TargetPath,strFind,strReplace,1,-1,1)
		objLink.WorkingDirectory = Replace(objLink.WorkingDirectory,strFind,strReplace,1,-1,1)

		objLink.Save
	end if
Next

Run this script as a login script on your clients and you will have one problem less the day after your file server migration.

/ Andreas

Office 365: Enable Multi Factor Authentication with PowerShell

Now when Multi Factor Authentication is free in Office 365 for all users, you might want to automate the activation of the service. And yes, you guessed it right, the way to do that is with PowerShell! 🙂 If you are running Office 365 in a Small Business or Small Business premium plan, this is currently the only way to enable MFA.

In this case we use the Windows Azure Active Directory Module for Windows PowerShell, which can be downloaded from here.

Enable Multi-Factor Authentication for users with PowerShell
In order to enable MFA for a user with PowerShell, we need to use the the object Microsoft.Online.Administration.StrongAuthenticationRequirement and put that with some additional settings in to the StrongAuthenticationRequirements attribute.

Note: After enabling MFA, the user will have to login through the portal and enroll their MFA methods and eventual app passwords before they will be able to logon to the services again.

#Create the StrongAuthenticationRequirement object and insert required settings
$mf= New-Object -TypeName Microsoft.Online.Administration.StrongAuthenticationRequirement
$mf.RelyingParty = "*"
$mfa = @($mf)
#Enable MFA for a user
Set-MsolUser -UserPrincipalName aaron.beverly@365lab.net -StrongAuthenticationRequirements $mfa

#Enable MFA for all users (use with CAUTION!)
Get-MsolUser -All | Set-MsolUser -StrongAuthenticationRequirements $mfa

#Disable MFA for a user
$mfa = @()
Set-MsolUser -UserPrincipalName aaron.beverly@365lab.net -StrongAuthenticationRequirements $mfa

MFA_2

Find your Multi Factor Authentication enabled users
If we want to know what users that have MFA enabled, the attribute StrongAuthenticationRequirements tells us that a user has MFA enabled, and the attribute StrongAuthenticationMethods tells us that a user has enrolled their MFA methods (Phone, App, Text etc.).

#Find all MFA enabled users
Get-MsolUser | Where-Object {$_.StrongAuthenticationRequirements -like "*"}  | select UserPrincipalName,StrongAuthenticationMethods,StrongAuthenticationRequirements

#Find all MFA enabled users that have enrolled their MFA methods
Get-MsolUser | Where-Object {$_.StrongAuthenticationMethods -like "*"}  | select UserPrincipalName,StrongAuthenticationMethods,StrongAuthenticationRequirements

As seen in the screenshot below, only one of my MFA enabled users have actually enrolled their MFA methods.
MFA-Enabled-Enrolled

Not to hard, right? Consider adding this as a step for certain users (eg. admins or other user groups) in your automated process of enabling users in Office 365.

/Johan

Office 365, ADFS and double logons: WAP to the rescue!

One of the things that are causing a lot of headache using ADFS with ADFS-proxy in combination with Office 365, is the fact that you have to type in your username twice when logging on to the portal or to the webmail externally. One way to avoid this is just go to the webmail directly using the address http://outlook.com/domain.com, but it might not be the easiest address to remember for your end users.

Luckily enough, this has been sorted out when using the Web Application Proxy in Windows Server 2012 R2. The Web Application Proxy in Server 2012 R2 replaces the ADFS proxy in earlier versions of Windows Server, and have been expanded with functionality to publish other resources in a secure manner as well.

Here we are logging on as usual to mail.office365.com (or portal.microsoftonline.com), and of course the usual redirection is taking place after going to the password field.
2014-02-13 18-06-31

2014-02-13 18-06-52

Earlier, this would have been the place where you were putting in your username once again. Not this time though, your username have now been passed along to the Web Application Proxy and you can continue by just typing in your password!
2014-02-13 18-10-18

Never thought I could be impressed by such a small feature…
I think we’ll see lots of customers upgrading their ADFS infrastructure due to this! 🙂

/Johan

Windows Azure Multi Factor Authentication in Office 365

Windows Azure Multi Factor Authentication is a great service/Product that gives you a complete MFA solution both on premise and in the cloud. The best thing is that as of yesterday, it’s free for all accounts and not just for admin accounts.

Now you don’t have any excuses to not secure your admin accounts that have potentially access to multiple thousands of email accounts and other sensitive information.

One thing that I have not been testing until today, was to activate MFA for a Federated Administrator(DirSynced account with global administrator rights).
It works completely transparent for the user/admin, they just log on as they normally do to the ADFS server, and then the Azure MFA will kick in and require additional authentication.
How awesome is that?

Here’s how to activate MFA for an admin user (regardless if you’re using ADFS or not):

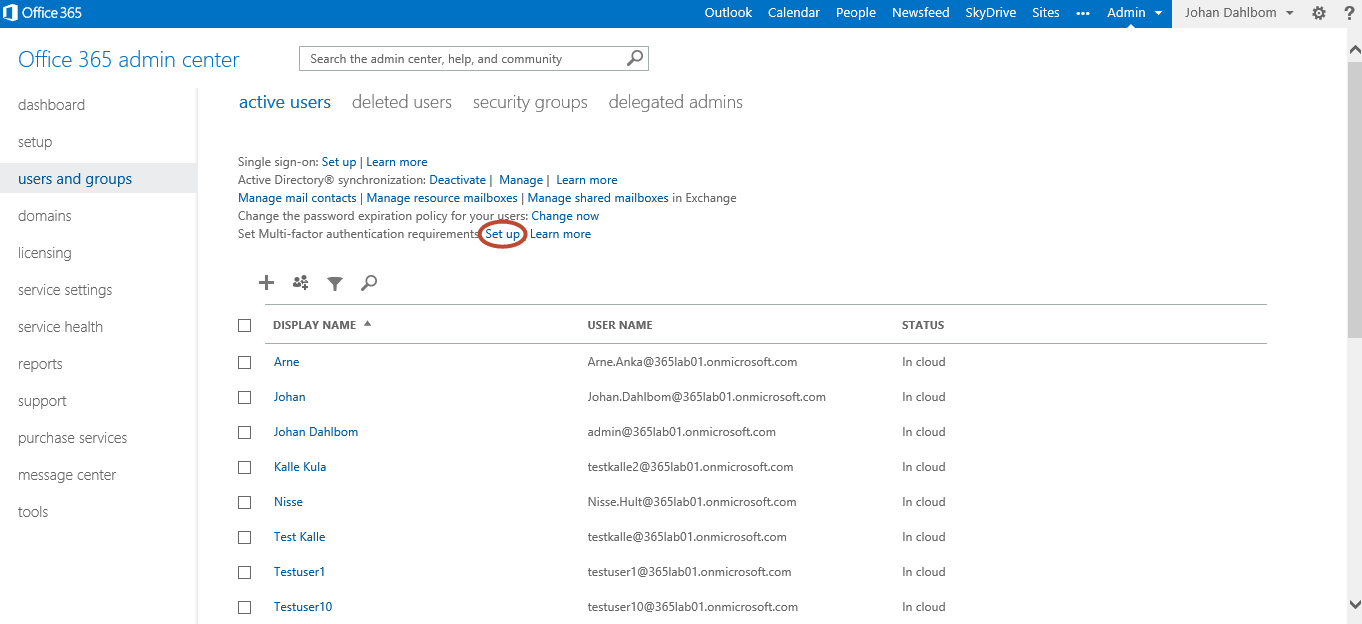
1. Logon to the O365-portal, under users and groups, find the “Set Multi-factor authentication requirements” row and click “Set up”.
2014-02-10 19-17-06

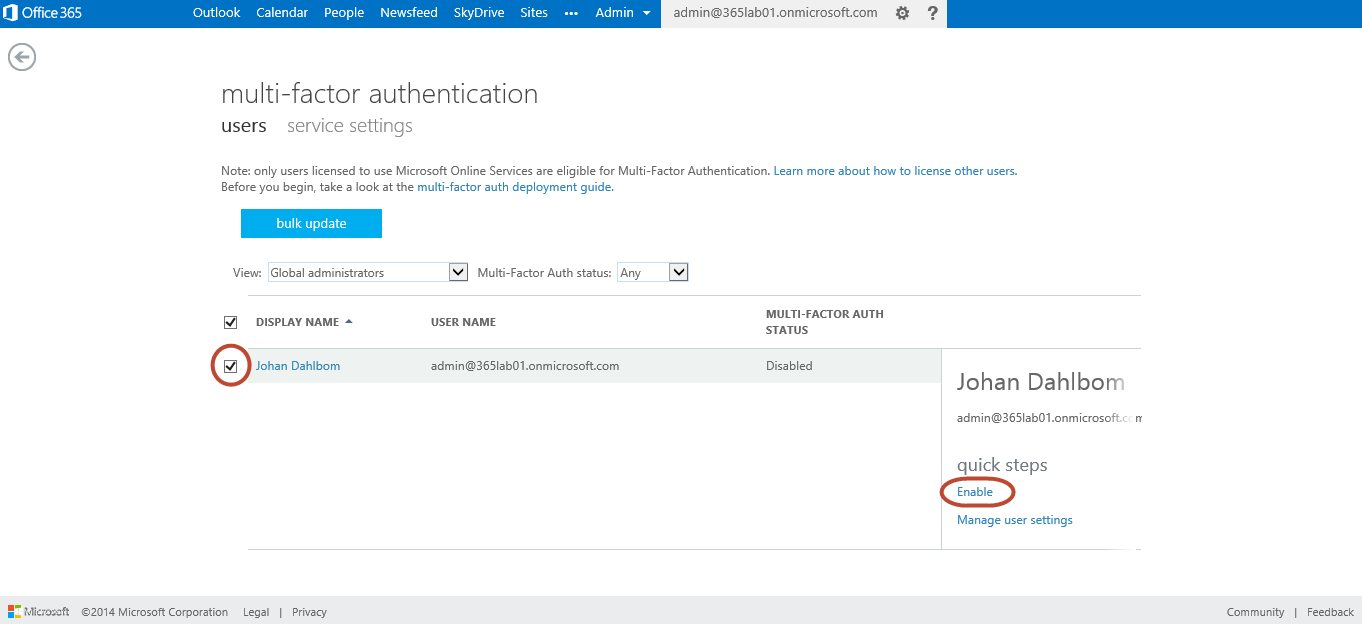
2. Choose the account(s) that you want to enable MFA for and click enable and then enable MFA.
2014-02-10 19-22-30
2014-02-10 19-27-38

3. After activated MFA, at next logon, the admin have to put in additional info about the second factor of authentication preferred. See the process to enroll devices as follows.
2014-02-10 19-37-24
Personally, I prefer using the mobile app as a second factor of authentication since its the easiest method, but it’s also possible to use text messages and phone for that.
2014-02-10 19-42-52
After verifying the activation with the Multi Factor Authentication app in my phone, I’m almost set, apart from one thing.
AzureMfaVerify
If you indend to use this account to connect to Office 365 with Outlook or ActiveSync, you will also need to create one or more app passwords that will be static passwords that can be used in cases where MFA doesn’t work.
2014-02-10 19-54-14

After creating eventual app passwords, you have now configured the specific account for multi factor authentication. Note that Microsoft is planning to add native multi-factor authentication for applications such as Outlook, Lync, Word, Excel, PowerPoint, PowerShell, and OneDrive for Business, with a release date planned for later in 2014.

Was it Hard? – No!
Should you use it whenever possible? – Yes!

Now, what’s your excuse to not activate Windows Azure Multi Factor Authentication for your Admin accounts?

/Johan

Offline Domain Join and Direct Access – A real life example

A few days ago I got a new computer at work. I took it home to install it, but to finish the installation and log on with my domain account I needed access to the corporate network.

I had to find a solution to finalize the installation without going back to the office. Luckily we have Direct Access configured at my company, and all I need to connect is a domain joined computer. A perfect opportunity to use the Offline Domain Join feature.

For this to work we need some prerequisites in place:

  • A Windows Server 2012 or newer Direct Access server
  • A domain controller with at least Windows Server 2008 R2
  • At least Windows 8 on the client computer

Note: Offline Domain Join works in Windows 7 as well, but these are the minimum requirements to use it in conjunction with Direct Access

This process is performed in two steps: First we have to provision the computer in Active Directory. We create a computer account, and store metadata about the computer in a file. The metadata file is then used on the computer to finish the process.

The information we have to provide during the provisioning is:

  • The name of the domain that we want to join the new computer to
  • The name of the computer
  • Where to save the metadata file
  • The Direct Access Group Policy, to get all settings to connect using Direct Access
  • We also need to issue a computer certificate for Direct Access, so we have to specify what Certificate Template to use.

Let’s use Djoin.exe to provision the new computer. This command must run on a machine that is already a member of the domain, and you need rights to add workstations to the domain:

Djoin.exe /provision /domain corp.tailspintoys.com /machine PC5441 /savefile c:\OfflineDomainJoin.txt /policynames "DirectAccess Client Settings" /policypaths "\\corp.tailspintoys.com\SYSVOL\corp.tailspintoys.com\Policies\{GUID}\Machine\Registry.pol" /certtemplate Machine

Now, I copy OfflineDomainJoin.txt to the new computer and run Djoin.exe again to insert the metadata into the computer. Please be aware that this file contains sensitive information and should not be sent unencrypted.

Djoin.exe /requestODJ /loadfile C:\OfflineDomainJoin.txt /windowspath %systemroot% /localos 

Finally, a restart is required. After the restart I’m connected with Direct Access and it is possible to log on with my domain credentials.

/ Andreas

Quick Tip: Why are you still using nslookup?

Still using nslookup when troubleshooting and verifying DNS records?
Since Windows 8 and Windows Server 2012 arrived, I’ve been switching to the cmdlet Resolve-DnsName instead.
Two of the benefits are:

  • It gives ju way nicer and much more structured data that easily can be used in scripting scenarios.
  • It’s faster to write, just type Reso<tab> in your Powershell window.

Examples on output below:

2014-02-08 21-08-09

/Johan

PowerShell GPO Reporting: WSUS

In addition to my earlier creations that gives you an inventory of your GPO Deployed Printers and GPP Drive Maps, I’ve now created a similiar script that makes inventory of WSUS settings in all your GPO’s.
This can very much come in handy when having an extensive amount of GPO’s that are controlling WSUS settings (e.g. for different maintenance schedules).

See the example below of the output:
2014-02-05 07-17-52

<#
.SYNOPSIS     
Function that find certain information about all your WSUS related GPO's.
.NOTES     
           File Name: Get-GPOWsusInfo    
           Author   : Johan Dahlbom, johan[at]dahlbom.eu     
           The script are provided “AS IS” with no guarantees, no warranties, and it confer no rights. 
           Blog     : 365lab.net
#>
function Get-GPOWsusInfo {

try
{
Import-Module GroupPolicy -ErrorAction Stop
}
catch
{
throw "Module GroupPolicy not Installed"
}
        $GPO = Get-GPO -All

        foreach ($Policy in $GPO){

                $GPOID = $Policy.Id
                $GPODom = $Policy.DomainName
                $GPODisp = $Policy.DisplayName

                [xml]$xml = Get-GPOReport -Id $GPOID -ReportType xml
                $GPOSec = Get-GPPermissions -All -Guid $GPOID
                $WSUSBase = Get-GPRegistryValue -Guid $GPOID -Key HKEY_LOCAL_MACHINE\Software\Policies\Microsoft\Windows\WindowsUpdate -ErrorAction SilentlyContinue
                $WSUSAU = Get-GPRegistryValue -Guid $GPOID -Key HKEY_LOCAL_MACHINE\Software\Policies\Microsoft\Windows\WindowsUpdate\AU   -ErrorAction SilentlyContinue

                    if ($WsusBase) {

                        New-Object PSObject -Property @{
                           	GPOName = $GPODisp
                            GPOLinks = $xml.gpo.Linksto.SOMPath
                            GPOFilter = ($GPOSec | Where-Object {$_.Permission -eq "GpoApply"}).trustee.name
                            ScheduleDay = ($WSUSAU | Where-Object {$_.ValueName -eq "ScheduledInstallDay"}).Value.tostring().Replace("0","0 - Every Day").Replace("1","1 - Sunday").Replace("2","2 - Monday").Replace("3","3 - Tuesday").Replace("4","4 - Wednesday").Replace("5","5 - Thursday").Replace("6","6 - Friday").Replace("7","7 - Saturday")
                            Installtime =  ($WSUSAU | Where-Object {$_.ValueName -eq "ScheduledInstallTime"}).Value.tostring() + ':00'
                            AutoUpdateSetting = ($WSUSAU | Where-Object {$_.ValueName -eq "AUOptions"}).Value.tostring().Replace("2","2 - Notify for download and notify for install").Replace("3","3 - Auto download and notify for install").Replace("4","4 - Auto download and schedule the install").Replace("5","5 - Allow local admin to choose setting")
                            WSUSTargetGroup = ($WSUSBase | Where-Object {$_.ValueName -eq "TargetGroup"}).Value
                            WSUSServer = ($WSUSBase | Where-Object {$_.ValueName -eq "WUServer"}).Value
                        }
                    }

           }
}

Hope you find this useful!
When I find the time I’ll create a more complete set of GPO reporting functions with more functionality than they have today, maybe with help from Ramblingcookiemonster that has extended and created additions to the GP Preferences functions.

Until next time, Happy GPO Reporting!

/Johan

DirSync Configuration Error: “There is no such object on the server”

Recently, I ran across an issue deploying DirSync at a Customer.
The installation went well, but running the “Directory Sync Configuration Wizard” failed with the error message “There is no such object on the server”.
2014-02-03 09-14-26

Investigating the event logs, the configuration seemed to stop at the following event:
2014-02-03 09-19-06
Looking in to AD after the wizard had failed, no account had been created.
I then noticed that the Users container in the domain root was missing.
Since it is there DirSync by default tries to create the sync account and the container didn’t exist, it failed.

After recreating the Users container (can be done with either AdsiEdit or PowerShell), the Configuration Wizard completed successfully.

Recreate the users container with PowerShell

New-ADObject -Description "Default container for upgraded user accounts" ` 
             -Name Users ` 
             -Type Container `
             -ProtectedFromAccidentalDeletion $true

Hope this helps you if you are running in to this problem!

/Johan