Category Archives: Geek Stuff

ADFS Customization – add custom help form to the login page

In the spirit of sharing more “not-so-evergreen” ADFS customizations, I wanted to share another customization request I got a while ago.
The case was very simple, they customer wanted to fit more end-user information in the login flow than the ADFS login page could fit without sending the user to another page.
Onload.js to the rescue again! This time we are using it to simply create an additional form where we present additional information when clicking on the help button.

My example looks like this:
2017-01-01_21-06-44
2017-01-01_21-36-25
2017-01-01_21-36-43

Note that everything is in the JavaScript code, including the help page text. If preferred, that part could be loaded from another location.

Customize ADFS with help page (yes, I should move my content to GitHub)

// Author: Johan Dahlbom
// Blog: 365lab.net
// Twitter: @daltondhcp
// Get DOM elements and save as objects
var loginMessage = document.getElementById('loginMessage'),
    loginArea = document.getElementById('loginArea'),
    loginForm = document.getElementById('loginForm'),
	userNameInput = document.getElementById('userNameInput'),
    helpContent,
    usernameLink,
    passwordResetLink,
	errorText = document.getElementById("errorText"),
	introArea = document.getElementById("introduction"),
	authArea = document.getElementById("authArea");

var showingHelper = false,
    showingLoginform = false;

// CREATE CONTENT FUNCTIONS

function createHelpersForLoginForm() {
  //Create the hyperlink to the help form
  passwordResetLink = document.createElement('a');
  var linkText = "Need help?";
  passwordResetLink.appendChild(document.createTextNode(linkText));
  passwordResetLink.title = linkText;
  passwordResetLink.href = "#";
  passwordResetLink.onclick = toggleHelpContent;

  loginArea.appendChild(passwordResetLink);
}

function createHelpContent() {
  if (!authArea) {
    return;
  }
  helpContent = document.createElement("div");
  helpContent.style.display = 'none';

  helpContent.innerHTML = '\
    <br><br>\
    <h2><strong>What is my username?</strong></h2>\
    <p>Your username is the same as your email address. Example: ann.andersson@365lab.net</p><br>\
    <h2><strong>What is my password?</strong></h2>\
    <p>This is a secret chosen by you. It would not be a secret if we told you. If you forgot your password, you can reset it <a href="https://passwordreset.microsoftonline.com/?whr=365lab.net" target="_blank">here</a><br><br>\
    </p>\
    <h2><strong>Support</strong></h2>\
    <p>If you have any issues or questions, please contact our helpdesk at 555-GET-HELP or <a href="mailto:support@365lab.net">support@365lab.net</a><br><br><br></p>\
    ';

  // Link for close help
  var closeHelpContentLink = document.createElement('span');
  closeHelpContentLink.innerHTML = "Back to the login form";
  closeHelpContentLink.className = "submit";
  closeHelpContentLink.onclick = toggleHelpContent;

  // Duplicate it to have one before the content as well.
  // Uncomment these lines if the help  content grows.
  // var closeHelpContentLinkUpper = closeHelpContentLink.cloneNode(true);
  // closeHelpContentLinkUpper.onclick = toggleHelpContent;
  // helpContent.insertBefore(closeHelpContentLinkUpper, helpContent.firstChild);

  helpContent.appendChild(closeHelpContentLink);

  authArea.appendChild(helpContent);
}

function updateUI() {
  // Check for DOM errors
  if (!loginForm || !helpContent) {
    return;
  }

  if (showingHelper) {
    openHelpContent();
  } else {
    closeHelpContent();
  }
}

function toggleHelpContent() {
  showingHelper = !showingHelper;

  updateUI();
}

function openHelpContent() {
	helpContent.style.display="block";
	loginArea.style.display="none"
}

function closeHelpContent() {
	helpContent.style.display="none";
	loginArea.style.display="block"
}

// Create DOM elements 
createHelpersForLoginForm();
createHelpContent();
updateUI();

As usual, you update onload.js with the Set-AdfsWebTheme cmdlet.
Hope this will be useful for some of you guys! If you have questions, ping me o twitter or email!

Thanks,
/Johan

ADFS Customization – Branding per domain for Azure AD/Office 365

Branding your services can be very important for many reasons where recognizability and company profile are the most common ones. Making the marketing department happy is not a bad thing either.
With ADFS in Server 2016, the capability to do branding on a relying party basis was added. This was something that you in 2012 R2 needed to use JavaScript to achieve. Please note that the customizations in this post works both in 2012R2 and 2016.

While the default branding options above fit most customer needs, I recently had a customer case where two municipalities were onboarding to Office 365. Since they were sharing the same AD domain, they also shared their ADFS environment. You can probably guess where we are going now… They want continue using the same ADFS environment but have different branding depending on the login domain in Office 365 / Azure AD. I have got this request before, but have usually talked out the customers of going that path and instead agree upon common branding, but not this time. Not the most evergreen solution, but all for the customers, right? 🙂

There is a uservoice for the same request using managed domains directly in Azure AD – so clearly this is not the first time this has come up.

OVERVIEW
We will customize onload.js to apply different branding depending on the Office 365 / Azure AD domain used to login.
If browsing /idpinitiatedsignon directly or using another RP than Azure AD/Office 365, the default branding should apply. In my example, I will use the domains dom1.365lab.net and dom2.365lab.net. I assume that basic branding/webtheme already is in place.

The branding will apply in the following scenarios:

UPLOAD LOGO AND ILLUSTRATION
Upload the logos and illustrations as in my example script below. For performance and looks, follow the recommendation on sizes etc. on this TechNet page. If you have many domains, using some kind of naming convention might also be a good idea ;-).

$WebThemeName = "365lab"
#The pictures to upload
$UploadData = @{
  logo = @('C:\temp\Branding\dom1.365lab.net_logo.png',
           'C:\temp\Branding\dom2.365lab.net_logo.png')
  illustration = @('C:\temp\Branding\dom1.365lab.net_illustration.jpg',
                  'C:\temp\Branding\dom2.365lab.net_illustration.jpg')
}                                                                                                              
#Loop through the image HT and upload the files accordingly
foreach ($ImageType in $UploadData.Keys) {
  $UploadData[$ImageType] | ForEach-Object -Process {
    $FileName = $_.Split('\')[-1]
    Set-AdfsWebTheme -TargetName $WebThemeName `
                      -AdditionalFileResource @{
                        Uri = '/adfs/portal/{0}/{1}' -f $ImageType,$FileName
                        Path = $_.ToString() 
                      } 
  }                  
}                                                                                                                                                                                                                               

CUSTOMIZATION OF ONLOAD.JS
The JavaScript basically loops through an array and checks if the request has been referred from any of the domains in scope for customizations. In the example, the username placeholder and the login message are customized based on the “domainconfig” data as well. If you don’t know how to export/import onload.js to ADFS, looking in to this article prior doing any changes might be a good idea.

//Variables
var locationUrl = window.location.href.toLowerCase(),
	referrerUrl = document.referrer.toLowerCase(),
    logoDomain = document.getElementById('header'),
    loginMessage = document.getElementById('loginMessage'),
    userNameInput = document.getElementById('userNameInput'),
    domainconfig = [
        {domain:"dom1.365lab.net", companyName: "365lab Domain 1", logo:"dom1.365lab.net_logo.png", illustration:"dom1.365lab.net_illustration.jpg"},
        {domain:"dom2.365lab.net", companyName: "365lab Domain 2", logo:"dom2.365lab.net_logo.png", illustration:"dom2.365lab.net_illustration.jpg"}
    ];

function checkUrlForDomain(domainName) {
  return locationUrl.indexOf(domainName) > -1 || referrerUrl.indexOf(domainName) > -1;
}

for (var j = 0; j < domainconfig.length; j++){
  var domainName = domainconfig[j].domain;
  if (checkUrlForDomain(domainName)) {
     var logo = domainconfig[j].logo;
     var illustration = domainconfig[j].illustration;
     var companyName = domainconfig[j].companyName;

     //for troubleshooting purposes
     //console.log(domainName); 
     //console.log(logo);
     //console.log(illustration);

     //Change Logo
     logoDomain.innerHTML = "<img class='logoImage' src='/adfs/portal/logo/" + logo +"' alt='" + domainName + "'" +">"
     //Change illustration
     document.getElementsByTagName('style')[0].innerHTML = ".illustrationClass {background-image:url(/adfs/portal/illustration/" + illustration + ");}"; 
     //Change login message
     loginMessage.innerHTML = "<h2>Sign in with your " + companyName + " account </h2>" ;
     //Change username placeholder
     userNameInput.placeholder = "firstname.lastname@" + domainName ;
  }
}

After updated onload.js with your code, upload the changes to your webtheme with the following PowerShell cmdlet.

$WebThemeName = "365lab"
Set-AdfsWebTheme -TargetName $WebThemeName `
                 -AdditionalFileResource @{
                    Uri="/adfs/portal/script/onload.js"
                    path="C:\temp\script\onload.js"
                  }

RESULTS
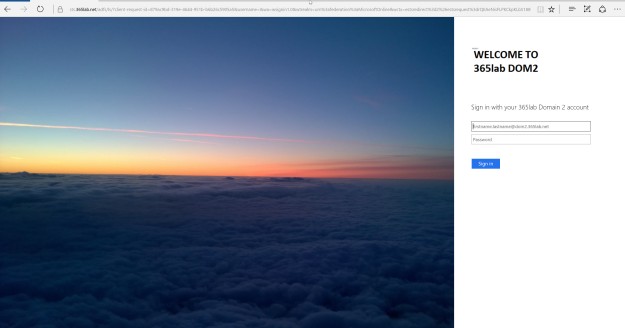
Voila! We now have different branding in our ADFS depending on the domain suffix entered in Office 365 / Azure AD. Note that the code won’t change branding if you change the domain suffix in the username field after hitting the ADFS farm.

idpInitiatedSignOn
2016-12-30_11-00-39
Browsing outlook.com/dom1.365lab.net
2016-12-30_10-59-33
Browsing outlook.com/dom2.365lab.net
2016-12-30_11-00-16

Good luck with your branding and as always, let me know if you have feedback!

Happy new year!

/Johan

How to resolve “We’ve run into a problem with your Office 365 subscription” with PowerShell

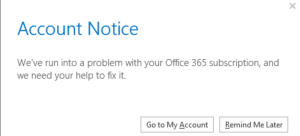
A colleague of mine performed a tenant to tenant migration a while ago. After the switchover to the new tenant, almost all users Office 365 ProPlus installations started to complain with the error message “We’ve run into a problem with your Office 365 subscription”. 2016-07-13_21-29-33
Signing out/in trying to activate the installation again didn’t help and after a while he found a solution at Jaap Wesselius blog.

The solution was to run the OSPP.vbs script located in the Office installation folder as in the screenshot below. Running the script with the /unpkey parameter removes the existing license and forces the user/client to re-register.
2016-07-13_21-41-40

So – all good? The only challenge now was that he had over 200 clients to run the script on.

To help him automate this, I wrote a simple PowerShell script as a wrapper around OSPP.vbs to automate the key deactivation. It simply locates OSPP.vbs from the installation folder(s), fetches the key(s) and last removes all existing activations. Please note that it needs to run elevated and that it removes ALL activations on the machine.
2016-07-13_21-54-06

<#
    .SYNOPSIS
    This script locates OSPP.vbs and removes all product keys to trigger O365 reactivation. It will remove ALL product keys.
    .NOTES
    File Name: 
    Author   : Johan Dahlbom, johan[at]dahlbom.eu
    Blog     : 365lab.net
    The script is provided “AS IS” with no guarantees, no warranties, and they confer no rights.
#>
#Check that the script runs with privileged rights
if (-not([Security.Principal.WindowsPrincipal] [Security.Principal.WindowsIdentity]::GetCurrent()).IsInRole([Security.Principal.WindowsBuiltInRole] "Administrator")) {
    Write-Warning "You need to have Administrator rights to run this script!`nPlease re-run this script as an Administrator in an elevated powershell prompt!"
    break
}
#Find OSPP.vbs path and run the command with the dstatus option (Last 1...)
$OSPP = Resolve-Path -Path "C:\Program Files*\Microsoft Offic*\Office*\ospp.vbs" | Select-Object -ExpandProperty Path -Last 1
Write-Output -InputObject "OSPP Location is: $OSPP"
$Command = "cscript.exe '$OSPP' /dstatus"
$DStatus = Invoke-Expression -Command $Command

#Get product keys from OSPP.vbs output.
$ProductKeys = $DStatus | Select-String -SimpleMatch "Last 5" | ForEach-Object -Process { $_.tostring().split(" ")[-1]}

if ($ProductKeys) {
    Write-Output -InputObject "Found $(($ProductKeys | Measure-Object).Count) productkeys, proceeding with deactivation..."
    #Run OSPP.vbs per key with /unpkey option.
    foreach ($ProductKey in $ProductKeys) {
        Write-Output -InputObject "Processing productkey $ProductKey"
        $Command = "cscript.exe '$OSPP' /unpkey:$ProductKey"
        Invoke-Expression -Command $Command
    }
} else {
    Write-Output -InputObject "Found no keys to remove... "
}

Hope this helps you if running in to this issue and as always – let me know if you have any questions!

/Johan

Office 365: Deploying your SSO Identity Infrastructure in Microsoft Azure – Part 2

This is part 2 of 3 in a series where we go through how to create a highly available SSO infrastructure for Office 365 in Microsoft Azure. In this part we will deploy all infrastructure components such as virtual machines and load balancers, all with help from PowerShell!
Part 1 of the series can be found here.
Part 3 of the series can be found here.

As mentioned, in order to automate the process of creating the SSO-infrastructure in Azure, I’ve created a PowerShell script/Hydration Kit that does that for you. Based on input from a CSV file, the Machines will not only be provisioned, they will also be configured based on their specific role as follows:

All Machines will

  • Join the domain specified in the $DomainName parameter. If you for example would like to exclude the WAP-servers from getting AD-joined, that’s something for a later version of the script.
  • Get the Telnet-Client Installed (Important 🙂 ).
  • Get an Azure static ip assignment/subnet and InstanceSize based on the input from the CSV file.
  • Be placed in the correct cloud service, availability set (if not set to ‘None’) and subnet as specified in the CSV file.
  • Get the Operating System specified in the $ImageFamily parameter installed.

Domain Controller

  • One 60gb extra DataDisk with HostCaching will be added to the machine (will be initialized and formatted)
  • The role AD-Domain-Services will be installed. Note that the Domain Controller will not be promoted automatically by the script.

ADFS Server

  • An Azure Internal Load Balancer will be added with the IP Address specified in the CSV file.
  • Endpoints for HTTPS will be added to the Load Balancer pointing at the servers.
  • The role ADFS-Federation will be installed.

2014-11-26 14-47-53

Web Application Proxy

  • An external load balanced HTTPS endpoint will be added.
  • The role Web-Application-Proxy will be installed.

2014-11-26 14-39-03
2014-11-26 14-44-26
2014-11-26 14-38-45

GETTING STARTED

Assumptions
In order for the script to work properly, you need to have the base infrastructure (AffinityGroups, Virtual Networks/Subnets/DNS) in place prior to running the script. Since the script is automatically joining the VM’s to the domain specified, you need to have connectivity to your local domain as well.
The Default WinRM Endpoint is used to configure the machines, which means you might get issues if your firewall is blocking high ports, such as in the screenshot below.
2014-11-26 14-05-59

The Azure PowerShell module do of course need to be installed on the machine you are running the script.

RUNNING THE SCRIPT
1. First, download the script and the csv sample file from here.
2. Edit the csv file according to your needs, make sure that you put the related servers (WAP, ADFS) in the same CloudService, Subnet and Availabilityset etc. For the ADFS servers, you also need to add the Internal Load Balancer IP in the InternalLB column.
2014-11-26 15-08-14
3. Run the script. Remember to change the parameters to match your Azure tenant configuration.If you haven’t already added your Account to the session, you will be prompted to do so. You will find screenshots of the steps below. If you lose your Azure session (internet problems etc.) while running, the script can safely be restarted, and will pickup where it stopped after some verification steps.

.\CreateO365AzureEnvironment.ps1 -Verbose -InputFile .\AzureMachines.csv

a. Prompted for domain join credentials
2014-11-26 12-59-23
b. Prompted to set local admin credentials for the new servers
2014-11-26 12-59-57
c. Prompted for Azure tenant credentials
2014-11-26 15-28-03
4. Grab some coffee and watch PowerShell do the magic. The entire deployment has taken between 35-45 minutes when I’ve been running it. If you don’t like having the WinRM Endpoint on each exposed to the internet, you need to remove them manually after deployment.
2014-11-26 15-00-16

CreateO365AzureEnvironment.ps1

<#
.SYNOPSIS
    The scripts creates and configures virtual machines in Microsoft Azure based on an input CSV file.
.EXAMPLE
   .\CreateO365AzureEnvironment.ps1 -InputFile '.\AzureMachines.csv' -Verbose
.NOTES
    File Name: CreateO365AzureEnvironment.ps1
    Author   : Johan Dahlbom, johan[at]dahlbom.eu
    Blog     : 365lab.net
    The script are provided “AS IS” with no guarantees, no warranties, and they confer no rights.
    Requires PowerShell Version 3.0!
#>
[CmdletBinding(SupportsShouldProcess=$true)]
param (
  [Parameter(Mandatory=$false)][string]$AffinityGroup = '365lab-affinitygroup',
  [Parameter(Mandatory=$false)][string]$DomainName = '365lab.internal',
  [Parameter(Mandatory=$false)][string]$DomainShort = '365lab',
  [Parameter(Mandatory=$false)][string]$ImageFamily = 'Windows Server 2012 R2 Datacenter',
  [Parameter(Mandatory=$false)][string]$VnetName = '365lab-azure',
  [Parameter(Mandatory=$false)][string]$AdminUsername = '365_admin',
  [Parameter(Mandatory=$false)][ValidateNotNullOrEmpty()]$DomainJoinCreds = (Get-Credential -Message 'Please enter credentials to join the server to the domain'),
  [Parameter(Mandatory=$false)][ValidateNotNullOrEmpty()]$VMCredentials = (Get-Credential -Message 'Please enter the local admin password for the servers' -UserName $AdminUsername),
  [Parameter(Mandatory=$false)][ValidateScript({Import-Csv -Path $_})]$InputFile =  '.\AzureMachines.csv'
)
#Check that script is running in an elevated command prompt
if (-not([Security.Principal.WindowsPrincipal] [Security.Principal.WindowsIdentity]::GetCurrent()).IsInRole("S-1-5-32-544")) {
  Write-Warning "You need to have Administrator rights to run this script!`nPlease re-run this script as an Administrator in an elevated powershell prompt!"
  break
}
#region functions
function Connect-Azure {
  begin {
      try {
          Import-Module Azure
      } catch {
          throw "Azure module not installed"
      }
  } process {
    if (-not(Get-AzureSubscription -ErrorAction Ignore).IsCurrent -eq $true) {
      try {
        Add-AzureAccount -WarningAction stop -ErrorAction Stop
      } catch {
        throw "No connection to Azure"
      }
    }
  } end {
    $AzureSubscription = Get-AzureSubscription -Default -ErrorAction Ignore
    Set-AzureSubscription -SubscriptionId $AzureSubscription.SubscriptionId -CurrentStorageAccountName (Get-AzureStorageAccount -WarningAction Ignore).StorageAccountName
    Write-Verbose "Connected to Azure"
  }
}
function Configure-JDAzureVM {
  [CmdletBinding(SupportsShouldProcess=$true)]
  Param(
    [Parameter(Mandatory=$true)][ValidateNotNullOrEmpty()][string]$Role,
    [Parameter(Mandatory=$false)][ValidateNotNullOrEmpty()]$VMCredentials,
    [Parameter(Mandatory=$true)][ValidateNotNullOrEmpty()][string]$VM,
    [Parameter(Mandatory=$true)][ValidateNotNullOrEmpty()][string]$CloudService,
    [Parameter(Mandatory=$true)][ValidateNotNullOrEmpty()][string]$VMUri,
    [Parameter(Mandatory=$false)][ValidateNotNullOrEmpty()][string]$InternalLBIP,
    [Parameter(Mandatory=$true)][ValidateNotNullOrEmpty()][string]$Subnet
  )
  begin {
    Write-Verbose "Starting to configure $VM..."
  }
  process {
    #Install mandatory features
    $AzureVM = Get-AzureVM -ServiceName $CloudService -Name $VM
    #Establish a PS Session to the AzureVM
    $SessionOptions = New-PSSessionOption -SkipCACheck -SkipCNCheck
    $VMSessionConfig = @{
      ConnectionUri = $VMUri
      SessionOption = $SessionOptions
      Credential = $VMCredentials
    }
    $VMSession = New-PSSession @VMSessionConfig -ErrorAction Stop
    #Install mandatory features
    Write-Verbose "Installing mandatory features on $VM"
    Invoke-Command -Session $VMSession -ScriptBlock {
      #Install the MOST IMPORTANT FEATURE of them all!
      Add-WindowsFeature -Name Telnet-Client -IncludeManagementTools -WarningAction Ignore
    }
    #Install features per role
    Write-Verbose "$VM is $Role."
    switch ($Role) {
    'Domain Controller' {
      #Add additional data disk to the domain controller, with host caching disabled
      if (-not(Get-AzureDataDisk -VM $AzureVM)) {
        Write-Verbose "Adding additional data disk..."
        Add-AzureDataDisk -CreateNew -DiskSizeInGB 60 -DiskLabel "ADDB" -HostCaching None -LUN 0 -VM $AzureVM | Update-AzureVM -ErrorAction Stop
      }
      Write-Verbose "Installing role 'AD-Domain-Services'"
      Invoke-Command -Session $VMSession -ScriptBlock {
        #Initialize and format additional disks
        Get-Disk | Where-Object {$_.PartitionStyle -eq 'raw'} | Initialize-Disk -PartitionStyle MBR -PassThru | New-Partition -AssignDriveLetter -UseMaximumSize |
            Format-Volume -FileSystem NTFS -NewFileSystemLabel "ADDB" -Confirm:$false
        #Install Role specific features
        Add-WindowsFeature -Name AD-Domain-Services -IncludeManagementTools -WarningAction Ignore
      }
    } 'ADFS Server' {
      #Create Internal Load Balancer for the ADFS farm if not already created
      if (-not(Get-AzureInternalLoadBalancer -ServiceName $CloudService) -and $InternalLBIP) {
        Write-Verbose "Creating/adding $vm to Internal Load Balancer $($AzureVM.AvailabilitySetName) ($InternalLBIP)"
        Add-AzureInternalLoadBalancer -ServiceName $CloudService -InternalLoadBalancerName $azurevm.AvailabilitySetName -SubnetName $Subnet -StaticVNetIPAddress $InternalLBIP
      }
      #Add the server to the Internal Load Balanced set and add 443 as endpoint
      if (-not((Get-AzureEndpoint -VM $AzureVM).InternalLoadBalancerName -eq $AzureVM.AvailabilitySetName)) {
        Write-Verbose "Adding Internal Load Balanced endpoint on port 443 to $VM"
        Add-AzureEndpoint -Name HTTPS -Protocol tcp -LocalPort 443 -PublicPort 443 -LBSetName $AzureVM.AvailabilitySetName -InternalLoadBalancerName $AzureVM.AvailabilitySetName -VM $AzureVM -DefaultProbe | Update-AzureVM -ErrorAction Stop
      }
      Write-Verbose "Installing role 'ADFS-Federation'"
      Invoke-Command -Session $VMSession -ScriptBlock {
        #Install Role specific features
        Add-WindowsFeature -Name ADFS-Federation -IncludeManagementTools -WarningAction Ignore
      }
    } 'Web Application Proxy' {
      #Add the server to the Cloud Service Load Balanced set and add 443 as endpoint
      if (-not((Get-AzureEndpoint -VM $AzureVM).LBSetName -eq $AzureVM.AvailabilitySetName)) {
        Write-Verbose "Adding Load Balanced endpoint on port 443 to $CloudService.cloudapp.net"
        Add-AzureEndpoint -Name HTTPS -Protocol tcp -LocalPort 443 -PublicPort 443 -LBSetName $AzureVM.AvailabilitySetName -VM $AzureVM -DefaultProbe -LoadBalancerDistribution sourceIP | Update-AzureVM -ErrorAction Stop
      }
      Write-Verbose "Installing role 'Web-Application-Proxy'"
      Invoke-Command -Session $VMSession -ScriptBlock {
        #Install Role specific features
        Add-WindowsFeature -Name Web-Application-Proxy -IncludeManagementTools -WarningAction Ignore
      }
    }
   }
  }
  end {
    Write-Verbose "Finished configuring $VM" 

  }
}
function New-JDAzureVM {
  [CmdletBinding(SupportsShouldProcess=$true)]
  Param(
    [Parameter(Mandatory=$true)][ValidateNotNullOrEmpty()][string]$VMName = '',
    [Parameter(Mandatory=$true)][ValidateNotNullOrEmpty()][string]$CloudService,
    [Parameter(Mandatory=$true)][ValidateNotNullOrEmpty()][string]$IPAddress,
    [Parameter(Mandatory=$true)][ValidateNotNullOrEmpty()][string]$Size,
    $VMCredentials,
    $DomainJoinCreds,
    [Parameter(Mandatory=$true)][ValidateNotNullOrEmpty()][string]$SubnetName,
    [Parameter(Mandatory=$true)][ValidateNotNullOrEmpty()][string]$OperatingSystem,
    [Parameter(Mandatory=$true)][ValidateNotNullOrEmpty()][string]$VnetName,
    [Parameter(Mandatory=$true)][ValidateNotNullOrEmpty()][string]$AvailabilitySet,
    [Parameter(Mandatory=$true)][ValidateNotNullOrEmpty()][string]$AffinityGroup
  )

  if (-not(Get-AzureVM -ServiceName $CloudService -Name $VMName -WarningAction Ignore))  {
    #region VM Configuration
    #Get the latest VM image based on the operating system choice
    $ImageName = (Get-AzureVMImage | Where-Object {$_.ImageFamily -eq $OperatingSystem} | Sort-Object -Property PublishedDate -Descending | Select-Object -First 1).ImageName
    #Construct VM Configuration
    $VMConfigHash = @{
      Name =  $VMName
      InstanceSize = $Size
      ImageName = $ImageName
    }
    if ($AvailabilitySet -ne 'None') {
      $VMConfigHash["AvailabilitySetName"] = $AvailabilitySet
    }
    #VM Provisioning details
    $VMProvisionHash = @{
      AdminUsername = $VMCredentials.UserName
      Password = $VMCredentials.GetNetworkCredential().Password
      JoinDomain = $DomainName
      DomainUserName = $DomainJoinCreds.UserName.split("\")[1]
      DomainPassword = $DomainJoinCreds.GetNetworkCredential().Password
      Domain = $DomainShort
    }
    #Create VM configuration before deploying the new VM
    $VMConfig = New-AzureVMConfig @VMConfigHash | Add-AzureProvisioningConfig @VMProvisionHash -WindowsDomain -NoRDPEndpoint |
                    Set-AzureStaticVNetIP -IPAddress $IPAddress | Set-AzureSubnet -SubnetNames $SubnetName |
                        Set-AzureVMBGInfoExtension -ReferenceName 'BGInfo'
    #endregion VM Configuration
    #region Create VM
    Write-Verbose "Creating $VMName in the Cloud Service $CloudService"
    $AzureVMHash = @{
      ServiceName = $CloudService
      VMs = $VMConfig
      VnetName = $VnetName
      AffinityGroup  = $AffinityGroup
    }
    New-AzureVM @AzureVMHash -WaitForBoot -ErrorAction Stop -WarningAction Ignore
    #endregion Create VM
  } else {
    Write-Warning "$VMName do already exist..."
  }
}
 #endregion functions
 #Connect with Azure PowerShell
  Connect-Azure
  $AzureMachines = Import-Csv -Path $InputFile
  Write-Verbose "Starting deployment of machines at: $(Get-date -format u)"
foreach ($Machine in $AzureMachines) {
  Write-Verbose "Starting to process $($Machine.Name)"
  #Create VM Configuration hashtable based on input from CSV file
  $VirtualMachine = @{
    VMName = $Machine.Name
    CloudService = $Machine.CloudService
    IPAddress = $Machine.IP
    VMCredentials = $VMCredentials
    DomainJoinCreds = $DomainJoinCreds
    SubnetName = $Machine.SubnetName
    AvailabilitySet = $Machine.AvailabilitySet
    AffinityGroup = $AffinityGroup
    Size = $Machine.Size
    VnetName = $VnetName
    OperatingSystem = $ImageFamily
  }
  try {
    #Create virtual machine
    New-JDAzureVM @VirtualMachine -ErrorAction Stop
    #Wait for machine to get to the state "ReadyRole" before continuing.
    while ((Get-AzureVM -ServiceName $Machine.CloudService -Name $Machine.Name).status -ne "ReadyRole") {
      Write-Verbose "Waiting for $($Machine.Name) to start..."
      Start-Sleep -Seconds 15
    }
    $VMUri = Get-AzureWinRMUri -ServiceName $machine.CloudService -Name $Machine.Name
    #Create VM Role configuration
    $VMRoleConfiguration = @{
      Role = $Machine.Role
      VMUri = $VMUri
      VMCredentials = $VMCredentials
      VM = $Machine.Name
      CloudService = $Machine.CloudService
      Subnet = $machine.SubnetName
    }
    #Add internal load balancer IP to the role configuration
    if ($Machine.InternalLB) {
      $VMRoleConfiguration["InternalLBIP"] = $Machine.InternalLB
    }
    #Role specific configuration of the virtual machine
    Configure-JDAzureVM @VMRoleConfiguration -ErrorAction Stop
  } catch {
    Write-Warning $_
  }
}
Write-Verbose "Finished deployment of machines at: $(Get-date -format u)"

RESULTS
After some waiting for the provisioning, we now have the infrastructure in place in order to complete the configuration of our SSO infrastructure for Office 365 in Microsoft Azure. In the next part of this series we will put all the pieces together and finish AADSync, ADFS and WAP configuration against Office 365 / Azure Active Directory.
2014-11-26 15-54-05

Enjoy, let me know if you have any feedback!

/Johan

PowerShell GUI application to set thumbnailPhoto

A while ago I started experimenting with writing GUI applications in PowerShell. This script that updates the thumbnailPhoto attribute of a user was my first attempt, and since it works quite well I thought that I might share it with you.

The thumbnailPhoto attribute is used more and more, and it is now supported by Outlook, SharePoint and Lync. It is also supported by Office 365, and when using DirSync the data is synced to Windows Azure Active Directory.

This script uses Windows Presentation Foundation (WPF) which is part of .Net 3.0. The window form is easily built with Microsoft Visual Studio Express 2013 for Windows Desktop and can be saved as a XAML document, which we can import in our PowerShell script.

Data are saved and retrieved from Active Directory using ADSI, which means no additional PowerShell modules must be installed. The only requirements are PowerShell 2.0 or newer with .Net Framework 3.0. If running PowerShell version 2.0 you also need the -STA parameter to powershell.exe.

The application itself is very simple, just type the username in the search box, and browse for a photo. When clicking Apply the image data is saved to Active Directory. By default all users has permission to change their own thumbnailPhoto. To change other users, permissions needs to be delegated.

There is a limit in picture size, maximum size is 100 kB, but since Office 365 cannot handle that large image I have set the limit in the script to 10 kB. Also recommended resolution is 96×96 pixels.

thumbnailphotoguiapp

Here’s the full script, please note that you need a valid path to the .xaml document.

Set-ThumbnailPhotoGUI-mainform.xaml

<Window x:Class="MainWindow"
    xmlns="http://schemas.microsoft.com/winfx/2006/xaml/presentation"
    xmlns:x="http://schemas.microsoft.com/winfx/2006/xaml"
    Title="Thumbnail photo changer app" Height="350" Width="525" ResizeMode="NoResize">
    <Grid x:Name="list1" Margin="0,0,0,2">
        <Label Content="Username:" HorizontalAlignment="Left" Width="105" Margin="20,23,0,250" />
        <TextBox x:Name="txtSearch" Margin="138,27,0,0" HorizontalAlignment="Left" VerticalAlignment="Top" Width="122"/>
        <Button x:Name="btnSearch" Content="Search" HorizontalAlignment="Left" VerticalAlignment="Top" Width="50" Margin="271,27,0,0"/>
        <Label Content="Surname:" HorizontalAlignment="Left" Height="30" Margin="20,92,0,0" VerticalAlignment="Top" Width="92"/>
        <Label x:Name="lblSn" Content="" Height="30" VerticalAlignment="Top" HorizontalAlignment="Left" Width="315" Margin="134,92,0,0"/>
        <Label Content="UserPrincipalName:" HorizontalAlignment="Left" Height="30" Margin="20,123,0,0" VerticalAlignment="Top" Width="115"/>
        <Label x:Name="lblUPN" Content="" Height="30" VerticalAlignment="Top" HorizontalAlignment="Left" Width="346" Margin="134,123,0,0"/>
        <Label Content="Givenname:" HorizontalAlignment="Left" Height="30" Margin="20,61,0,0" VerticalAlignment="Top" Width="92"/>
        <Label x:Name="lblGivenName" Content="" Height="30" VerticalAlignment="Top" HorizontalAlignment="Left" Width="315" Margin="134,61,0,0"/>
        <Image x:Name="imgThumb" HorizontalAlignment="Left" Height="96" Margin="29,203,0,0" VerticalAlignment="Top" Width="96"/>
        <Button Name="btnImg" Content="Change photo..." HorizontalAlignment="Left" Height="28" Margin="149,267,0,0" VerticalAlignment="Top" Width="111" IsEnabled="False"/>
        <Label Content="DistinguishedName:" HorizontalAlignment="Left" Height="30" Margin="20,156,0,0" VerticalAlignment="Top" Width="126"/>
        <Label x:Name="lblDN" Content="" Height="30" VerticalAlignment="Top" HorizontalAlignment="Left" Width="373" Margin="134,156,0,0"/>
        <Button x:Name="btnApply" Content="Apply" HorizontalAlignment="Left" Height="28" Margin="278,267,0,0" VerticalAlignment="Top" Width="111" IsEnabled="False"/>
    </Grid>
</Window>

Set-ThumbnailPhotoGUI.ps1

if ([threading.thread]::CurrentThread.ApartmentState.ToString() -eq 'MTA') {
    Write-Error "This script requires PowerShell to run in Single-Threaded Apartment. Please run powershell.exe with parameter -STA"
    Exit
}

Add-Type -AssemblyName PresentationFramework 
[xml]$XAML = Get-Content "Set-ThumbnailPhotoGUI-mainform.xaml"
$XAML.Window.RemoveAttribute("x:Class")
 
$global:userinfo = @{
    dn = $null
    photo = [byte[]]$null
}
 
function Invoke-FileBrowser {
    param([string]$Title,[string]$Directory,[string]$Filter="jpeg (*.jpg)|*.jpg")
    [System.Reflection.Assembly]::LoadWithPartialName("System.Windows.Forms") | Out-Null
    $FileBrowser = New-Object System.Windows.Forms.OpenFileDialog
    $FileBrowser.InitialDirectory = $Directory
    $FileBrowser.Filter = $Filter
    $FileBrowser.Title = $Title
    $Show = $FileBrowser.ShowDialog()
    If ($Show -eq "OK") { Return $FileBrowser.FileName }
}
 
function Get-LDAPUsers($sam) {
    $activeDomain = New-Object DirectoryServices.DirectoryEntry
    $domain = $activeDomain.distinguishedName
    $searcher = [System.DirectoryServices.DirectorySearcher]"[ADSI]LDAP://$domain"
    $searcher.filter = "(&(samaccountname=$sam)(objectClass=user)(objectClass=person))"
    $result = $searcher.findall()
     
    if ($result.count -gt 1) {
        Write-Warning "More than one user found. Please refine your search."
    } elseif ($result.count -eq 1) {
        $result = $searcher.findone().getDirectoryEntry()
        [pscustomobject]@{
            UserPrincipalName = $result.userprincipalname[0]
            DistinguishedName = $result.distinguishedname[0]
            samAccountName = $result.samaccountname[0]
            Givenname = $result.givenname[0]
            Surname = $result.sn[0]
            ThumbnailPhoto = $result.thumbnailphoto
        }
    }
}
 
function Update-WPFForm($sam) {
   $selecteduser = Get-LDAPUsers $sam
   if ($selecteduser) {
        $global:userinfo.dn = $selecteduser.DistinguishedName
        $global:userinfo.photo = [byte[]]$($selecteduser.thumbnailphoto)
 
        $lblGivenName.Content = $selecteduser.GivenName
        $lblSN.Content = $selecteduser.SurName
        $lblUPN.Content = $selecteduser.UserPrincipalName
        $lblDN.Content = $global:userinfo.dn
        $txtSearch.Text = $selecteduser.SamAccountName
        $imgThumb.Source = $global:userinfo.photo
        $btnImg.IsEnabled = $true
    }
}
 
#region GUI
    $reader=(New-Object System.Xml.XmlNodeReader $xaml)
    $window=[Windows.Markup.XamlReader]::Load($reader)
 
    $btnSearch = $window.FindName("btnSearch")
    $btnImg = $window.FindName("btnImg")
    $btnApply = $window.FindName("btnApply")
    $txtSearch = $window.FindName("txtSearch")
    $lblGivenName = $window.FindName("lblGivenName")
    $lblSn = $window.FindName("lblSn")
    $lblUPN = $window.FindName("lblUPN")
    $lblDN = $window.FindName("lblDN")
    $imgThumb = $window.FindName("imgThumb")
#endregion GUI
 
#region Events
 
    #region btnSearchClick
        $btnSearch_click = $btnSearch.add_Click
        $btnSearch_click.Invoke({
            Update-WPFForm($txtSearch.Text)
        })
    #endregion btnSearchClick
 
    #region btnImgClick
        $btnImg_click = $btnImg.add_Click
        $btnImg_click.Invoke({
            $file = Invoke-FileBrowser -Title "Choose a thumbnail photo" -Filter "Jpeg pictures (*.jpg)|*.jpg"
            if ($file) {
                if ((Get-Item $file).length -gt 10kB) {
                    Write-Warning "Picture too large. Maximum size is 10 kB."
                } else {
                    $global:userinfo.photo = [byte[]](Get-Content $file -encoding byte)
                    $imgThumb.Source = $global:userinfo.photo
                    $btnApply.IsEnabled = $true
                }
            }
        })
    #endregion btnImgClick
     
    #region btnApplyClick
        $btnApply_click = $btnApply.add_Click
        $btnApply_click.Invoke({
            $user = New-Object DirectoryServices.DirectoryEntry "LDAP://$($global:userinfo.dn)"
            $user.put("thumbnailPhoto", $global:userinfo.photo)
            $user.setinfo()
            $btnApply.IsEnabled = $false
            Write-Verbose "User $($global:userinfo.dn) updated."
        })
    #endregion btnApplyClick
     
    #region textChange
        $txtSearch_Change = $txtSearch.add_KeyDown
        $txtSearch_Change.Invoke({
            if ($_.Key -ieq 'Return') {
                Update-WPFForm($txtSearch.Text)
            }
        })
    #endregion textChange
 
#endregion Events
 
$window.ShowDialog() | Out-Null

This is just an example how a useful script with GUI can be written with quite simple means. Now let’s get the camera and take some photos!

/ Andreas

Adding .guru domains to Office 365 (Always use PowerShell!)

A couple of weeks ago, general availability for the .guru tld was announced. The new tld means that geeks like me can show off their ‘expertise’ by having a cool domain!

Now to the problem. When trying to add the new cool domain to my Office 365 tenant, I tried to do it in the Admin Center, as I usually do when adding single domain.
Unfortunately they have not yet added support for the new cool .guru tld in Admin Center.
o365.guru-admincenter

Fortunately, when adding the domain with the New-MsolDomain cmdlet, it went through with no problems.
2014-02-27 21-13-59

So, a friendly reminder to all of you geeks out there with .guru domains –
Whenever possible, use PowerShell! 🙂

/Johan

WMI Eventing: Watch folder and send files as email attachments, Part II

In my previous post I described how to create a WMI Event to watch a folder for changes. In this post I will make the WMI Event permanent so that it will work also after a computer restart.

Our script will have three parts:

  1. A definition of an event filter. I will reuse the same filter I used in Part I of this post.
  2. An event consumer which handles our event, in this case I will use a CommandLine Event Consumer.
  3. A part that binds the filter and the consumer together.

Let’s look at our WMI Event Query again:

$Query = @"
Select * from __InstanceCreationEvent within 10
where targetInstance isa 'Cim_DirectoryContainsFile'
and targetInstance.GroupComponent = 'Win32_Directory.Name="C:\\\\Data"'
"@

We have defined a query that monitors the C:\Data folder for changes, with an interval of 10 seconds. Lets put this into a Event Filter:

$WMIEventFilter = Set-WmiInstance -Class __EventFilter `
    -NameSpace "root\subscription" `
    -Arguments @{Name="WatchFolder2EmailFilter";
                 EventNameSpace="root\cimv2";
                 QueryLanguage="WQL";
                 Query=$Query
                }

Next it is time for the Event Consumer. This is where we define what to do when the event is triggered. I will use the CommandLineEventConsumer that runs a command line. Another option would be to use ActiveScriptEventConsumer to run a script, but it only supports VBScript and we need PowerShell for our script.

If you want to read more about the different Event Consumers there’s more information on MSDN.

I have to define the Executable, CommandLine and the parameters to use for powershell.exe.

$WMIEventConsumer = Set-WmiInstance -Class CommandLineEventConsumer `
    -Namespace "root\subscription" `
    -Arguments @{Name="WatchFolder2EmailConsumer";
                 ExecutablePath = "C:\\Windows\\System32\\WindowsPowerShell\\v1.0\\powershell.exe";
                 CommandLineTemplate =" C:\\Windows\\System32\\WindowsPowerShell\\v1.0\\powershell.exe –ExecutionPolicy Bypass -File c:\\WatchFolder2Email.ps1"
                }

As you can see I run the script file WatchFolder2Email.ps1 which we created in Part I of this post. I also specify ExecutionPolicy on the command line to make sure that I can run the script file.

Finally we bind our Filter and Consumer together:

Set-WmiInstance -Class __FilterToConsumerBinding `
                -Namespace "root\subscription" `
                -Arguments @{Filter=$WMIEventFilter;
                             Consumer=$WMIEventConsumer
                            }

There we go! Now we have a persistent WMI Event that watches our folder for changes, and then triggers our script that sends an email with the files as attachments.

Now we know how to create a persistent WMI Event. To remove it just run the following lines:

Get-WmiObject __EventFilter -namespace root\subscription -filter "name='WatchFolder2EmailFilter'" | Remove-WmiObject
Get-WmiObject CommandLineEventConsumer -Namespace root\subscription -filter "name='WatchFolder2EmailConsumer'" | Remove-WmiObject
Get-WmiObject __FilterToConsumerBinding -Namespace root\subscription -Filter "Filter = ""__eventfilter.name='WatchFolder2EmailFilter'""" | Remove-WmiObject

/ Andreas

Geek tip: Top 10 shortcut commands to remember!

In the shadow of all PowerShell stuff, I’d like to share some old, but very good information with you guys.

I like knowing exactly where I’m going and I like getting there fast. Therefore, I’ve learned the file names of the most common OS utilities I use. (And yes, I might be a bit reactionary 🙂 )

Many of them are nowdays in the Win+X menu, but sometimes its nice just typing where you want to go.

  1. ncpa.cpl – Network Connections – This was once very easy to find, but in Vista and above they made it very hard to get there.
  2. certlm.msc – Local Computer Certificates – as this is something I use every day, it’s very nice to actually get there directly (only works in 8/2012 and above) (certmgr.msc for User Certificates)
  3. lusrmgr.msc – Access Local users and Groups directly
  4. appwiz.cpl – Add remove programs (turn Windows features on or off is optionalfeatures.exe)
  5. firewall.cpl – Windows Firewall
  6. compmgmt.msc –  Computer management
  7. sysdm.cpl – System Properties (change computer name, join domain etc. (but please, use POSH for that if possible)
  8. wuapp.exe – Windows Update (very useful in 8/2012 and above)
  9. eventvwr.exe – Event Viewer
  10. mstsc.exe – Remote Desktop Client (everyone knows about this one, I hope).
    In Windows 8 and above, you have to start it with <shift>+<enter> instead of just <enter> if opening more than one window.

/Johan

WMI Eventing: Watch folder and send files as email attachments, Part I

I got a question from one of my colleagues if I knew an application that watched a folder for files, and then emailed all files to a specific address. My immediate answer was that this can very easily be achieved with PowerShell.

Short version

First we define the action to trigger when a file is found. We simply enumerate all files with Get-ChildItem and then use the standard Send-MailMessage cmdlet to send them to the recipient.

WatchFolder2Email.ps1

$WatchFolder = "C:\Data"
$To = "admin@365lab.net"
$From = "noreply@365lab.net"
$Subject = "File transfer"
$Body = "Please check the attached file(s)."
$SMTPServer = "smtp.cloud.net"
 
$Files = (Get-ChildItem $WatchFolder).FullName
if ($Files) {
    Send-MailMessage -From $From -To $To -Subject $Subject -Body $Body -SmtpServer $SMTPServer -Attachments $Files
    Remove-Item $Files
}

Now we could call our problem solved. Just put the code in a .ps1 file and use Task Scheduler to run it every 10 minutes.

Advanced version

Another way of triggering the script is to use WMI Eventing. There are different types of events, I will use an intrinsic event which are events triggered on a change to the CIM database, for example a change in the file system. This is defined in a WQL Query that also defines an interval and which folder to watch.

SELECT * FROM __InstanceCreationEvent WITHIN 10 
WHERE TargetInstance ISA "CIM_DirectoryContainsFile" 
AND TargetInstance.GroupComponent = "Win32_Directory.Name=\"c:\\\\Data\""

Let’s put the script together and register the event.

$action = {
    $WatchFolder = "C:\Data"
    $To = "admin@365lab.net"
    $From = "noreply@365lab.net"
    $Subject = "File transfer"
    $Body = "Please check the attached file(s)."
    $SMTPServer = "smtp.cloud.net"
        
    $Files = (Get-ChildItem $WatchFolder).FullName 
    if ($Files) {
        Send-MailMessage -From $From -To $To -Subject $Subject -Body $Body -SmtpServer $SMTPServer -Attachments $Files 
        Remove-Item $Files
    }
}

$WQLQuery = 'SELECT * FROM __InstanceCreationEvent WITHIN 10 
             WHERE TargetInstance ISA "CIM_DirectoryContainsFile"
             AND TargetInstance.GroupComponent = "Win32_Directory.Name=\"c:\\\\Data\""'

Register-WmiEvent -Query $WQLQuery -SourceIdentifier "WatchFolder2Email" -Action $action  

Now we can put a file in the C:\Data folder. Within seconds it will be sent by email and then deleted.

To remove the Job we simply run

Unregister-Event -SourceIdentifier "WatchFolder2Email" 

Unfortunately this solution is limited to your PowerShell session only. When you close the window the job is terminated. In Part II of this blog post I will show how to create a Permanent WMI Consumer that will work also after computer restarts.

/ Andreas

Quick Tip: Self signed certificates made easy with PowerShell!

Most solutions today require certificates in some way, which means we need them even when setting up a lab/test environment.
If you for some reason don’t have a PKI/CA infrastructure in your lab environment you will most likely end up with a self signed certificates for web sites or other parts of your environment.

Since Windows 8/8.1 or Server 2012/2012 R2 there is a really nice PowerShell cmdlet that does that for us, without no hassle.
It can even handle multiple SAN’s.
It’s just to use the New-SelfSignedCertificate cmdlet from an elevated PowerShell window.

Example 1: Create and export one certificate with the name test.365lab.net:

New-SelfSignedCertificate -DnsName test.365lab.net -CertStoreLocation cert:\LocalMachine\My
#Export certificate to c:\test_365lab_net.pfx with the password 'Password'. (the thumbprint is found in the output from the New-SelfsignedCertificate command.)
Export-PfxCertificate -Cert cert:\LocalMachine\My\5D46460D29FE8E0C3F644D8ABA3C707AA83AFC79 -FilePath c:\test_365lab_net.pfx -Password (ConvertTo-SecureString -String "Password" -Force -AsPlainText)

2014-01-04 15-57-46

Example 2: Create self signed SAN certificate with the names test.365lab.net,sts.365lab.net and 365lab.net:

New-SelfSignedCertificate -DnsName test.365lab.net,sts.365lab.net,365lab.net -CertStoreLocation cert:\LocalMachine\My

2014-01-04 16-06-34

To check out your newly create certificates in the GUI, fire up the Computer Certificates Store mmc, which from Windows 8 / Server 2012 and above can be started with ‘certlm.msc‘ (OH YES!).
2014-01-04 16-10-55

Note that I generally never recommend doing self signed certificates in production environments, they are only for testing purposes!

/Johan