Monthly Archives: January 2014

Quick Tip: Still using ipconfig? Use gip instead!

Since you more or less are never using cmd.exe any longer, why not go away from other classic toolsets you’ve been using forever?

In Windows 8 and Windows Server 2012 and later, you can use the cmdlet Get-NetIPConfiguration or the alias gip to get your ip addresses instead of using ipconfig. Good stuff! (and nicer output)

2014-01-26 21-55-31/Johan

Office 365: Migrating DirSync to new AD domain

Disclaimer
This blog post was written for older versions of Office 365 and Azure AD, and has not been tested in the latest version. Always make sure that you have a valid backup before making any changes to your system.

In a migration scenario you might need to replace the Active Directory domain used to sync your users to Office 365. I will go through the steps you need to change AD domain.

In this scenario I assume that ADFS is not used. If it is, you first have to disable federation. I suggest looking at my previous post where I described how to switch from ADFS to Password Sync.

The steps we have to go through are:

  1. Disable DirSync in old domain
  2. Populate new AD domain with users and attributes
  3. Prepare Office 365 users for new domain
  4. Install DirSync in the new domain.
  5. Verify Sync

First, disabling DirSync is very easy. Just go to the Office 365 admin center and click the Deativate link under users and groups.

dirsync-change-domain-1This will take up to 72 hours. When this process is over all user accounts are managed in the Office 365 portal, and there is no connection to your old domain. This change will not cause any service interruption, all users will be able to use their services as normal.

In the meantime you can uninstall the Azure Active Directory Sync tool on the old DirSync server.

The second step is to populate your new AD domain with all user accounts. It is now important that you copy all information from the old domain, (i.e. phone numbers, titles etc), and for Exchange Online it is especially important that these attributes are copied:

  • userPrincipalName
  • proxyAddresses
  • legacyExchangeDN

UserPrincipalName is your login name to Office 365. I don’t think I have to explain why this attribute is important 🙂 . ProxyAddresses are all your email addresses, both primary and alias. The last attribute, legacyExchangeDN, is used if you previously have migrated from an Exchange on-premises to Office 365. It is used for internal addressing in Exchange. If it is removed you will not be able to reply to old emails, meeting invitations, and your Suggested Contacts will also fail.

I will not go through here how to migrate these attributes here, check out our post on how to sync attributes from cloud identities to active directory.

The third step is where the magic happens. Office 365 uses the ObjectGUID attribute to keep track of the user accounts in in your on-premises Active Directory. It is translated to an ImmutableID in Azure Active Directory. If you rename your users, the ObjectGUID is untouched. Hence the name ImmutableID.

dirsync-change-domain-2The problem is that when you move to a new domain, all ObjectGUIDs are changed, and we need to generate a new ImmutableID.

Office 365 generates these IDs for us, we just have to clear the attribute on all users in Office 365. This is easily done with PowerShell:

Set-MsolUser -UserPrincipalName "aaron.beverly@365lab.net" -ImmutableId "$null"

The next step is to activate DirSync in the Office 365 portal again, and then reinstall the Azure Active Directory Sync tool on a server in the new domain. I strongly recommend using a new server for this step. Re-using the old server (after joining it to the new domain) might break your sync.

After the installation a full sync is done. The Sync tool will identify and match the users in Office 365 and Active Directory by the primary email address. If a match is found a new ImmutableID is created and written to Azure Active Directory.

Finally, after the initial sync is done we can look in Synchronization Service Manager to check that all users were matched and that we don’t have any sync errors.

/ Andreas

WMI Eventing: Watch folder and send files as email attachments, Part II

In my previous post I described how to create a WMI Event to watch a folder for changes. In this post I will make the WMI Event permanent so that it will work also after a computer restart.

Our script will have three parts:

  1. A definition of an event filter. I will reuse the same filter I used in Part I of this post.
  2. An event consumer which handles our event, in this case I will use a CommandLine Event Consumer.
  3. A part that binds the filter and the consumer together.

Let’s look at our WMI Event Query again:

$Query = @"
Select * from __InstanceCreationEvent within 10
where targetInstance isa 'Cim_DirectoryContainsFile'
and targetInstance.GroupComponent = 'Win32_Directory.Name="C:\\\\Data"'
"@

We have defined a query that monitors the C:\Data folder for changes, with an interval of 10 seconds. Lets put this into a Event Filter:

$WMIEventFilter = Set-WmiInstance -Class __EventFilter `
    -NameSpace "root\subscription" `
    -Arguments @{Name="WatchFolder2EmailFilter";
                 EventNameSpace="root\cimv2";
                 QueryLanguage="WQL";
                 Query=$Query
                }

Next it is time for the Event Consumer. This is where we define what to do when the event is triggered. I will use the CommandLineEventConsumer that runs a command line. Another option would be to use ActiveScriptEventConsumer to run a script, but it only supports VBScript and we need PowerShell for our script.

If you want to read more about the different Event Consumers there’s more information on MSDN.

I have to define the Executable, CommandLine and the parameters to use for powershell.exe.

$WMIEventConsumer = Set-WmiInstance -Class CommandLineEventConsumer `
    -Namespace "root\subscription" `
    -Arguments @{Name="WatchFolder2EmailConsumer";
                 ExecutablePath = "C:\\Windows\\System32\\WindowsPowerShell\\v1.0\\powershell.exe";
                 CommandLineTemplate =" C:\\Windows\\System32\\WindowsPowerShell\\v1.0\\powershell.exe –ExecutionPolicy Bypass -File c:\\WatchFolder2Email.ps1"
                }

As you can see I run the script file WatchFolder2Email.ps1 which we created in Part I of this post. I also specify ExecutionPolicy on the command line to make sure that I can run the script file.

Finally we bind our Filter and Consumer together:

Set-WmiInstance -Class __FilterToConsumerBinding `
                -Namespace "root\subscription" `
                -Arguments @{Filter=$WMIEventFilter;
                             Consumer=$WMIEventConsumer
                            }

There we go! Now we have a persistent WMI Event that watches our folder for changes, and then triggers our script that sends an email with the files as attachments.

Now we know how to create a persistent WMI Event. To remove it just run the following lines:

Get-WmiObject __EventFilter -namespace root\subscription -filter "name='WatchFolder2EmailFilter'" | Remove-WmiObject
Get-WmiObject CommandLineEventConsumer -Namespace root\subscription -filter "name='WatchFolder2EmailConsumer'" | Remove-WmiObject
Get-WmiObject __FilterToConsumerBinding -Namespace root\subscription -Filter "Filter = ""__eventfilter.name='WatchFolder2EmailFilter'""" | Remove-WmiObject

/ Andreas

Change from ADFS to Password Sync in Office 365

Disclaimer
This blog post is reflecting how the process was made in early 2014, and has since then been replaced with built-in tools in ADConnect.

Some time ago Johan wrote a post about how to convert a federated domain to a standard domain in Office 365. Much has happened since, and one feature that has been added is to synchronize the passwords between on-premises Active Directory and Office 365.

An important reason to implement ADFS and federation is to keep all user passwords the same, to reduce support and Helpdesk calls. The drawback is that a high availability server (or even better, an ADFS farm distributed over several locations) is needed on-premises. If your internet connection is dropping, no-one will able to access Exchange or SharePoint even though it is located “in the Cloud”.

Now when Password Sync is available, some organizations choose to retire their ADFS servers to implement Password Sync instead. It is now possible to have the same password in all systems without those high availability servers.

The process to move to a non-federated state with Password Sync is similar to how Johan described the process, but to minimize the service interruption for your end-users there are a few things to think of. All steps below are performed on the server hosting the Azure Active Directory Sync tool.

  1. First of all you need to upgrade to the latest version of Azure Active Directory Sync tool. The upgrade process is simple; just uninstall the old version and install the new one. The installation may take a few minutes. Make sure that you check the Password Sync option during installation. End by running the Configuration Wizard.
  2. Check the Synchronization Service Manager (miisclient.exe) to make sure that the synchronization was successful. You may have to log off and log in again to be able to access Synchronization Service Manager.
  3. Time for PowerShell 🙂
    #Connect to MSOnline
    Import-Module MSOnline
    
    #Enter credentials
    Connect-MsolService
    
    #Set context and credentials
    Set-MsolADFSContext -Computer srv01
    
    #From here on the Office 365 services will be unavailable 
    #for the end-users until all passwords are in in sync.
    
    #This is where we change our federated domain to a standard domain.
    #This command generates a text file with new random passwords for all users.
    #In the next step we will replace these passwords with passwords synced from AD.
    Convert-MSOLDomainToStandard -DomainName "mydomain.com" -SkipUserConversion $false -PasswordFile C:\userpwd.txt
    
    #Make sure that all user passwords has ForceChangePassword flag set to False
    Get-MsolUser -Synchronized | Set-MsolUserPassword -ForceChangePassword $false
    
    
  4. Now all users are converted. A file with new temporary passwords for each user is saved to the path you specified, but we will not use it. Instead, we now have to initialize a full password sync.

To see the status of the password sync you should check the Application Log in Event Viewer for event id 657. When all passwords are synchronised the users will be able to access their services again. This will take a few minutes depending on the number of users in your environment.

/ Andreas

Geek tip: Top 10 shortcut commands to remember!

In the shadow of all PowerShell stuff, I’d like to share some old, but very good information with you guys.

I like knowing exactly where I’m going and I like getting there fast. Therefore, I’ve learned the file names of the most common OS utilities I use. (And yes, I might be a bit reactionary 🙂 )

Many of them are nowdays in the Win+X menu, but sometimes its nice just typing where you want to go.

  1. ncpa.cpl – Network Connections – This was once very easy to find, but in Vista and above they made it very hard to get there.
  2. certlm.msc – Local Computer Certificates – as this is something I use every day, it’s very nice to actually get there directly (only works in 8/2012 and above) (certmgr.msc for User Certificates)
  3. lusrmgr.msc – Access Local users and Groups directly
  4. appwiz.cpl – Add remove programs (turn Windows features on or off is optionalfeatures.exe)
  5. firewall.cpl – Windows Firewall
  6. compmgmt.msc –  Computer management
  7. sysdm.cpl – System Properties (change computer name, join domain etc. (but please, use POSH for that if possible)
  8. wuapp.exe – Windows Update (very useful in 8/2012 and above)
  9. eventvwr.exe – Event Viewer
  10. mstsc.exe – Remote Desktop Client (everyone knows about this one, I hope).
    In Windows 8 and above, you have to start it with <shift>+<enter> instead of just <enter> if opening more than one window.

/Johan

WMI Eventing: Watch folder and send files as email attachments, Part I

I got a question from one of my colleagues if I knew an application that watched a folder for files, and then emailed all files to a specific address. My immediate answer was that this can very easily be achieved with PowerShell.

Short version

First we define the action to trigger when a file is found. We simply enumerate all files with Get-ChildItem and then use the standard Send-MailMessage cmdlet to send them to the recipient.

WatchFolder2Email.ps1

$WatchFolder = "C:\Data"
$To = "admin@365lab.net"
$From = "noreply@365lab.net"
$Subject = "File transfer"
$Body = "Please check the attached file(s)."
$SMTPServer = "smtp.cloud.net"
 
$Files = (Get-ChildItem $WatchFolder).FullName
if ($Files) {
    Send-MailMessage -From $From -To $To -Subject $Subject -Body $Body -SmtpServer $SMTPServer -Attachments $Files
    Remove-Item $Files
}

Now we could call our problem solved. Just put the code in a .ps1 file and use Task Scheduler to run it every 10 minutes.

Advanced version

Another way of triggering the script is to use WMI Eventing. There are different types of events, I will use an intrinsic event which are events triggered on a change to the CIM database, for example a change in the file system. This is defined in a WQL Query that also defines an interval and which folder to watch.

SELECT * FROM __InstanceCreationEvent WITHIN 10 
WHERE TargetInstance ISA "CIM_DirectoryContainsFile" 
AND TargetInstance.GroupComponent = "Win32_Directory.Name=\"c:\\\\Data\""

Let’s put the script together and register the event.

$action = {
    $WatchFolder = "C:\Data"
    $To = "admin@365lab.net"
    $From = "noreply@365lab.net"
    $Subject = "File transfer"
    $Body = "Please check the attached file(s)."
    $SMTPServer = "smtp.cloud.net"
        
    $Files = (Get-ChildItem $WatchFolder).FullName 
    if ($Files) {
        Send-MailMessage -From $From -To $To -Subject $Subject -Body $Body -SmtpServer $SMTPServer -Attachments $Files 
        Remove-Item $Files
    }
}

$WQLQuery = 'SELECT * FROM __InstanceCreationEvent WITHIN 10 
             WHERE TargetInstance ISA "CIM_DirectoryContainsFile"
             AND TargetInstance.GroupComponent = "Win32_Directory.Name=\"c:\\\\Data\""'

Register-WmiEvent -Query $WQLQuery -SourceIdentifier "WatchFolder2Email" -Action $action  

Now we can put a file in the C:\Data folder. Within seconds it will be sent by email and then deleted.

To remove the Job we simply run

Unregister-Event -SourceIdentifier "WatchFolder2Email" 

Unfortunately this solution is limited to your PowerShell session only. When you close the window the job is terminated. In Part II of this blog post I will show how to create a Permanent WMI Consumer that will work also after computer restarts.

/ Andreas

Analyze your VHD(x) usage with PowerShell

In this case, I wanted a quick analysis on my Hyper-V VM’s vhd files and get the disk size and free disk space before upgrading to Server 2012 R2 Hyper-V.

The snippet basically loops trough all VM’s on a host (or in a cluster if you would want that), and gives you output as below.

2014-01-11 21-01-04

2014-01-11 21-01-23

If you want information on all disks for all VM’s in a cluster you can get that with Get-VHDStat -Cluster ClusterName.

Get-VHDStat

function Get-VHDStat {
param(
[Parameter(Mandatory=$false)]
[string]
$Cluster
)

if ($Cluster) {
    $VMs = Get-ClusterGroup -Cluster $cluster | where grouptype -eq 'virtualmachine' | Get-VM
} else {
    $VMs = Get-VM 
}
	foreach ($VM in $VMs){
		$VHDs=Get-VHD $vm.harddrives.path -ComputerName $vm.computername
            foreach ($VHD in $VHDs) {
        	    New-Object PSObject -Property @{
                    Name = $VM.name
				    Type = $VHD.VhdType
				    Path = $VHD.Path
				    'Total(GB)' = [math]::Round($VHD.Size/1GB)
                    'Used(GB)' = [math]::Round($VHD.FileSize/1GB)
				    'Free(GB)' =  [math]::Round($VHD.Size/1GB- $VHD.FileSize/1GB)
                 }
	        }
    }
}

Enjoy!

/Johan

Synchronizing users between two AD Domains without trust

AD LDS Sync
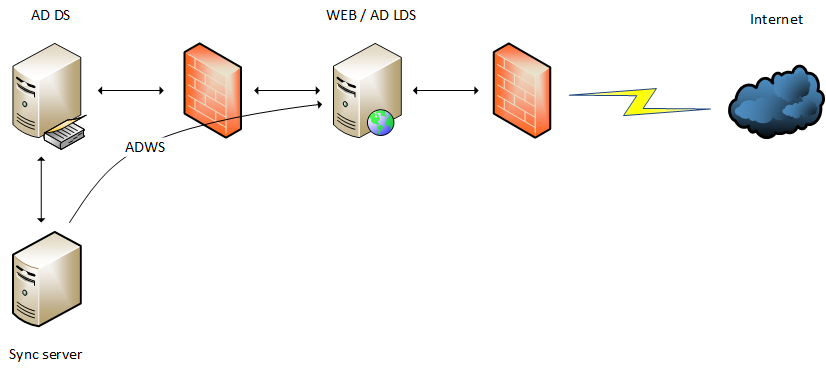
Recently I had an interesting job at a customer, who used a web application with an address book. The web application used LDAP queries to Active Directory to get all users addresses and phone numbers. This information was then searchable on a public web site located in DMZ.

The problem here is that we had an internet facing server. We could not allow it to make queries directly to the internal Active Directory. We decided to install a new AD LDS (Lightweight Directory Services) partition in the DMZ where we could ask our queries.

Next problem: We have to populate our new LDS partition with users. Normally this would be done with a system designed for it, like Forefront Identity Manager. Here we needed a quick-and-dirty solution to get started, and I therefore wrote a PowerShell script that copied the attributes we needed from our Active Directory.

One of the first things to solve was to find who and what to sync. With ten thousands of users in Active Directory we needed a solution to select users, even though they were spread across several OUs. Also, Swedish laws regulate what information to publish, so we had to filter sensitive information.

We ended up with a solution where only users in a specific OU were synced, but they also needed to be member of a specific group. We also filtered disabled users.

$ADUsers = Get-ADGroupMember -Identity "grp_ADSyncUsers" -Recursive | Get-ADUser -Properties `
     SamAccountName,GivenName,Surname,DisplayName,Title,Office,Department,Company,EmailAddress,Mobile,OfficePhone,Modified,Enabled | `
     Where-Object { $_.Enabled -eq $true -and $_.DistinguishedName -like "*$sourceou" }

We now have too much data. Our sync will be too slow, so we need to filter again.

There is no need to process accounts that haven’t been changed recently. We simply checked the Modified attribute in active directory and skipped these.

if ((get-date $modified) -ge ($(get-date).AddDays(-1.5))) {
    ...
}

We also needed a method to detect deleted accounts. Here we simply got all users in AD LDS and compared it with the users in AD DS. Any extra users were removed.

Compare-Object $PhoneBookUsers.Name $ADUserNames | Where-Object { $_.SideIndicator -eq "<=" } | ForEach-Object {
    $id="cn=$($_.InputObject),$destou"
    Remove-ADUser -Identity $id -Server $destserver -Credential $cred -Partition $destpartition -Confirm:$false
}

Below is the entire script, but as I wrote, it is a quick-and-dirty solution just to get started.

$destserver = "10.10.10.5"
$destpartition = "dc=cloud,dc=net"
$destou = "ou=PhoneBook,dc=cloud,dc=net"
$sourceou = "ou=MyBusiness,dc=contoso,dc=com"

$cred = Get-Credential
$i = 0

Import-Module ActiveDirectory

# Define users to process

    Write-Host "Collecting user information..."

    $ADUsers = Get-ADGroupMember -Identity "grp_ADSyncUsers" -Recursive | Get-ADUser -Properties `
            SamAccountName,GivenName,Surname,DisplayName,Title,Office,Department,Company,EmailAddress,Mobile,OfficePhone,Modified,Enabled | `
            Where-Object { $_.Enabled -eq $true -and $_.DistinguishedName -like "*$sourceou" }

    Write-Host "$($ADUsers.Count) user(s) found in Active Directory."

# Create/update users

    $ADUsers | ForEach-Object {

        $sam = $_.Name
        $givenname = $_.GivenName
        $surname = $_.Surname
        $displayname = $_.DisplayName
        $email = $_.EmailAddress
        $department = $_.Department
        $office = $_.Office
        $title = $_.Title
        $company = $_.Company
        $tele = $_.OfficePhone
        $mobil = $_.Mobile
        $modified = $_.Modified

        if ((get-date $modified) -ge ($(get-date).AddDays(-1.5))) {
            # Process user accounts modified the last 36 hours

            $i++;

            try {
                # Create new account in AD LDS
                New-ADUser -SamAccountName $sam -Name $sam -DisplayName $displayname -GivenName $givenname `
                    -SurName $surname -EmailAddress $email -Title $title -Office $office -Department $department `
                    -Company $company -OfficePhone $tele -MobilePhone $mobil `
                    -Enabled $false -Path $destou –Type iNetOrgPerson `
                    -Server $destserver `
                    -Credential $cred

                Write-Host "Creating user $sam"

            } catch [System.Exception] {
                switch($_.Exception.GetType().FullName) {
                    'Microsoft.ActiveDirectory.Management.ADException' {
                        # User already exists. Update existing account
                        Set-ADUser -Identity "cn=$sam,$destou" -DisplayName $displayname -GivenName $givenname -SurName $surname `
                            -EmailAddress $email -Title $title -Office $office -Department $department `
                            -Company $company -OfficePhone $tele -MobilePhone $mobil `
                            -Server $destserver `
                            -Credential $cred `
                            -Partition $destpartition
                        Write-Host "Updating user $sam"
                    }
                }
            }
        }
    }

# Remove deleted accounts

Write-Host "$i user(s) processed."
Write-Host "Searching for users to delete..."
$i=0

    $PhoneBookUsers = Get-ADUser -Server $destserver -SearchBase $destou -Filter * -Credential $cred | Select -Property Name
    $ADUserNames += $ADUsers.Name

    Compare-Object $PhoneBookUsers.Name $ADUserNames | Where-Object { $_.SideIndicator -eq "<=" } | ForEach-Object {
        $id="cn=$($_.InputObject),$destou"
        Remove-ADUser -Identity $id -Server $destserver -Credential $cred -Partition $destpartition -Confirm:$false
        Write-Host "Deleting user $($_.InputObject)"
        $i++
    }

Write-Host "$i user(s) deleted."
Write-Host "Done!"

/ Andreas

Dealing with drive letters in PowerShell

Have you ever wondered why the newly installed disk gets a drive letter in the middle of the alphabet even though E: is free? Why that network drive refuses to connect with the drive letter you want? The reason is most probably that the drive letter you want has been reserved for removable drives even though no media is inserted. This has been an problem for some time now since many computers are shipped with built-in multimedia card readers.

W8-storage-management

In the above example, if you for example try to map a network drive as F: it will fail because it is already reserved by a SD card reader, even when no card is inserted. The solution: change the drive letters to something that you know will never conflict.

Here’s a PowerShell script that automatically reassigns drive letters on removable drives to a predefined set of “approved” drive letters. The script uses the standard mountvol tool, so it also works in older Windows versions.

Replace-DriveLetters.ps1

$ForbiddenDrives = @("E:","F:","G:","H:")
$AllowedDrives = @("W:","X:","Y:","Z:")

$RemovableDrives = Get-WmiObject -Class Win32_Volume -Filter "DriveType=2"
$DrivesToReassign = $RemovableDrives | Where-Object { $ForbiddenDrives -contains $_.DriveLetter }
$i=0

foreach ($Drive in $DrivesToReassign) {
     &mountvol $Drive.DriveLetter /D
     &mountvol $AllowedDrives[$i++] $Drive.DeviceID
}

In an Enterprise Environment this is easy to implement in for example Microsoft Deployment Toolkit. That way your clients will never fail mapping network drives.

MDT

/ Andreas

Friendly Reminder – do NOT assign passwords through Group Policy Preferences

This is an issue that have been out for quite a while, but I see it a lot when checking customers environments, so it’s always good to remind yourself about this kind of important things.

Through GPP, you have the ability to do lots of stuff, one of them is fiddling with builtin local accounts on computers and even change password on those.

A common case is applying GPP settings as below to your client computers.
2014-01-09 11-48-522014-01-09 11-49-06
Note the warning about where the password will be stored.

It actually gets worse from there… with the script which can be downloaded here, you can extract ALL passwords from ALL GPP’s you have since they are stored in XML files located on the sysvol in your domain.
OK, who have access to read those files then?
Authenticated Users, which means whoever that has an account in your domain can do this.
2014-01-09 11-50-01

Conclusion: do not change password with GPP unless you do it and remove the policy directly after the policy has successfully been applied.

In this blog post series from Microsoft PFE’s, you find a great solution to handle and store local admin passwords in a secure, yet manageble way.

/Johan