Monthly Archives: March 2014

How to manually configure an Outlook profile for Office 365

Manually configuring Outlook for Office 365 can be tricky. That’s what Autodiscover is for. But in some situations you have to be able to do a manual configuration in for example a pilot deployment. Here are the steps required.

The nice thing with this method is that we will be able configure Outlook without changing our Autodiscover DNS records. That means we can do a full Office 365 test deployment without affecting users in an on-premises Exchange environment.

The first step is to establish a remote PowerShell session to Exchange Online. Here we need the ExchangeGuid attribute from our mailbox. Copy this value and save it for later.

exguid

The next step is to launch the New Profile Wizard in Outlook. We will go for the option to do a Manual setup.

outlookprofile1

In the next screen we select that we have a Microsoft Exchange Server.

outlookprofile2

Now it’s time to enter the exchange server name. Here we need the ExchangeGuid from the first step. Write the Guid followed by @ and the email domain. The user name is our Office 365 user name.
Now click More Settings.

outlookprofile3

On the Security tab we select Anonymous Authentication.

outlookprofile4

On the Connection tab check the box to connect using HTTP and click Exchange Proxy Settings

outlookprofile5

Fill in all values as below

outlookprofile6

Click OK to close all windows. You will be asked for credentials, fill in your Office 365 username and password.

outlookprofile7

Now our Outlook Profile is ready to use and Outlook is configured for Exchange Online, without using Autodiscover.

/ Andreas

Advertisement

Logging on as Domain Admin to end user workstations? Think again!

We’ve all been there.
An end user has a problem with their computer or needs manual installation of some software. Either we elevate with an admin account logged on as the end user, or we switch user and are logging on with our admin account.
Far too often, the admin accounts used to help out end users, are very privileged accounts, 2/5 times I see this at my customers those accounts are Domain Admins.

Why is this a problem? Well, first of all, you should never expose very privileged credentials to “non trusted” computers. Secondly, at the time you log on, your credentials are exposed and can with Benjamin “gentilkiwi” Delpy’s tool mimikatz be extracted in clear text through the lsass process.

Ok, but the user is not local admin, so they will not be able to do it anyway? That is true, but far too many let end users be local admins, and of course there are ways to get around that if you’re a non admin user as well.

Example:
The end user Aaron that has been privileged enough to get local admin rights on his computer. He puts the powershell-script Invoke-Mimikatz.ps1 as a task to run at logon for all users.
2014-03-12 13-33-19

2014-03-12 13-44-04
In this example, I’ve just put in the row below in at the end of the script to dump the credentials to a file on the c-disk. This could of course be dumped anywhere if you wanted to.

Invoke-Mimikatz -dumpcreds | 
    Out-File -Append  c:\evilplace\$env:computername.txt

Effect:
Now, when his fellow administrator logs on to his computer to help him with some software installation, the admin credentials will be dumped to a file and Aaron is from now on Domain Admin!

2014-03-12 13-54-02

Scary? Yes!
Lesson learned: Think both once and twice before logging on with privileged credentials to non trusted computers.

This is of course nothing new, it’s been out for quite a while. Look in to the following matrix that clarifies when this is an issue or not (in most cases it is…:( )

/Johan

Exchange Online: Migrating shared mailboxes and resources

In Exchange 2003 Resource Mailboxes and Shared Mailboxes are often set up as a regular user mailbox. These mailboxes are still possible to migrate using Staged Migration or Cutover Migration, by migrating them as a regular user mailbox. The downside is that they will require an Exchange Online license.

If you are migrating from an Exchange version that supports Hybrid Migration you will be able to migrate resources directly without assigning licenses, but there is a workaround for Cutover and Staged migrations as well.

The process of migrating a Shared Mailbox or Resource Mailbox is as follows:

  1. Migrate mailbox as regular user mailbox
  2. Assign license
  3. Convert mailbox to shared/resource
  4. Remove license

To convert a user mailbox to a shared mailbox we just need one line of PowerShell. Except from changing the type, we also have to modify the mailbox quotas.

Set-Mailbox -Identity "shared@365lab.net" `
	-Type Shared `
	-IssueWarningQuota 9.5GB `
	-ProhibitSendQuota 9.75GB `
	-ProhibitSendReceiveQuota 10GB

The same thing applies to Resource Mailboxes (Rooms and Equipment). The difference here is that we also want to configure AutoAccept policies and set default access rights to the calendar:

Set-Mailbox -Identity "resource@365lab.net" `
	-Type Room `
	-IssueWarningQuota 9.5GB `
	-ProhibitSendQuota 9.75GB `
	-ProhibitSendReceiveQuota 10GB

Set-CalendarProcessing -Identity "resource@365lab.net" `
	-AutomateProcessing AutoAccept 

Add-MailboxFolderPermission "resource@365lab.net:\Calendar" `
	-User Default `
	-AccessRights LimitedDetails

After this is done the license can be removed. You will get a warning that your data will be lost, but it is safe to click Yes on this one.

licensewarning

/ Andreas

Office 365: Monitor and finish remote mailbox moves

A while ago, I posted a script that helps you out informing end users and starting remote mailbox moves in hybrid migration scenarios.
In the script we started our mailbox moves with the -SuspendWhenReadyToComplete switch. That switch means we manually have to go in and resume the mailbox moves with the Resume-MoveRequest cmdlet.

In this follow up script, we automate that process by monitoring active mailbox moves and handle resuming and removing of them. We also have the possibility to send out emails to our end users when the move has been completed (if uncommenting row 78).

Note: The script only works as intended if you have created one moverequest per user, as done in my script that start the migrations.

<#  
.SYNOPSIS 
    Script that monitors remote mailbox moves in Exchange Online and handles resuming, removing of them. 
.NOTES 
    Author: Johan Dahlbom 
    Blog: 365lab.net 
    Email: johan[at]dahlbom.eu 
    The script are provided “AS IS” with no guarantees, no warranties, and they confer no rights.     
#>

#region variables
$CloudUsername = "migration@365lab.net"
$CloudPassword = ConvertTo-SecureString "password" -AsPlainText -Force
$CloudCred = New-Object System.Management.Automation.PSCredential $CloudUsername, $CloudPassword
$PSScriptRoot = Split-Path -Parent -Path $MyInvocation.MyCommand.Definition
$Logfile = ($PSScriptRoot + "\HybridMigrations.log")
$enduserinfo = @"
Hi $($MoveRequest.batchname),<p>

You've just been moved to Office 365, if you have questions regarding the move, or if anything is not working as intended, let us know!
<p>
<strong>Best Regards
IT Department
</strong>
"@
#endregion variables

#region functions
#Function to send out email with defined parameters
function Send-MigrationMail {
param(
    [Parameter(Mandatory=$true)]
    [string]$Message,
    [Parameter(Mandatory=$true)]
    [string]$Recipient
)
$emailFrom = "Office 365 <migration@365lab.net>"
$smtpserver = "mailserver.365lab.net"
$subject = "Migration batch Finished"
$cc = "migrationadmin@365lab.net"
 
Send-MailMessage -From $emailfrom -To $Recipient -Cc $cc -SmtpServer $smtpserver -Subject $subject -Body $Message -BodyAsHtml
 
}
#Function to write information to a log file and to console output
function Write-Log {
Param (
    [Parameter(Mandatory=$true)]
    [string]$Logstring
)
Add-Content $Logfile -value $logstring -ErrorAction Stop
Write-Output $logstring
}
#endregion functions

#Connect to Exchange Online
if (!(Get-Command Get-CloudMoveRequest -ErrorAction SilentlyContinue)) {
    $session = New-PSSession -ConfigurationName Microsoft.Exchange -Authentication Basic -ConnectionUri https://ps.outlook.com/powershell -AllowRedirection:$true -Credential $CloudCred
    Import-PSSession $session -Prefix Cloud -CommandName @("Get-MoveRequest","Resume-MoveRequest","Remove-MoveRequest","Get-MoveRequestStatistics") -AllowClobber
}

#Run the following as long as there are active move requests
while (Get-CloudMoveRequest)
{
	$MoveRequests = Get-CloudMoveRequest
	foreach ($MoveRequest in $MoveRequests) {
		switch ($MoveRequest.status) { 
			"InProgress" 	{ 
				Write-Output "INFO: Move request for $($MoveRequest.Batchname) at $((Get-CloudMoveRequestStatistics -Identity $MoveRequest.BatchName).PercentComplete)% $(Get-date -format u)" 
			}
			"AutoSuspended" {
				Write-Log "INFO: Completing mailbox move for $($MoveRequest.BatchName) at $(get-date -Format u)"
				Resume-CloudMoveRequest -identity $moverequest.batchname
			}
			"Completed" 	{
				Write-Log "INFO: Removing completed MoveRequest $($MoveRequest.Batchname) at $(get-date -Format u)"
                #Uncomment row below to send information to end users when migration has been completed.
                #Send-MigrationMail -Message $enduserinfo -Recipient $moverequest.batchname 
				Remove-CloudMoveRequest -identity $moverequest.batchname -confirm:$false 
			}
		}
	}
	
	Write-Host "------------------------------------------------------------------------------"
	Start-Sleep 60
}

 Write-Log "INFO: All migration batches finished at $(Get-Date -format u)"
 #Send information to admin then the batches are complete.
 Send-MigrationMail -Message "Migration batch finished at $(Get-Date -format u)<br>Logfile attached." -Recipient migrator@365lab.net
 

Hope this is at any help, just let me know if you have suggestions that can improve the script.

/Johan

Quick Tip: Forcing Office 365 Directory Synchronization to run

Disclaimer
This blog post was written for an older version of the Azure AD Connect Synchronization Service. For information regarding the current version please look at the documentation from Microsoft.

Sometimes you need changes in your on-premises Active Directory to sync to Office 365 as soon as possible. You might, for example, have a new employee at your doorstep one morning, and you quickly have to create an account for him. Normally a sync is only done every three hours. With these commands your data is synced immediately.

Depending on your version of DirSync/AADSync the commands are a bit different:

DirSync prior to version 6862.0000

To start a manual sync you launch the DirSyncConfigShell Console File, located at C:\Program Files\Windows Azure Active Directory Sync.

A sync is triggered by the command

Start-OnlineCoexistenceSync

You can also trigger a full sync by using the -FullSync parameter.

If you are using DirSync with Password Sync you can also run a full password sync with the following lines of PowerShell code:

Set-FullPasswordSync
Restart-Service FIMSynchronizationService -Force

The DirSync result can be viewed in the FIM Client, but to see the result of Password Sync you need to look at the Event Viewer in Windows.

DirSync version 6862.0000 and later

Starting with DirSync version 6862.0000 released on June 5 2014 there is no longer a DirSyncConfigShell Console file in the Program Files folder. Instead you just start a normal PowerShell window and run Import-Module DirSync. After that the Start-OnlineCoexistenceSync cmdlet is available.

Forcing a Password Sync uses the same lines of PowerShell code as the previous versions:

Set-FullPasswordSync
Restart-Service FIMSynchronizationService -Force

Azure Active Directory Synchronization Services (AAD Sync)

A Directory Synchronization is triggered by running an exe file:

C:\Program Files\Microsoft Azure AD Sync\Bin\DirectorySyncClientCmd.exe

force_dirsync

DirectorySyncClientCmd.exe accept two parameters, initial and delta. Running DirectorySyncClientCmd.exe initial initiates to a FullSync, and running DirectorySyncClientCmd.exe delta (or without any parameters) initiates an incremental sync.

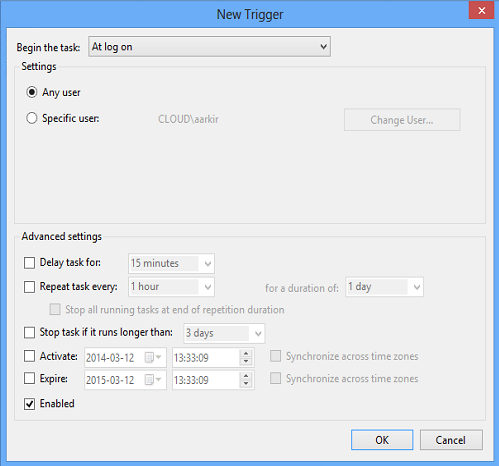
The delta synchronization is triggered every 3 hours, and it can also be started manually by running the Scheduled Task “Azure AD Sync Scheduler” in the Task Scheduler.

To force a Password Sync the following lines of PowerShell code is needed. Modify the first two lines to match your environment.

$adConnector  = 'ad.contoso.com'
$aadConnector = 'contoso.onmicrosoft.com - AAD'

Import-Module ADSync

$c = Get-ADSyncConnector -Name $adConnector
$p = New-Object Microsoft.IdentityManagement.PowerShell.ObjectModel.ConfigurationParameter 'Microsoft.Synchronize.ForceFullPasswordSync', String, ConnectorGlobal, $null, $null, $null
$p.Value = 1
$c.GlobalParameters.Remove($p.Name)
$c.GlobalParameters.Add($p)
$c = Add-ADSyncConnector -Connector $c
Set-ADSyncAADPasswordSyncConfiguration -SourceConnector $adConnector -TargetConnector $aadConnector -Enable $false
Set-ADSyncAADPasswordSyncConfiguration -SourceConnector $adConnector -TargetConnector $aadConnector -Enable $true 

/ Andreas