Monthly Archives: June 2014

Troubleshooting TLS in an Exchange Online Hybrid Deployment

One of the prerequisites for having a Hybrid relationship established between your on-prem Exchange environment and Office 365 is to have a functioning mail flow using TLS. The Hybrid Configuration Wizard automatically creates the inbound and outbound connectors required both in your on-prem environment and in Office 365 as a part of the setup, and this is used for secure mail transfer between the two environments.

If TLS fails your mail flow will suddenly stop, and outgoing emails are stuck in the queue with error message 451 4.4.0 Primary target IP address responded with: “451 5.7.3 Must issue a STARTTLS command first.”. You may not even be able to complete the Hybrid Configuration Wizard, you just get an error message stating that Subtask ValidateConfiguration execution failed: Configure Mail Flow.

Several blogs on the Internet addresses these problems, but must of them show you the commands how to turn TLS off. This is not something that I recommend! A problem is not solved by hiding it’s symptoms, always try to find the root cause.

There are several possible reasons for malfunctioning TLS. A good start in the troubleshooting is to use good old telnet.exe and connect to smtp.office365.com on port 25. By simply sending the ehlo command you can easily see if the server is accepting TLS connections. If you get a 250-STARTTLS response the problem is most likely with your certificate. It may not be configured to be used with SMTP, or is longer valid. Also make sure that you have installed the latest Root Certificate Updates from Windows Update.

tls1

A response from the SMTP server without the STARTTLS extension listed might indicate that your IP address is on a blacklist. Use one of the online tools available for free to check the status of your IP address. In your telnet session you will find the IP address you are connecting from.

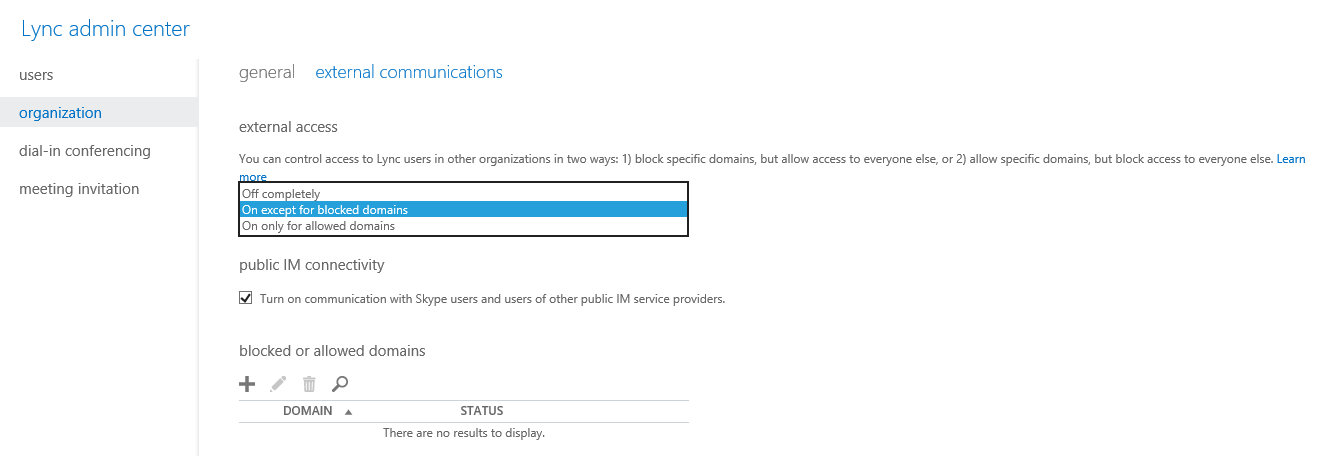
This IP address must also be in list of Sender IP Addresses in the Hybrid Mail Flow Inbound Connector in Office 365 created by the Hybrid Configuration Wizard. If it isn’t there it must be added. If the IP is incorrect the connector will not be used, and the mail flow will use the MX record instead, without enforcing TLS.

tls2

Another result from your telnet session could be this:

tls3

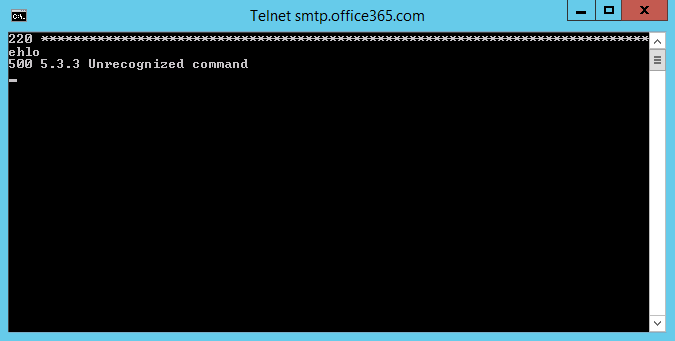
In this case a firewall is configured to filter some protocols, which effectively stops all TLS communication. In for example Cisco firewalls the solution is to turn off ESMTP inspection.

This is not a complete guide on how to solve your TLS problems, but it shows some common solutions, and hopefully it gives you some input to start your troubleshooting.

/ Andreas

Advertisement

Exchange Online: How to create a dirsynced Resource Mailbox

The idea with DirSync is to keep your user administration on-prem. A problem arise when you decomission the on-premises Exchange server and want to create a Shared Mailbox or a Resource Mailbox. There is no simple way to create such mailbox without assigning a license. It is possible to create a new regular user, assign a license, and then convert it to a Shared Mailbox or a Resource Mailbox, but the drawback with this method is that it requires a license during the process. On the other hand your user account will be fully managed in your on-prem environment, and the goal is achieved.

Another possibility is to create a Resource Mailbox with a Cloud Identity, and then connect it to an account synced from your Active Directory. This is what I will show you now. Lets start with disabling DirSync. This step is not necessary, but we might get some problems if our accounts are synced before they are ready.

Stop-Service MSOnlineSyncScheduler

Then we create a user account in Active Directory that we will later sync to Office 365:

Import-Module ActiveDirectory
$ADUserProperties = @{
    Name =               'Meeting Room 1'
    Path =               'CN=Users,DC=365lab,DC=net'
    SamAccountName =     'room1'
    UserPrincipalName =  'room1@365lab.net'
    DisplayName =        'Meeting Room 1'
    EmailAddress =       'room1@365lab.net'
    OtherAttributes = @{
        ProxyAddresses = 'SMTP:room1@365lab.net'
    }
}
$ADUser = New-ADUser @ADUserProperties -PassThru

The next step is to create a new Resource Mailbox in Office 365. This can be done either with GUI or PowerShell, I prefer PowerShell.

$O365cred = Get-Credential
$O365sess = New-PSSession -ConfigurationName Microsoft.Exchange -ConnectionUri https://ps.outlook.com/powershell -Credential $O365cred -Authentication Basic -AllowRedirection
$importcmd = Import-PSSession $O365sess

$O365UserProperties = @{
    DisplayName =        'Meeting Room 1'
    Name =               'room1'
}

$RoomMailbox = New-Mailbox @O365UserProperties -Room

Now we have two separate accounts, one in Active Directory with the managed attributes, and one in the cloud that we want to connect to our on-prem identity. The connection is done by populating the ImmutableID attribute with the corresponding ObjectGuid from Active Directory. Also, we change the UserPrincipalName in Office 365 to match our domain account.

$ObjectGuid = $ADUser.objectGuid
$ImmutableId = [System.Convert]::ToBase64String($ObjectGuid.ToByteArray())

Import-Module MSOnline
Connect-MsolService 

Set-MsolUserPrincipalName -UserPrincipalName $RoomMailbox.UserPrincipalName -NewUserPrincipalName $ADUser.UserPrincipalName -ImmutableId $ImmutableId

Now our UserPrincipalNames are the same in both our Active Directory and in Office 365, and we have linked then together using the ObjectGuid/ImmutableId. Time to start our DirSync service again and force a synchronization to run.

Start-Service MSOnlineSyncScheduler

Import-Module DirSync
Start-OnlineCoexistenceSync -FullSync

Now the Cloud Identity is converted to a DirSynced Identity, and the attributes in Active Directory are syned to our new Resource Mailbox. From now on all user administration tasks for this account can be managed in our on-prem Active Directory.

/ Andreas

Lync Online: External Communiations/Federation not working – “Do it over again…”

Working with IT can sometimes be a pain. You do everything by the book, but it is still not working. (if I got a penny every time i ran in to that… 🙂 )

Enabling External Communiations/Federation in Lync Online is one of the easiest things to do, enable a tick box and make sure that you have all dns records added for Lync Online to work properly.

2014-04-07 07-58-15 2014-04-07 07-56-50

What if its not working anyway? Recently that was exactly my case, I had done the extremely difficult operations above, yet external federation was not working.

Solution
After troubleshooting forth and back by enabling logging in the Lync clients, it seemed like my external communiations settings had not been provisioned to back end. The solution I tried then was the following:
Simply disable external communications in the portal and wait 24 hours before you enable it again.
2014-04-07 08-03-50
24%20hours_lit 2014-04-07 08-08-03
That did the trick! Sometimes there are easy ways to solve problems. 🙂

/Johan

Automating the creation of Lync Online DNS Records

Recently I implemented Lync Online with a customer that had a lot of custom domain names. Adding the required DNS records manually would literary take hours, but luckily the customer used Windows DNS both internally and externally, so it was easy for me to write a script to add these DNS records.

In my case both DNS servers (internal and external) are running Windows Server 2008 R2. That gives me the option to use dnscmd.exe to add the records. Here is the script I used to add the records. Please note that you may need to modify the script if you are using subdomains.

#Get all domains registered in Office 365
Import-Module MSOnline
Connect-MsolService
$domains = Get-MsolDomain | Where-Object { $_.Name -notlike '*.onmicrosoft.com' }
$dnsserver = 'srv-dns01'

#Loop through all domains and add the required DNS records for all domains
foreach ($domain in $domains) {
    Write-Verbose "Adding records for domain $($domain.Name)"
    &"dnscmd.exe $dnsserver /RecordAdd $($domain.Name) sip CNAME sipdir.online.lync.com"
    &"dnscmd.exe $dnsserver /RecordAdd $($domain.Name) lyncdiscover CNAME webdir.online.lync.com"
    &"dnscmd.exe $dnsserver /RecordAdd $($domain.Name) _sipfederationtls._tcp SRV 100 1 5061 sipfed.online.lync.com."
    &"dnscmd.exe $dnsserver /RecordAdd $($domain.Name) _sip._tls SRV 100 1 443 sipdir.online.lync.com."
} 

Now I reduced this time-consuming (and boring) task to just a few minutes!

/ Andreas