Category Archives: Exchange Online

Beyond the supported – Cross forest style Exchange Online Migration

Migration and consolidation projects always put our skills to the test and in some cases forces us to do things that are not fully supported. But sometimes, the end justifies the means.

Some time ago, I did an Exchange Online onboarding project in a quite complex scenario, at least in terms of the identities. 10+ Active Directories and almost as many Exchange environments. On top of that, due to several reasons, it was not possible to create trusts between the different directories. Not the easiest starting point…
Looking at all different options we agreed upon to synchronize one of the directories to Azure AD. This meant that all users not in that directory were to get new accounts, effectively taking the first step towards a common environment.

– Identites – check!

The next step were to determine the migration strategy for the Exchange environments that was ranging from Exchange 2007 -> 2013. Given the quite complex scenario without trusts between the environments, our minds were set to use a third-party tool to do all the migrations. I always like challenging the obvious path, so I wanted to see if it was possible to do native mailbox moves even though there was no possibility to use the regular Hybrid Configuration Wizard.

Guess what – following cross-forest migration principals and copying the relevant attributes between the environments worked great! Cutting $100k in third-party software licensing costs from the project budget is never a bad thing either 🙂

A little simplified, we ended up with a scenario / environment looking like below:

fakehybrid

Remember that this is a quite complex scenario where you have to do most preparations “manually”, so don’t try this unless you really need this kind of scenario. Also note that the same approach works in a staged migration scenario from Exchange 2003/2007.

Assumptions:

  • You have a way to match users between the different environments when moving the attributes.
  • The target directory/forest has been prepared with the Exchange server schema.
  • SMTP/Port 25 is open from the source Exchange environments for outgoing coexistence mailflow.
  • You are in control of your incoming mailflow as well as AutoDiscover, depending on how your environment/domains look like. 🙂
  • This method will be used to migrate mailboxes, not for long-term coexistence. If you have separate SMTP domains per environment, free/busy sharing can be configured if needed.

Preparation steps: 
Source Exchange Environment:

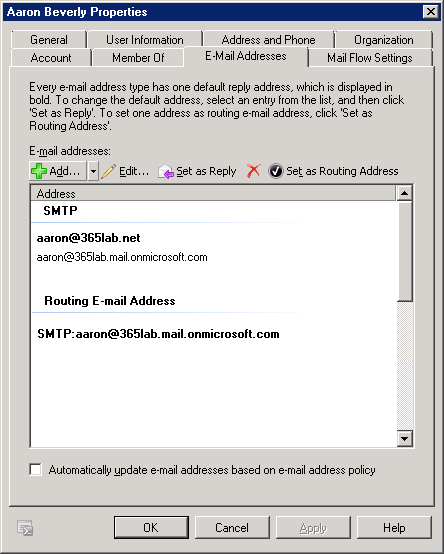
1. Add the tenant routing domain (tenant.mail.onmicrosoft.com) as an accepted domain. Also create a send connector to solve outgoing email in the transition
2. Add the routing email address (smtp:samaccountname@tenant.mail.onmicrosoft.com) to all users in scope for migration.
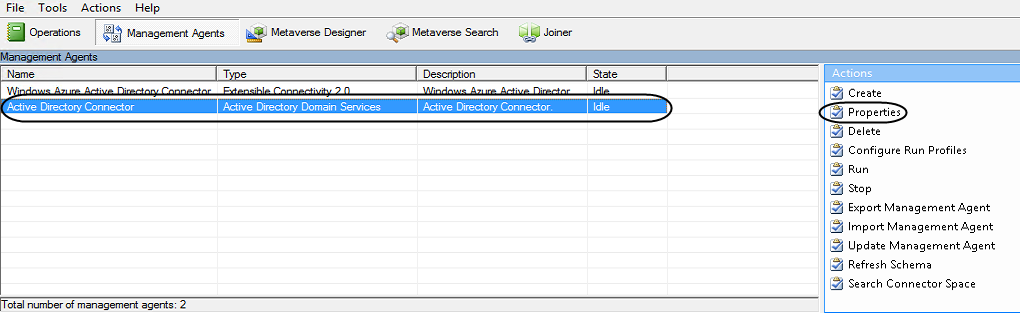
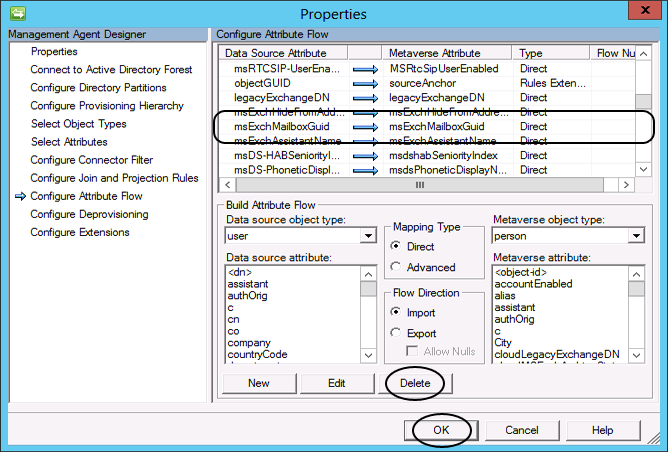
3. Export the attributes needed to perform the migration from the source Exchange environment. The following attributes are needed for a successful migration. I have used Export-Clixml instead of a CSV-file for simpler handling importing back the Guid Attributes.

  • mail
  • mailNickname
  • proxyAddresses
  • msExchMailboxGuid       
  • msExchArchiveGuid  
  • legacyExchangeDN          
  • msExchRecipientDisplayType
  • msExchRecipientTypeDetails

4. Export mailbox permissions/calendar permissions for users/shared mailboxes if needed.
5. Enable MRSProxy in the Exchange Environment. Also create a service account with at least Recipient Management permissions to use setting up the migration endpoint in Exchange Online.

Target Active Directory / Exchange Online environment:
1. Set up an “Exchange Remote” migration endpoint towards the MRSProxy earlier created.
2. Import the attributes earlier exported in the user directory.
3. After a successful directory synchronization, verify that the users in scope shows up as Mail Users in Exchange Online. If you did the Exchange schema update after you installed AADConnect, don’t forget to refresh the schema there as well, otherwise you won’t synchronize the imported attributes.
4. Perform a test move and verify that everything works as expected. Just as in the case of a “normal” move, the mailbox will be converted to a remote mailbox after the move has been completed.

Migration/post migration steps 
1. Plan and execute your migration batches. Remember that this is not a regular hybrid environment with free/busy etc., so plan your batches accordingly.
2. Import eventual mailbox/calendar permissions after each batch.
3. Switch MX/Autodiscover to Office 365
4. Decommission the source Exchange environment.

Summary
One approach does not fit all and sometimes you have to think a little bit out of the box. I hope this post was interesting and that it might give you some creative ideas running in to similar scenarios. For any questions or feedback, feel free to comment here or ping me on Twitter, @daltondhcp.

/Johan

Common questions using Office 365 with ADFS and Azure MFA

Azure Multi Factor Authentication (MFA) is a great service that has been included in Office 365 for almost 2,5 years. The adoption has really been great – at least from an admin user perspective where 99% of my customers admins have it enabled (I usually force them).
From an end user perspective we have more technical and informational challenges, which means that the adoption has not been as great as on the admin side. Hopefully the new shiny Conditional access policies for specific workloads will boost the adoption a bit.

The purpose of this post is to share the most common questions I get from customers about using Azure MFA included in Office 365 (in most cases in combination with ADFS).

Q: Can we pre-stage the MFA authentication methods so the end user doesn’t have to enroll after being enabled for MFA?
2016-07-15_12-56-53
A: As of now, unfortunately no – I tried to build a PowerShell function to pre-populate the authentication methods if the user already had a mobile phone number. I was fooled and thought it worked, but when I tried on a user that never had enrolled MFA before, it failed. Troubleshooting further, the required MFA property “StrongAuthenticationUserDetails” is not possible to pre-populate programmaticly, yet. Maybe the new AzureAD module can help here in the future.
2016-07-15_13-04-332016-07-15_13-10-20
Conclusion – we have to instruct our users to enroll for MFA.

Q: Can we prevent MFA from kicking in when authenticating from our internal network?
A: Absolutely – There are some options depending on if you have Azure AD Premium or not.

With Azure AD Premium
Here you can choose to “white list” your external IP addresses (which of course works with or without ADFS), or check the “Skip multi-factor authentication for requests from federated users on my intranet” checkbox. This will make Azure AD decide about MFA based on the insidecorporatenetwork claims issued by your own ADFS.
2016-07-15_13-32-05
The following PowerShell rows will add the required Issuance Transform Rules to your Azure AD RP.

$ByPassMFAClaims = @"
@RuleName = "Passtrough - InsideCorporateNetwork"
c:[Type == "http://schemas.microsoft.com/ws/2012/01/insidecorporatenetwork"]
 => issue(claim = c);

@RuleName = "Passtrough - PSSO"
c:[Type == "http://schemas.microsoft.com/2014/03/psso"]
 => issue(claim = c);
"@
$AzureADRP = Get-AdfsRelyingPartyTrust -Name "Microsoft Office 365 Identity Platform" 
Set-AdfsRelyingPartyTrust -TargetName $AzureADRP.Name `
                          -IssuanceTransformRules ($AzureADRP.IssuanceTransformRules + $ByPassMFAClaims)

Without Azure AD Premium
Without Azure AD Premium we don’t have the same choices in service settings.
2016-07-15_13-30-57
We can however achieve the same result, but instead of passing through the insidecorporatenetwork claims, we use it in ADFS and “tell” Azure AD that MFA is already taken care of. This can be done with the claim rules as below.

$ByPassMFAClaims = @"
@RuleName = "Bypass MFA from inside - Without Azure AD Premium"
EXISTS([Type == "http://schemas.microsoft.com/ws/2012/01/insidecorporatenetwork", Value == "true"])
 => issue(Type = "http://schemas.microsoft.com/claims/authnmethodsreferences", Value = "http://schemas.microsoft.com/claims/multipleauthn");

@RuleName = "Passtrough - PSSO"
c:[Type == "http://schemas.microsoft.com/2014/03/psso"]
 => issue(claim = c);
"@
$AzureADRP = Get-AdfsRelyingPartyTrust -Name "Microsoft Office 365 Identity Platform" 
Set-AdfsRelyingPartyTrust -TargetName $AzureADRP.Name `
                          -IssuanceTransformRules ($AzureADRP.IssuanceTransformRules + $ByPassMFAClaims)

Q: Do we really need to use the f****** app passwords?
A: Not really anymore, at least not if you are using ADFS. I usually turn it off.
First of all most rich clients (Including Outlook/SfB on mobile devices) do now support Modern Authentication (ADAL), which means they can handle MFA out of the box. So as long as you have updated clients, you most often only need to handle ActiveSync (native mail clients in all kinds of devices). My approach here is usually to exclude them from MFA to get rid of the app password need, but enable conditional access in order to control the devices.

Below you find a claims rule for the ActiveSync protocol that issues the multipleauthn claim which Azure AD will honor by skipping MFA for the request.

$Claims = @"
@Claims= "Bypass MFA for ActiveSync"
EXISTS([Type == "http://schemas.microsoft.com/2012/01/requestcontext/claims/x-ms-endpoint-absolute-path", Value=="/adfs/services/trust/2005/usernamemixed"]) && 
EXISTS([Type == "http://schemas.microsoft.com/2012/01/requestcontext/claims/x-ms-client-application", Value =~"^(Microsoft.Exchange.(Autodiscover|ActiveSync))$"]) 
=> Issue(Type = "http://schemas.microsoft.com/claims/authnmethodsreferences", Value = "http://schemas.microsoft.com/claims/multipleauthn"); 
"@
$AzureADRP = Get-AdfsRelyingPartyTrust -Name "Microsoft Office 365 Identity Platform" 
Set-AdfsRelyingPartyTrust -TargetName $AzureADRP.Name `
                          -IssuanceTransformRules ($AzureADRP.IssuanceTransformRules + $Claims)

Please note that additional rules may be needed depending on if you have an Exchange or Skype for Business Hybrid environment.

Q: Can we combine Azure MFA with our already implemented on-premises MFA solution?
A: It works fine to combine Azure MFA with any MFA solution that integrates with ADFS. The only thing you need to do is issue the authnmethodsreferences on the Azure AD RP to prevent users from getting “Double MFA” like SmartCard + Azure MFA. 🙂 For example, if I have Cert Auth as an enabled MFA provider as below, I only have to authenticate with my VSM/SmartCard even if MFA is enabled on the user.
2016-07-15_14-27-41
The needed claims rule looks like this:

$Claims= @"
@RuleName = "Passthrough - MFA"
c:[Type == "http://schemas.microsoft.com/claims/authnmethodsreferences"]
 => issue(claim = c);
"@
$AzureADRP = Get-AdfsRelyingPartyTrust -Name "Microsoft Office 365 Identity Platform" 
Set-AdfsRelyingPartyTrust -TargetName $AzureADRP.Name `
                          -IssuanceTransformRules ($AzureADRP.IssuanceTransformRules + $Claims)

The above also works with the new Conditional Access policies for Exchange and SharePoint online.

Wrap up
Hopefully this post has given you some good insights what to think about implementing Azure MFA for Office 365. It is not a complete walk in the park, but it’s definately doable for most organizations.
As always, there are lots of if’s and but’s in all different environments. If I have missed something or if you have other, more specific questions, let me know!

/Johan

Exchange Online (Archive) offboarding – “Multiple objects with Guid were found”

Quite a few customers that are using Exchange Online Archiving in an Exchange Hybrid environment, where they have their primary mailboxes on-premises and the archive mailboxes in Exchange Online. This makes a very flexible solution and a perfect start to utilize but not go all in to the cloud.

Just as in a “regular” hybrid environment, you have the possibility to on and offboard the archive mailboxes from and to the on-premises Exchange server. While testing offboarding of an archive mailbox a while ago, I ran in to an interesting error related to the ExchangeGuid attribute.

The exact error message trying to start the moverequest was as follows:
2015-08-19_07-54-19
“Multiple objects with Guid 1b2eaa95-0d64-4469-9fb2-d8f9be3e28ce were found”

Multiple objects with the same Guid, could that really be true? Investigating further confirmed the error message. All users in Exchange Online/Office365 had the same value in the ExchangeGuid attribute, even if they didn’t have an archive mailbox.
2015-08-18_12-44-21

SOLUTION
The following kb describes a similiar problem in a hybrid environment, but the exact solution could not be applied in my scenario since the RemoteMailbox-cmdlets isn’t working in EOA scenarios. It do however state that in order for a successful move, the ExchangeGuid should be the same on-premises as in the cloud.

After doing the change on one user as below the move started and completed successfully.

#Connect to Exchange Online and Exchange On Premises with prefixes
$cred = Get-Credential
$OnPremSess = New-PSSession -ConfigurationName Microsoft.Exchange `
                            -Authentication Kerberos `
                            -ConnectionUri http://exchangeserver/powershell
$O365Sess = New-PSSession -ConfigurationName Microsoft.Exchange `
                          -Authentication Basic `
                          -ConnectionUri https://outlook.office365.com/powershell-liveid/ `
                          -AllowRedirection:$true `
                          -Credential $cred
Import-PSSession $O365Sess -Prefix Cloud -AllowClobber
Import-PSSession $OnPremSess -Prefix OnPrem -AllowClobber

#Get the On-Premises mailbox
$Mailbox = Get-OnPremMailbox -Identity johan@365lab.net
#Get the Exchange Online MailUser
$MailUser = Get-CloudMailUser -Identity johan@365lab.net
#Change the ExchangeGuid to match the on-premises Guid
$MailUser | Set-CloudMailUser -ExchangeGuid $Mailbox.ExchangeGuid

Since it worked on one user, I then decided to to the change on all users that had EOA activated, as below:

#Get all Mailboxes with EOA Activated
$Mailboxes = Get-OnPremMailbox -Filter {(Archivestate -eq "HostedProvisioned")}
foreach ($Mailbox in $Mailboxes) {
    $CloudUser = Get-CloudMailUser -Identity $mailbox.userprincipalname
    if ($CloudUser.ExchangeGuid -ne $mailbox.ExchangeGuid) {
        $clouduser | Set-CloudMailUser -ExchangeGuid $mailbox.ExchangeGuid
    }
}

I still have a MS support case open regarding how the attribute ended up the same on all users and will update the post when we have identified the root cause.

Let me know if you have questions!

/Johan

Get in control of your Office 365 usage with PowerShell reporting!

Having deployed different Office 365 workloads often makes you want to get some statistics on how the services are used.
You can find quite a few reports for most of the services in the reporting part of the admin UI. 2015-04-18_20-57-28
The most common ones used are the inactive users and mailboxes reports, but there are also reports on how users are utilizing Lync Online, OneDrive for Business etc.

What not so many people know about is that all these reports and some more are available through Exchange Online PowerShell as well.
2015-04-18_21-25-05
As seen above, we have 61 cmdlets related to reporting in EXO PowerShell, some of them quite interesting. For example, Get-LicenseVsUsageSummaryReport, that will give you a brief overview of how many active users you have compared to the amount of assigned licenses. Detailed information about the cmdlets can be found here.

2015-04-26_16-21-31
Active users per workload in comparison to the amount of licenses assigned to the tenant.

Except the report above, two reports that many of my customers schedule and send out as an email to to admins, are Get-StaleMailboxReport and Get-StaleMailboxDetailReport. Those reports can in many cases help us avoid having to use Get-MailboxStatistics that has been the only option earlier.

Happy reporting!

/Johan

Get rid of your Office 365 Scheduled tasks with Azure Automation!

Implementing Office 365 in a production environment you most often end up with quite a few scheduled scripts for licensing, shared mailbox maintenance and other similiar tasks. When moving more and more services to the cloud, moving from infrastructure services to platform services is the way of nature.

One service that can help you to get more efficient when it comes to scheduling scripts is Azure Automation. Instead of having a server where you schedule your scripts, you simply schedule them within the automation service that takes care of the rest. As of now, Azure Automation does not support use of the Azure Active Directory Powershell module, which means we cannot use the service for our licensing scripts. Make sure to vote for the suggestion to fix that here.

Exchange Online, Lync Online and SharePoint Online do however work well, so that’s what my example is going to be about. To make it easy for me I’m using a script from one of my older posts about Dynamically adding mailbox permissions through groups, with some adjustments to fit Azure Automation.

1. First of all, if you don’t already have one, you need an Azure Automation account. I’m choosing to create mine in the West Europe region. By default, it will use a free automation plan that gives you 500 minutes of job runtime per month.
2015-04-05_16-56-21
2. Now create an asset/setting that will store your Exchange Online admin credentials in a secure way. We will call the asset ‘EXOCreds’ so we easliy can pick them up later in the script.2015-04-05_17-03-15
2015-04-05_17-04-13
2015-04-05_17-05-11
3. Create a runbook in the automation account you created earlier, in my case I called it ‘Sync-EXOSharedMailboxPermissions’.
2015-04-05_17-15-35
4. Now it’s time to author the runbook, in my example I’ve just changed some minor things with parameters and credentials. If you’re a PowerShell WF Pro, there might be a lot of things you can do to improve the script.
2015-04-05_19-11-27
Below you’ll find the code I’ve used:

Sync-EXOSharedMailboxPermissions

workflow Sync-EXOSharedMailboxPermissions {
<#
    .SYNOPSIS
    The script will automatically assign mailbox and recipient permissions on shared mailboxes based on groups.
    Modified 2015-04-05 to support Azure automation and PowerShell workflows
    .NOTES
    File Name: SharedMailboxViaGroups.ps1
    Author   : Johan Dahlbom, johan[at]dahlbom.eu
    Blog     : 365lab.net
    The script are provided “AS IS” with no guarantees, no warranties, and they confer no rights.
    Requires PowerShell Version 3.0!
#>
    #Credentials to connect to Exchange Online
    $Credentials = Get-AutomationPSCredential -Name 'EXOCreds'
    #Prefix to search for
    $Prefix = 'SM-'
    function Connect-ExchangeOnline {
    param (
        $Creds
    )
        #Clean up existing PowerShell Sessions
        Get-PSSession | Remove-PSSession
        #Connect to Exchange Online
        $Session = New-PSSession –ConfigurationName Microsoft.Exchange -ConnectionUri https://outlook.office365.com/powershell-liveid/ -Credential $Creds -Authentication Basic -AllowRedirection
        $Commands = @("Add-MailboxPermission","Add-RecipientPermission","Remove-RecipientPermission","Remove-MailboxPermission","Get-MailboxPermission","Get-User","Get-DistributionGroupMember","Get-DistributionGroup","Get-Mailbox")
        Import-PSSession -Session $Session -Prefix "Cloud" -DisableNameChecking:$true -AllowClobber:$true -CommandName $Commands | Out-Null
    }
    Connect-ExchangeOnline -Creds $Credentials
    inlineScript {
        function Add-JDMailboxPermission {
            param(
                [string]$Identity,
                [string]$SharedMailboxName
            )
            try {
                Add-CloudMailboxPermission -Identity $SharedMailboxName -User $Identity -AccessRights FullAccess -ErrorAction stop | Out-Null
                Add-CloudRecipientPermission -Identity $SharedMailboxName -Trustee $Identity -AccessRights SendAs -Confirm:$False -ErrorAction stop | Out-Null
                Write-Output "INFO: Successfully added $Identity to $SharedMailboxName"
            } catch {
                Write-Warning "Cannot add $Identity to $SharedMailboxName`r`n$_"
            }
        }
        function Remove-JDMailboxPermission {
            param(
                [string]$Identity,
                [string]$SharedMailboxName
            )
            try {
                Remove-CloudMailboxPermission -Identity $SharedMailboxName -User $Identity -AccessRights FullAccess -Confirm:$False -ErrorAction stop -WarningAction ignore | Out-Null
                Remove-CloudRecipientPermission -Identity $SharedMailboxName -Trustee $Identity -AccessRights SendAs -Confirm:$False -ErrorAction stop -WarningAction ignore  | Out-Null
                Write-Output "INFO: Successfully removed $Identity from $SharedMailboxName"
            } catch {
                Write-Warning "Cannot remove $Identity from $SharedMailboxName`r`n$_"
            }
        }
        function Sync-EXOResourceGroup {
            [CmdletBinding(SupportsShouldProcess=$true)]
            param(
                [string]$Prefix = 'SM-'
            )
            #Get All groups to process mailboxes for
            $MasterGroups = Get-CloudDistributionGroup -ResultSize Unlimited -Identity "$Prefix*"
            foreach ($Group in $MasterGroups) {
                #Remove prefix to get the mailbox name
                $MbxName = $Group.Name.Replace("$Prefix",'')
                $SharedMailboxName =  (Get-CloudMailbox -Identity $MbxName -ErrorAction ignore -WarningAction ignore).WindowsLiveID
                if ($SharedMailboxName) {
                    Write-Verbose -Message "Processing group $($Group.Name) and mailbox $SharedMailboxName"
                    #Get all users with explicit permissions on the mailbox
                    $SharedMailboxDelegates = Get-CloudMailboxPermission -Identity $SharedMailboxName -ErrorAction Stop -ResultSize Unlimited | Where-Object {$_.IsInherited -eq $false -and $_.User -ne "NT AUTHORITY\SELF" -and $_.User -notmatch 'S-\d-\d-\d+-\d+-\d+-\d+-\w+' -and $_.User -notlike "$Prefix*"} |  Select-Object @{Name="User";Expression={(Get-CloudUser -identity $_.User).WindowsLiveID }}
                    #Get all group members
                    $SharedMailboxMembers = Get-CloudDistributionGroupMember -Identity $Group.Identity -ResultSize Unlimited
                    #Remove users if group is empty
                    if (-not($SharedMailboxMembers) -and $SharedMailboxDelegates) {
                        Write-Warning "The group $Group is empty, will remove explicit permissions from $SharedMailboxName"
                        foreach ($user in $SharedMailboxDelegates.User) {
                            Remove-JDMailboxPermission -Identity $user -SharedMailboxName $SharedMailboxName
                        }
                        #Add users if no permissions are present
                    } elseif (-not($SharedMailboxDelegates)) {
                        foreach ($user in $SharedMailboxMembers.WindowsLiveID) {
                            Add-JDMailboxPermission -Identity $user -SharedMailboxName $SharedMailboxName
                        }
                        #Process removals and adds
                    } else {
                        #Compare the group with the users that have actual access
                        $Users = Compare-Object -ReferenceObject $SharedMailboxDelegates.User -DifferenceObject $SharedMailboxMembers.WindowsLiveID 

                        #Add users that are members of the group but do not have access to the shared mailbox
                        foreach ($user in ($users | Where-Object {$_.SideIndicator -eq "=>"})) {
                            Add-JDMailboxPermission -Identity $user.InputObject -SharedMailboxName $SharedMailboxName
                        }
                        #Remove users that have access to the shared mailbox but are not members of the group
                        foreach ($user in ($users | Where-Object {$_.SideIndicator -eq "<="})) {
                            Remove-JDMailboxPermission -Identity $user.InputObject -SharedMailboxName $SharedMailboxName
                        }
                    }
                } else {
                    Write-Warning "Could not find the mailbox $MbxName"
                }
            }
        }
        #Start Processing groups and mailboxes
        Sync-EXOResourceGroup -Prefix $Using:Prefix -Verbose
    }
}

5. Test the runbook by clicking the test button. You will be asked to save the runbook before you test. Hopefully your output will be as nice looking as mine. 🙂
2015-04-05_20-12-47
6. If all went good, you’re now ready to publish and schedule the runbook. I’m choosing to schedule mine to run every three hours. Depending on your script runtime, you might want to change this due to cost or other factors. (Remember your free 500 minutes!)
2015-04-05_20-12-472015-04-06_13-40-14
2015-04-06_13-45-53
2015-04-06_13-46-56
2015-04-06_13-47-44
2015-04-06_13-48-13
2015-04-06_13-48-39

My runbook is now published and scheduled, now it’s just to wait for the magic to happen. Hope this gives you an idea what Azure Automation can do for you!

Additional resources to get started can be found below:
Get Started with Azure Automation
Automating the Cloud with Azure Automation (MVA)

Until next time! 🙂

/Johan

Export legacyExchangeDN from Global Address List in Outlook

In some migration scenarios it is necessary to export all legacyExchangeDN addresses from your Exchange environment. This is for example the case if you are doing a mail migration with .pst files. If you are migrating from a Hosted Exchange environment this information can sometimes be hard to get. However, there are solutions.

It is quite easy to export all legacyExchangeDN addresses from the Global Address List using Access and Outlook on a client that is connected to the Exchange environment.

Start by opening Access and create a new empty database.
On the External Data tab select Outlook Folder

legacydn-access_1

In the Import Guide select to import data into a new table, and click OK

legacydn-access_2

Select your Outlook profile

legacydn-access_3

Now select the address list to export from, in this case I select the Global Address List to get all addresses.

legacydn-access_4

In the next step it is possible to adjust the data, just click Finish.

legacydn-access_5

Now we’re done! A new table has been added to the database, and in the E-mail address column you will see the legacyExchangeDN for all users

legacydn-access_6

Now it is easy to add these addresses as a x500 alias addresses in your migrated mailboxes.

/ Andreas

Back to Basics: Creating new users in an Exchange Hybrid Deployment

Some of the most common questions I get from my clients are related to how to create new users in an Exchange Hybrid environment. I have seen users set up in an incorrect way in most Hybrid Environments. Some common problems resulting from this include missing Autodiscover functionality or bouncing emails from external users. The reason for these kind of problems is that your on-premises Exchange server doesn’t recognize the Exchange Online mailbox.

The best way of creating new users during the Hybrid is to use the New Remote Mailbox guide in Exchange Management Console (this can of course also be done in an on-premises Exchange 2013 server, the principle is the same). This will create both the AD account, and populate all necessary attributes for Office 365. It will also enable you to continue using Exchange Management Console for managing all Exchange attributes.

The key is to use the Mail Contact pane in Exchange Management Console. Start by right-clicking and select the New Remote Mailbox guide.

remotemailbox1

Select the type of mailbox you are creating, normally a User Mailbox.

remotemailbox2

Fill in all the information that you would normally fill in when creating a new AD user.

remotemailbox3

If you are not using Archive Mailboxes just click Next.

remotemailbox4

Review the summary and click New.

remotemailbox5

All done! Close the guide by clicking Finish.

remotemailbox6

If we right-click on our new user and check the Email Addresses tab, we will see that it is already populated with all addresses according to our E-mail Address Policy. We even have a Routing E-mail Address set, pointing to our Office 365 tenant.

remotemailbox7

This means that we are all set, our on-premises Exchange server is now aware of the Mailbox in Office 365! The final step is to wait for DirSync (or force a sync) then assign a license to the user.

/ Andreas

Exchange Online: Adding a secondary e-mail domain to all users

I thought that I would share with you a simple script that will add an email domain to your users. This script is handy if you for example would like to add contoso.info to your already existing contoso.com environment. If you are using the email address aaron@contoso.com you want the script to automatically add aaron@contoso.info.

Please note that the domain name that you are adding first has to be added and verified in your Office 365 tenant.

DirSync version (modifying Active Directory using ADSI):

$activeDomain = New-Object DirectoryServices.DirectoryEntry
$domain = $activeDomain.distinguishedName
$searcher = [System.DirectoryServices.DirectorySearcher]"[adsi]LDAP://$domain"
$searcher.filter = '(proxyaddresses=*@contoso.com*)'
$result = $searcher.findall()
$users = $result.Path

$users | ForEach-Object {
    $user = [adsi]"$_"
    $proxyaddresses = $user.proxyaddresses.Value | Where-Object { $_ -like 'smtp:*@contoso.com' }
    foreach ($proxyaddress in $proxyaddresses) {
        $newaddress = ($proxyaddress.split ':')[1] -replace '@contoso.com', '@contoso.info'
        $user.proxyaddresses.add("smtp:$newaddress")
    }
    $user.setinfo()
}

Cloud version:

$cred = Get-Credential -Message 'Please enter your Office 365 admin crendentials'
$O365 = New-PSSession -ConfigurationName Microsoft.Exchange -ConnectionUri 'https://outlook.office365.com/powershell-liveid/' -Credential $cred -Authentication Basic -AllowRedirection 
$importcmd = Import-PSSession $O365 -CommandName @('Get-Mailbox','Set-Mailbox') -AllowClobber

Get-Mailbox -ResultSize Unlimited -Filter { EmailAddresses -like '*@contoso.com' } | Select-Object Identity,EmailAddresses | ForEach-Object {
    $proxyaddresses = $_.EmailAddresses | Where-Object { $_ -like 'smtp:*@contoso.com' }
    foreach ($proxyaddress in $proxyaddresses) {
        $newaddress = ($proxyaddress -split ':')[1] -replace '@contoso.com','@contoso.info'
        Set-Mailbox -Identity $_.Identity -EmailAddresses @{Add="smtp:$newaddress"}    
    }
}

/ Andreas

Exchange Online: “This user’s on-premises mailbox hasn’t been migrated to Exchange Online”

Disclaimer
This blog post is intended for new deployment scenarios, where no mailboxes exist in Office 365. It is written for an old version of DirSync. Since then newer versions has been released with built in functionality to filter what attributes to sync. Always make sure that you have a valid backup before making any changes to existing environments.

Normally you would use the build-in tools to migrate a mailbox from your on-prem environment to Exchange Online. In some scenarios the built-in tools cannot be used, and then you have to be able to create the cloud mailbox while the on-prem mailbox is still available. The problem is that when you assign a license to the cloud user you get a warning that “The user’s on-premises mailbox hasn’t been migrated” and the new mailbox will not be created.

warning_onprem_mailbox

If you are using DirSync and your on-prem Exchange environment is not published to the internet according to best practice you may consider using third party migration tools instead of the built in tools to move your mailboxes to Office 365. This is one example of a scenario where you would encounter this warning message.

To solve this problem we have to exclude attributes from being synced in DirSync. The solution is very similar to a problem with Lync that we described a while ago, and I will use the same solution here. The idea is to exclude the msExchMailboxGuid attribute from DirSync.

Start the Synchronization Service Manager (miisclient.exe) on the DirSync server. In the “Management agents” pane, select properties on the Active Directory connector.

2014-04-06 22-41-04

In the management agent designer, select “Configure attribute flow” and remove the msExchMailboxGuid for both the User and inetOrgPerson Data Source from the attribute flow as below.

2014-04-06 22-44-06

msExchExchangeGuid

Finally we have to delete the Active Directory Connector Space.

2014-04-06 21-42-25

2014-04-06 22-46-58

2014-04-06 22-47-25

2014-04-06 22-47-48

After the connector space has been deleted, run a Full DirSync again, wait a few minutes and now you will be able to create mailboxes by assigning an Exchange Online license.

Happy provisioning!

/ Andreas

Exchange Online: Dynamically add mailbox permissions through groups

Managing shared and resource mailbox permissions can be more or less a pain depending on how you do it. Adding users directly as delegates to the shared mailboxes gives you a bit more administrative overhead, but makes it possible to utilize the AutoMapping feature that automatically adds the additional mailboxes to the end users Outlook client. If you instead add mail-enabled security groups to the delegate list, you get less administrative overhead, but not the AutoMapping feature.

Even though this is a really “old” problem, I get questions around it almost every week. Therefore I wanted to share a solution with you that gives you an example on how to solve it still using groups. A script that will use Mail-Enabled Security Groups/Distribution Groups to dynamically populate the delegate list of a shared mailbox.

GETTING STARTED
In order to get started, you need to create one “Shadow Group” per mailbox who’s delegation properties you want to manage automatically. To make it as easy as possible, I’m using a prefix to identify the groups with the mailboxes, like Prefix-MailboxName. In my example below, the prefix is SM-. See the screenshot below for the correlation between them.
2014-11-16 11-39-45
It could of course be possible to use another attribute on the groups to store the mailbox name, but I thought this was an easier approach.

RUNNING THE SCRIPT
After editing the credentials in the Connect-ExchangeOnline function, you simply run the script as below:

.\SharedMailboxViaGroups.ps1 -Prefix 'SM-'

2014-11-16 12-10-56
As seen in the screenshot above it will process adds and removals of permissions for all mailboxes/groups in scope. Please note that both FullAccess and SendAs-permissions are added for each delegate.
SharedMailboxViaGroups.ps1

<#
.SYNOPSIS
    The script will automatically assign mailbox and recipient permissions on shared mailboxes based on groups.
.EXAMPLE
   .\SharedMailboxViaGroups.ps1 -Prefix 'SM-'
.PARAMETER Prefix
    Prefix of the groups that will manage permissions on the shared mailboxes.
.NOTES
    File Name: SharedMailboxViaGroups.ps1
    Author   : Johan Dahlbom, johan[at]dahlbom.eu
    Blog     : 365lab.net
    The script are provided “AS IS” with no guarantees, no warranties, and they confer no rights.
    Requires PowerShell Version 3.0!
#>
param (
  [string]$Prefix = 'SM-'
)

function Connect-ExchangeOnline {
  param(
    [string]$Username = 'admin@tenant.onmicrosoft.com',
    [string]$Password = 'password'
  )
  #Clean up existing PowerShell Sessions
  Get-PSSession | Remove-PSSession
  $CloudCred = New-Object –TypeName System.Management.Automation.PSCredential –ArgumentList $Username, (ConvertTo-SecureString $Password -AsPlainText -Force)
 
  #Connect to Exchange Online
  $Session = New-PSSession –ConfigurationName Microsoft.Exchange -ConnectionUri https://outlook.office365.com/powershell-liveid/ -Credential $CloudCred -Authentication Basic -AllowRedirection
  $Commands = @("Add-MailboxPermission","Add-RecipientPermission","Remove-RecipientPermission","Remove-MailboxPermission","Get-MailboxPermission","Get-User","Get-DistributionGroupMember","Get-DistributionGroup","Get-Mailbox")
  Import-PSSession -Session $Session -Prefix "Cloud" -DisableNameChecking:$true -AllowClobber:$true -CommandName $Commands | Out-Null
}
function Add-JDMailboxPermission {
  param(
    [string]$Identity,
    [string]$SharedMailboxName
  )
  try {
    Add-CloudMailboxPermission -Identity $SharedMailboxName -User $Identity -AccessRights FullAccess -ErrorAction stop | Out-Null
    Add-CloudRecipientPermission -Identity $SharedMailboxName -Trustee $Identity -AccessRights SendAs -Confirm:$False -ErrorAction stop | Out-Null
    Write-Output "INFO: Successfully added $Identity to $SharedMailboxName"
  } catch {
    Write-Warning "Cannot add $Identity to $SharedMailboxName`r`n$_"
  }
}
function Remove-JDMailboxPermission {
  param(
    [string]$Identity,
    [string]$SharedMailboxName
  )
  try {
    Remove-CloudMailboxPermission -Identity $SharedMailboxName -User $Identity -AccessRights FullAccess -Confirm:$False -ErrorAction stop -WarningAction ignore | Out-Null
    Remove-CloudRecipientPermission -Identity $SharedMailboxName -Trustee $Identity -AccessRights SendAs -Confirm:$False -ErrorAction stop -WarningAction ignore  | Out-Null
    Write-Output "INFO: Successfully removed $Identity from $SharedMailboxName"
  } catch {
    Write-Warning "Cannot remove $Identity from $SharedMailboxName`r`n$_"
  }
}
function Sync-EXOResourceGroup {
  [CmdletBinding(SupportsShouldProcess=$true)]
  param(
    [string]$Prefix = 'SM-'
  )
  #Get All groups to process mailboxes for
  $MasterGroups = Get-CloudDistributionGroup -ResultSize Unlimited -Identity "$Prefix*"
  foreach ($Group in $MasterGroups) {
    #Remove prefix to get the mailbox name
    $MbxName = $Group.Name.Replace("$Prefix",'')
    $SharedMailboxName =  (Get-CloudMailbox -Identity $MbxName -ErrorAction ignore -WarningAction ignore).WindowsLiveID
    if ($SharedMailboxName) { 
      Write-Verbose -Message "Processing group $($Group.Name) and mailbox $SharedMailboxName"
      #Get all users with explicit permissions on the mailbox
      $SharedMailboxDelegates = Get-CloudMailboxPermission -Identity $SharedMailboxName -ErrorAction Stop -ResultSize Unlimited | Where-Object {$_.IsInherited -eq $false -and $_.User -ne "NT AUTHORITY\SELF" -and $_.User -notmatch 'S-\d-\d-\d+-\d+-\d+-\d+-\w+' -and $_.User -notlike "$Prefix*"} |  Select-Object @{Name="User";Expression={(Get-CloudUser -identity $_.User).WindowsLiveID }}
      #Get all group members
      $SharedMailboxMembers = Get-CloudDistributionGroupMember -Identity $Group.Identity -ResultSize Unlimited
      #Remove users if group is empty
      if (-not($SharedMailboxMembers) -and $SharedMailboxDelegates) {
        Write-Warning "The group $Group is empty, will remove explicit permissions from $SharedMailboxName"
        foreach ($user in $SharedMailboxDelegates.User) {
          Remove-JDMailboxPermission -Identity $user -SharedMailboxName $SharedMailboxName
        }
        #Add users if no permissions are present
      } elseif (-not($SharedMailboxDelegates)) {
        foreach ($user in $SharedMailboxMembers.WindowsLiveID) {
          Add-JDMailboxPermission -Identity $user -SharedMailboxName $SharedMailboxName
        }
        #Process removals and adds
      } else {
        #Compare the group with the users that have actual access
        $Users = Compare-Object -ReferenceObject $SharedMailboxDelegates.User -DifferenceObject $SharedMailboxMembers.WindowsLiveID 
         
        #Add users that are members of the group but do not have access to the shared mailbox
        foreach ($user in ($users | Where-Object {$_.SideIndicator -eq "=>"})) {
          Add-JDMailboxPermission -Identity $user.InputObject -SharedMailboxName $SharedMailboxName
        }
        #Remove users that have access to the shared mailbox but are not members of the group
        foreach ($user in ($users | Where-Object {$_.SideIndicator -eq "<="})) {
          Remove-JDMailboxPermission -Identity $user.InputObject -SharedMailboxName $SharedMailboxName
        }
      }
    } else {
      Write-Warning "Could not find the mailbox $MbxName"
    }
  }
}
#Connect to Exchange Online
Connect-ExchangeOnline
#Start Processing groups and mailboxes
Sync-EXOResourceGroup -Prefix $Prefix -Verbose

SUMMARY
A pretty simple solution on a very common problem in most environments where you have shared mailboxes. Let me know if you have feature requests or if something is not working as intended!

Enjoy!

/Johan