Monthly Archives: December 2014

Office 365: Assign individual parts of licenses based on groups using PowerShell

Important note: The end of an era with licensing scripts is near… and the beginning of a new one with Azure AD Group Based Licensing is here. Group Based Licensing is now in preview and currently requires a paid Azure AD Subscription. Try it out and give Microsoft your feedback on how they can make it even better! 

The story continues… After numerous requests regarding handling parts of licenses in my older licensing scripts , I’ve now created an example on how to do this using security groups.

Please note that this is of course not a complete solution, just an example on how to incorporate this in to one of the earlier solutions created.

SCENARIO
In this example, I will have three groups each assigning different parts of an E3 License. One assiging the Full E3, one assigning Exchange Online and one assigning Lync Online + Office 365 ProPlus.
In order to assign them with PowerShell, we need the ServicePlan name of each part we want to assign. Those can be found with the following command for an E3-license:

(Get-MsolAccountSku | Where-Object {$_.SkuPartNumber -eq "ENTERPRISEPACK"}).ServiceStatus

2014-12-16_20-32-02
As seen above the names are pretty easy to recognise, if you are unsure which one is which, you will find a good translation table here.

Disabling plans with PowerShell requires you to to select the ones that you want to disable rather than the ones you want to enable, just like in the portal. In my example I’m choosing the parts I want to assign per group, which means I’m disabling all other parts than just the ones you want.
See the example below how I’ve configured my $Licenses hashtable for my scenario:

$Licenses = @{
                 'E3-ExchangeOnline' = @{
                          LicenseSKU = 'tenant:ENTERPRISEPACK'
                          EnabledPlans = 'EXCHANGE_S_ENTERPRISE'
                          Group = 'E3-ExchangeOnline-Users'
                        }
                 'E3-LyncO365ProPlus' = @{
                          LicenseSKU = 'tenant:ENTERPRISEPACK'
                          EnabledPlans = 'MCOSTANDARD','OFFICESUBSCRIPTION'
                          Group = 'E3-LyncO365ProPlus-Users'
                        }
                 'E3' = @{
                          LicenseSKU = 'tenant:ENTERPRISEPACK'
                          Group = 'E3-Users'
                        }
            }

RUNNING THE SCRIPT
After editing the $Licenses hashtable, $UsageLocation and tenant credentials, you’re ready to run the script as in the screenshot below.
2014-12-16_21-52-24

2014-12-16_21-40-47
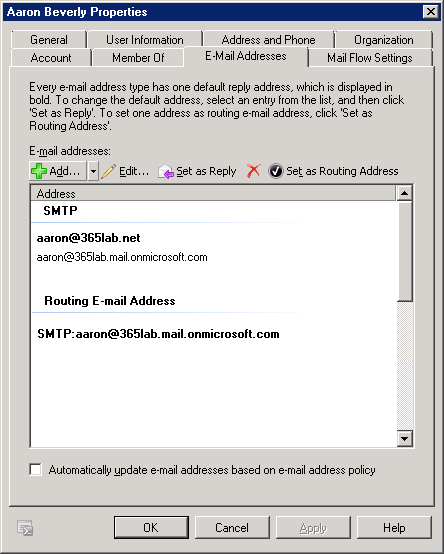
A user that have been assigned licenses with the E3-LyncO365ProPlus-Users group in the example

LicenseO365Users.ps1

<# .SYNOPSIS     Script that assigns Office 365 licenses based on Group membership in AAD. .NOTES     Author: Johan Dahlbom      Blog: 365lab.net      Email: johan[at]dahlbom.eu      The script are provided “AS IS” with no guarantees, no warranties, and they confer no rights.     Requires PowerShell Version 3.0! #>

#Import Required PowerShell Modules
Import-Module MSOnline
#Office 365 Admin Credentials
$CloudUsername = 'admin@tenant.onmicrosoft.com'
$CloudPassword = ConvertTo-SecureString 'password' -AsPlainText -Force
$CloudCred = New-Object System.Management.Automation.PSCredential $CloudUsername, $CloudPassword
#Connect to Office 365
Connect-MsolService -Credential $CloudCred
$UsageLocation = 'SE'

$Licenses = @{
                 'E3-ExchangeOnline' = @{
                          LicenseSKU = 'tenant:ENTERPRISEPACK'
                          EnabledPlans = 'EXCHANGE_S_ENTERPRISE'
                          Group = 'E3-ExchangeOnline-Users'
                        }
                 'E3-LyncO365ProPlus' = @{
                          LicenseSKU = 'tenant:ENTERPRISEPACK'
                          EnabledPlans = 'MCOSTANDARD','OFFICESUBSCRIPTION'
                          Group = 'E3-LyncO365ProPlus-Users'
                        }
                 'E3' = @{
                          LicenseSKU = 'tenant:ENTERPRISEPACK'
                          Group = 'E3-Users'
                        }
            }

foreach ($license in $Licenses.Keys) {
    $GroupName = $Licenses[$license].Group
    $GroupID = (Get-MsolGroup -All | Where-Object {$_.DisplayName -eq $GroupName}).ObjectId
    $AccountSKU = Get-MsolAccountSku | Where-Object {$_.AccountSKUID -eq $Licenses[$license].LicenseSKU}

    Write-Output "Checking for unlicensed $license users in group $GroupName"

    #region Disable non specific plans
    $EnabledPlans = $Licenses[$license].EnabledPlans
    if ($EnabledPlans) {
        $LicenseOptionHt = @{
            AccountSkuId = $AccountSKU.AccountSkuId
            DisabledPlans =  (Compare-Object -ReferenceObject $AccountSKU.ServiceStatus.ServicePlan.ServiceName -DifferenceObject $EnabledPlans).InputObject
        }
        $LicenseOptions = New-MsolLicenseOptions @LicenseOptionHt
    }
    #endregion Disable non specific plans

    #Get all unlicensed group members - needs to be changed if a user should be able to have more than one license
    $GroupMembers = (Get-MsolGroupMember -GroupObjectId $GroupID -All | Where-Object {$_.IsLicensed -eq $false}).EmailAddress
    #Warn if not enough licenses are available
    if ($AccountSKU.ActiveUnits - $AccountSKU.consumedunits -lt $GroupMembers.Count) {
        Write-Warning 'Not enough licenses for all users, please remove user licenses or buy more licenses'
    }

    foreach ($User in $GroupMembers) {
        try {
            #Set UsageLocation
            Set-MsolUser -UserPrincipalName $User -UsageLocation $UsageLocation -ErrorAction Stop -WarningAction Stop
            $LicenseConfig = @{
                UserPrincipalName = $User
                AddLicenses = $AccountSKU.AccountSkuId
            }
            if ($EnabledPlans) {
                $LicenseConfig['LicenseOptions'] = $LicenseOptions
            }
            Set-MsolUserLicense @LicenseConfig -ErrorAction Stop -WarningAction Stop
            Write-Output "SUCCESS: licensed $User with $license"
        } catch {
            Write-Warning "Error when licensing $User`r`n$_"
        }
    }
 }

Let me know if you have any questions or feedback!

/Johan

Back to Basics: Creating new users in an Exchange Hybrid Deployment

Some of the most common questions I get from my clients are related to how to create new users in an Exchange Hybrid environment. I have seen users set up in an incorrect way in most Hybrid Environments. Some common problems resulting from this include missing Autodiscover functionality or bouncing emails from external users. The reason for these kind of problems is that your on-premises Exchange server doesn’t recognize the Exchange Online mailbox.

The best way of creating new users during the Hybrid is to use the New Remote Mailbox guide in Exchange Management Console (this can of course also be done in an on-premises Exchange 2013 server, the principle is the same). This will create both the AD account, and populate all necessary attributes for Office 365. It will also enable you to continue using Exchange Management Console for managing all Exchange attributes.

The key is to use the Mail Contact pane in Exchange Management Console. Start by right-clicking and select the New Remote Mailbox guide.

remotemailbox1

Select the type of mailbox you are creating, normally a User Mailbox.

remotemailbox2

Fill in all the information that you would normally fill in when creating a new AD user.

remotemailbox3

If you are not using Archive Mailboxes just click Next.

remotemailbox4

Review the summary and click New.

remotemailbox5

All done! Close the guide by clicking Finish.

remotemailbox6

If we right-click on our new user and check the Email Addresses tab, we will see that it is already populated with all addresses according to our E-mail Address Policy. We even have a Routing E-mail Address set, pointing to our Office 365 tenant.

remotemailbox7

This means that we are all set, our on-premises Exchange server is now aware of the Mailbox in Office 365! The final step is to wait for DirSync (or force a sync) then assign a license to the user.

/ Andreas

Exchange Online: Adding a secondary e-mail domain to all users

I thought that I would share with you a simple script that will add an email domain to your users. This script is handy if you for example would like to add contoso.info to your already existing contoso.com environment. If you are using the email address aaron@contoso.com you want the script to automatically add aaron@contoso.info.

Please note that the domain name that you are adding first has to be added and verified in your Office 365 tenant.

DirSync version (modifying Active Directory using ADSI):

$activeDomain = New-Object DirectoryServices.DirectoryEntry
$domain = $activeDomain.distinguishedName
$searcher = [System.DirectoryServices.DirectorySearcher]"[adsi]LDAP://$domain"
$searcher.filter = '(proxyaddresses=*@contoso.com*)'
$result = $searcher.findall()
$users = $result.Path

$users | ForEach-Object {
    $user = [adsi]"$_"
    $proxyaddresses = $user.proxyaddresses.Value | Where-Object { $_ -like 'smtp:*@contoso.com' }
    foreach ($proxyaddress in $proxyaddresses) {
        $newaddress = ($proxyaddress.split ':')[1] -replace '@contoso.com', '@contoso.info'
        $user.proxyaddresses.add("smtp:$newaddress")
    }
    $user.setinfo()
}

Cloud version:

$cred = Get-Credential -Message 'Please enter your Office 365 admin crendentials'
$O365 = New-PSSession -ConfigurationName Microsoft.Exchange -ConnectionUri 'https://outlook.office365.com/powershell-liveid/' -Credential $cred -Authentication Basic -AllowRedirection 
$importcmd = Import-PSSession $O365 -CommandName @('Get-Mailbox','Set-Mailbox') -AllowClobber

Get-Mailbox -ResultSize Unlimited -Filter { EmailAddresses -like '*@contoso.com' } | Select-Object Identity,EmailAddresses | ForEach-Object {
    $proxyaddresses = $_.EmailAddresses | Where-Object { $_ -like 'smtp:*@contoso.com' }
    foreach ($proxyaddress in $proxyaddresses) {
        $newaddress = ($proxyaddress -split ':')[1] -replace '@contoso.com','@contoso.info'
        Set-Mailbox -Identity $_.Identity -EmailAddresses @{Add="smtp:$newaddress"}    
    }
}

/ Andreas

Updating Windows Management Framework breaking DirSync: “Invalid namespace”

Disclaimer
This blog post was written for an older version of the Azure AD Connect Synchronization Service, and has not been tested in the latest version. Always make sure that you have a valid backup before making any changes to your system.

After updating Windows Management Framework you might get an error message in the Event Viewer, “Invalid namespace”. The symptoms includes stopped scheduled synchronizations, and event 0 logged in the Event Viewer when trying to run the synchronization manually.

dirsync-event-0

The problem has to do with the WMI Performance Counters being updated when updating Windows Management Framework.

SOLUTION
The solution is to rebuild and recompile the MOF files used for the Performance Counters.

First, open a command prompt and change directory to %Program Files%\Windows Azure Active Directory Sync\SYNCBUS\Synchronization Service\Bin

 cd "%Program Files%\Windows Azure Active Directory Sync\SYNCBUS\Synchronization Service\Bin"

Open mmswmi.mof in Notepad.exe, and add the following text at the top in the file

#PRAGMA AUTORECOVER

Load the modified MOF file into the WMI repository by running the following command:

mofcomp mmswmi.mof

mofcomp

Register the Microsoft Identity Integration Server dll

regsvr32 /s mmswmi.dll

Restart Windows Management Instrumentation

net stop winmgmt
net start winmgmt

Re-run the DirSync Configuration Wizard, by running %Program Files%\Windows Azure Active Directory Sync\ConfigWizard.exe

Check the Event Viewer again and make sure that the Syncroniation was successful!

/ Andreas