Tag Archives: Office 365

Adding .guru domains to Office 365 (Always use PowerShell!)

A couple of weeks ago, general availability for the .guru tld was announced. The new tld means that geeks like me can show off their ‘expertise’ by having a cool domain!

Now to the problem. When trying to add the new cool domain to my Office 365 tenant, I tried to do it in the Admin Center, as I usually do when adding single domain.
Unfortunately they have not yet added support for the new cool .guru tld in Admin Center.
o365.guru-admincenter

Fortunately, when adding the domain with the New-MsolDomain cmdlet, it went through with no problems.
2014-02-27 21-13-59

So, a friendly reminder to all of you geeks out there with .guru domains –
Whenever possible, use PowerShell! 🙂

/Johan

Change from ADFS to Password Sync in Office 365

Disclaimer
This blog post is reflecting how the process was made in early 2014, and has since then been replaced with built-in tools in ADConnect.

Some time ago Johan wrote a post about how to convert a federated domain to a standard domain in Office 365. Much has happened since, and one feature that has been added is to synchronize the passwords between on-premises Active Directory and Office 365.

An important reason to implement ADFS and federation is to keep all user passwords the same, to reduce support and Helpdesk calls. The drawback is that a high availability server (or even better, an ADFS farm distributed over several locations) is needed on-premises. If your internet connection is dropping, no-one will able to access Exchange or SharePoint even though it is located “in the Cloud”.

Now when Password Sync is available, some organizations choose to retire their ADFS servers to implement Password Sync instead. It is now possible to have the same password in all systems without those high availability servers.

The process to move to a non-federated state with Password Sync is similar to how Johan described the process, but to minimize the service interruption for your end-users there are a few things to think of. All steps below are performed on the server hosting the Azure Active Directory Sync tool.

  1. First of all you need to upgrade to the latest version of Azure Active Directory Sync tool. The upgrade process is simple; just uninstall the old version and install the new one. The installation may take a few minutes. Make sure that you check the Password Sync option during installation. End by running the Configuration Wizard.
  2. Check the Synchronization Service Manager (miisclient.exe) to make sure that the synchronization was successful. You may have to log off and log in again to be able to access Synchronization Service Manager.
  3. Time for PowerShell 🙂
    #Connect to MSOnline
    Import-Module MSOnline
    
    #Enter credentials
    Connect-MsolService
    
    #Set context and credentials
    Set-MsolADFSContext -Computer srv01
    
    #From here on the Office 365 services will be unavailable 
    #for the end-users until all passwords are in in sync.
    
    #This is where we change our federated domain to a standard domain.
    #This command generates a text file with new random passwords for all users.
    #In the next step we will replace these passwords with passwords synced from AD.
    Convert-MSOLDomainToStandard -DomainName "mydomain.com" -SkipUserConversion $false -PasswordFile C:\userpwd.txt
    
    #Make sure that all user passwords has ForceChangePassword flag set to False
    Get-MsolUser -Synchronized | Set-MsolUserPassword -ForceChangePassword $false
    
    
  4. Now all users are converted. A file with new temporary passwords for each user is saved to the path you specified, but we will not use it. Instead, we now have to initialize a full password sync.

To see the status of the password sync you should check the Application Log in Event Viewer for event id 657. When all passwords are synchronised the users will be able to access their services again. This will take a few minutes depending on the number of users in your environment.

/ Andreas

Quick Tip: Using a custom domain to connect to Office 365 Webmail

Office365-sign-inAfter migrating to Office 365 it can be hard to communicate the new webmail addresses to all end-users. Especially when performing a cut-over migration all users suddenly need to be informed about the new address to use.

Office 365 uses many different host names, for example portal.microsoftonline.com and login.microsoftonline.com, both taking you to the portal page where users can access all services or download desktop software. But you still have to use the Outlook link in the portal page to access your mail. How can we make this simpler for the end-users?

If your tenant is set up with ADFS you want to use the address outlook.com/yourdomain.com. This automatically logs you on directly to the webmail using your domain credentials, allowing single sign-on to Office 365. Unfortunately with a custom domain this can only be achieved using a local web server that handles the redirect to the correct web page.

So, what to do then? I don’t want to set up a web server just to handle a redirect. Luckily there is an easy workaround to this: Use DNS to create a CNAME (for example mail.mydomain.com) that point to mail.office365.com. This presents a login screen for the users, and they will then be logged on directly to the webmail page.

The CNAME can be created using PowerShell cmdlets for DNS, which was introduced in Windows Server 2012:

Add-DnsServerResourceRecordCName -HostNameAlias mail.office365.com -Name mail -ZoneName mydomain.com

If you are using ADFS the users must check the “Keep me signed in” checkbox to handle single sign-on in the future.

/ Andreas

Mail flow rules for alias email addresses in Exchange Online

Stumbled upon an ‘issue/feature’ with mail flow rules (transport rules) that I’ve encountered before a couple of days ago and thought it was a good idea sharing.
It’s always good to get a reminder of things from time to time, even if it might be a bit obvious 🙂
The ‘issue’ do of course apply to Exchange On premise environments as well.

Case:
The user Kalle Kula have three email addresses as following:
SMTP:kalle.kula@corp.365lab.net (primary)
smtp:kalle.kula@spam.365lab.net
smtp:kalle.kula@365lab.onmicrosoft.com

If an email is sent to the address kalle.kula@spam.365lab.net (one of the alias email address for the user), we want to append a disclamer that states “This email was sent to the domain spam.365lab.net”

How to do it:
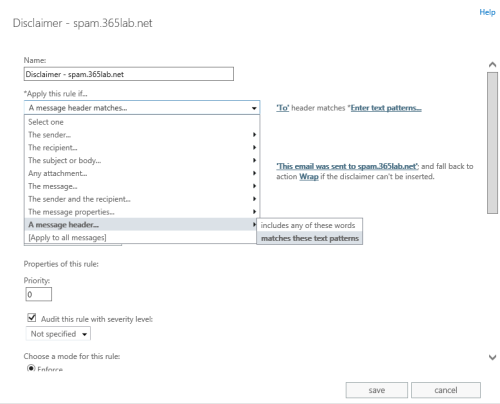
1. In Exchange Admin Center, under mail flow -> rules, create a new dislaimer rule.
2014-01-02 13-18-37
2. To be able to do more granular selection and actions, click “More Options” in the bottom left corner.

2014-01-02 13-22-46
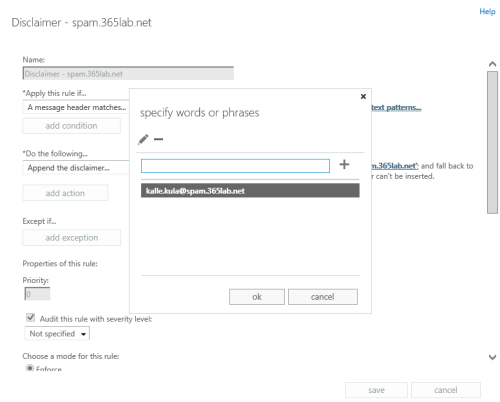
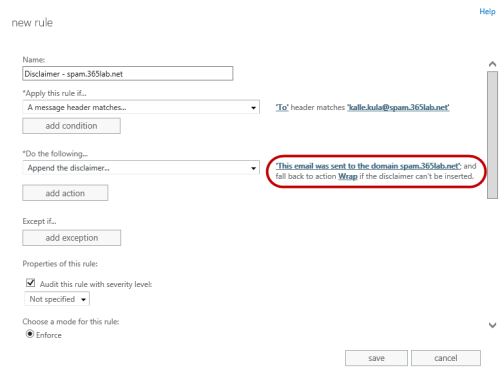
3. Then create your rule with the following options.

The logical thing here would have been to apply the rule if the recipient address matches my particular address, but that does only work for primary email addresses. So therefore we need to apply it on the header “To” and match the text pattern kalle.kula@spam.365lab.net (the alias address)

2014-01-02 13-36-072014-01-02 13-37-172014-01-02 13-39-00  

Add your disclaimer and set fall back action.
2014-01-02 13-42-27
The only thing you need to do now for the policy to be applied on future emails is to choose mode: Enforce, save it and you’re done!

If you want to check whether a rule has been used or not, you can use EAC as well.
2014-01-02 14-07-11

PowerShell version:
To do the same as above with PowerShell, you can use the following PowerShell lines:

 
#Connect to Exchange Online with PowerShell
$cred = Get-Credential
$O365 = New-PSSession -ConfigurationName Microsoft.Exchange -ConnectionUri https://ps.outlook.com/powershell -Credential $cred -Authentication Basic -AllowRedirection 
$importcmd = Import-PSSession $O365 
#Create the Mail Flow rule (transport rule)
New-TransportRule -Name "Disclaimer - spam.365lab.net" `
                   -HeaderMatchesPatterns {kalle.kula@spam.365lab.net} `
                   -HeaderMatchesMessageHeader To `
                   -ApplyHtmlDisclaimerText "This email was sent to the domain spam.365lab.net" `
                   -ApplyHtmlDisclaimerLocation Append `
                   -ApplyHtmlDisclaimerFallbackAction Wrap `
                   -Mode Enforce 

Further documentation on mail flow rules (transport rules) you find on http://technet.microsoft.com/en-us/library/dd351127(v=exchg.150).aspx.

/Johan

Office 365 PowerShell tip: Automatically assign licenses based on AD attribute

Important note: The end of an era with licensing scripts is near… and the beginning of a new one with Azure AD Group Based Licensing is here. Group Based Licensing is now in preview and currently requires a paid Azure AD Subscription. Try it out and give Microsoft your feedback on how they can make it even better! 

Using DirSync in combination with Office 365 / Windows Azure Active Directory is great.
It automates user creation and makes you able to master all user creation changes from on premises.
There is just one(or two) things you need to do manually, assign licenses…
This can be done both in the portal or with PowerShell.

Depending on how your license structure looks like and how large environment you have, you might want to automate this in a more convenient way. There is a Wiki article on TechNet with a few examples on how to automate it as well (both with Security Groups and AD attributes). http://social.technet.microsoft.com/wiki/contents/articles/15905.how-to-use-powershell-to-automatically-assign-licenses-to-your-office365-users.aspx

Until Microsoft has come up with an integrated solution for this in DirSync or something else, we have to stick with PowerShell…

The case:
In my case we want to assign Office 365 licenses based on a local AD attribute of your choice fully automated and minimal input.
We also want a bit of logging so we are able to find and fix errors as easy as possible.

In order to assign a license in Office 365, we need to assign two attributes on a user(of course the user must exist…):
UsageLocation and Licenses
Also, if a user has a valid license assigned, the boolean IsLicensed will be set to True.
2013-12-30 15-26-24

The ‘Licenses’ attribute contains “tenantname:LICENSESKU”, which in my case above is “mstlegacy:ENTERPRISEPACK” for an E3 license.
So, when assigning a license with PowerShell we need to know the SKUID of the particular license we are using.

We can also disable specific parts of a license, for example SharePoint when we assign the license. More details about ‘manual’ PowerShell assignment of licenses in Office 365 you’ll find here.

Solution

My script activates Office 365 users based on the AD attribute of your choise.
It requires you to populated the AD attribute with a string that identifies the license type for the particular user.
Default AD attribute used in the script is employeeType.

Supported license types with AD attributes as below (attribute to the left):
E1 – Office 365 for Enterprises E1
E3 – Office 365 for Enterprises E3
K1 – Deskless user without Office
E2 – Deskless user with Office
A1S – Office 365 for Education A1 (Students)
A2S – Office 365 for Education A2 (Students)
A3S – Office 365 for Education A3 (Students)
A1F – Office 365 for Education A1 (Faculty)
A2F – Office 365 for Education A2 (Faculty)
A3F – Office 365 for Education A3 (Faculty)
2014-01-01 15-31-22
In case the AD attribute Country is populated in your AD, it will automatically use that attribute to populate UsageLocation of the user in Office 365, otherwise it will default back to the parameter $DefaultCountry.

It will log all changes and errors to the logfile MSOL-UserActivation.log within the same folder you run the script.
Running the script
Prereqs:

Example – first time use:
As a preparation have to change the default value of $AdminUser parameter or use the parameter -AdminUser to an actual adminuser of your tenant.
On first use it’ll then ask you for the password and then store encrypted with DPAPI to a file in the same folder where you run the script. This so you can run without user interaction in the future.

.\ActivateMSOLUser.ps1 -AdminUser DirSync@mstlegacy.onmicrosoft.com

2013-12-30 16-31-16
(Hopefully you will type in the correct password… 🙂 )

After you’ve finished with the first time configuration, you are ready to actually start assigning licenses.
Example 1 – Activate all K1,K2 and E3 licenses with default AD attribute (employeeType)

.\ActivateMSOLUser.ps1 -AdminUser dirsync@mstlegacy.onmicrosoft.com -Licenses K1,K2,E3

2013-12-30 16-45-58
As seen above, 2 unlicensed users were found in Office 365, but only one of them had the required local AD attribute (employeeType in this case), set to ‘E3’.
I also go two errors since I didn’t have any K1 or K2 licenses in my tenant.

Example 2 – Activate all E3 licenses with custom AD attribute (msDS-cloudExtensionAttribute1) and MasterOnPremise

.\ActivateMSOLUser.ps1 -AdminUser dirsync@mstlegacy.onmicrosoft.com -Licenses E3 -LicenseAttribute msDS-cloudExtensionAttribute1 -MasterOnPremise

2013-12-30 16-57-28
In the above example we found one user to activate, but with the switch -MasterOnPremise we looked in to our local ad instead checking Office 365 for unlicensed users, and reported back to the attribute when the license was successfully assigned.
This can be useful if you for some reason have a lot of unlicensed users in Office 365 that you intend to keep that way.

Note: Since the -MasterOnPremise function writes back to your AD, the account that runs the script will in that case need write permissions to that AD attribute.

2013-12-30 17-03-59

Next Step
In order to make this fully automated, you will also need to schedule this as a task that runs (preferably) as often as your DirSync goes which by default is every 3 hours, an article on how to do that is here.

I’ve been running the script for a while and it works very well, of course some parts can be done more efficient. If you find any bugs or other issues, let me know!

The script can be downloaded from here, or cut’n’paste it from below…

Happy Licensing!
/Johan

ActivateMSOLUsers.ps1

<# .SYNOPSIS     The script automatically assigns licenses in Office 365 based on AD-attributes of your choice. .DESCRIPTION     Fetches your Office 365 tenant Account SKU's in order to assign licenses based on them.     Sets mandatory attribute UsageLocation for the user in Office 365 based on local AD attribute Country (or default)     If switch -MasterOnPremise has been used:     Assigns Office 365 licenses to the user based on an AD-attribute and reports back to the same attribute if a license was successfully assigned.     If not:     Looks after unlicensed users in Office365, checks if the unlicensed user has the right attribute in ad to be verified, otherwise not. .PARAMETER MasterOnPremise     Switch, If used, it  Assigns Office 365 licenses to the user based on an AD-attribute and reports back to the same attribute if a license was successfully assigned.     .PARAMETER Licenses     Array, defines the licenses used and to activate, specific set of licenses supported. "K1","K2","E1","E3","A1S","A2S","A3S","A1F","A2F","A3F" .PARAMETER LicenseAttribute     String, the attribute  used on premise to identify licenses .PARAMETER AdminUser     Adminuser in tenant .PARAMETER DefaultCountry     Defaultcountry for users if not defined in active directory              .NOTES     File Name: ActivateMSOLUsers.ps1     Author   : Johan Dahlbom, johan[at]dahlbom.eu     The script are provided “AS IS” with no guarantees, no warranties, and they confer no rights.     #>
param(
[parameter(Mandatory=$false)]
[Switch]
$MasterOnPremise = $false,

[parameter(Mandatory=$false,HelpMessage="Please provide the SKU's you want to activate")]
[ValidateSet("K1","K2","E1","E3","A1S","A2S","A3S","A1F","A2F","A3F")]
[ValidateNotNullOrEmpty()]
[array]
$Licenses,

[parameter(Mandatory=$false)]
[string]
$LicenseAttribute = "employeeType",

[parameter(Mandatory=$false)]
[string]
$AdminUser = "admin@tenant.onmicrosoft.com",

[parameter(Mandatory=$false)]
[string]
$DefaultCountry = "SE"
)
#Define variables
$PSScriptRoot = Split-Path -Parent -Path $MyInvocation.MyCommand.Definition
$Logfile = ($PSScriptRoot + "\MSOL-UserActivation.log")
$TimeDate = Get-Date -Format "yyyy-MM-dd-HH:mm"
$SupportedSKUs = @{
                    "K1" = "DESKLESSPACK"
                    "K2" = "DESKLESSWOFFPACK"
                    "E1" = "STANDARDPACK"
                    "E3" = "ENTERPRISEPACK"
                    "A1S" = "STANDARDPACK_STUDENT"
                    "A2S" = "STANDARDWOFFPACK_STUDENT"
                    "A3S" = "ENTERPRISEPACK_STUDENT"
                    "A1F" = "STANDARDPACK_FACULTY"
                    "A2F" = "STANDARDWOFFPACK_FACULTY"
                    "A3F" = "ENTERPRISEPACK_FACULTY"

                    }

################################################
##### Functions

#Function to Import Modules with error handling
Function Import-MyModule
{
Param([string]$name)
    if(-not(Get-Module -name $name))
    {
        if(Get-Module -ListAvailable $name)
        {
            Import-Module -Name $name
            Write-Host "Imported module $name" -ForegroundColor Yellow
        }
        else
        {
            Throw "Module $name is not installed. Exiting..."
        }
    }
    else
    {
        Write-Host "Module $name is already loaded..." -ForegroundColor Yellow }
    }

#Function to log to file and write output to host
Function LogWrite
{
Param ([string]$Logstring)
Add-Content $Logfile -value $logstring -ErrorAction Stop
Write-Host $logstring
}
#Function to activate your users based on ad attribute
Function Activate-MsolUsers
{
Param([string]$SKU)

    begin {
        #Set counter to 0
        $i = 0
    }

        process {

            #Catch and log errors
            trap {
                $ErrorText = $_.ToString()
		        LogWrite "Error: $_"
                $error.Clear()
                Continue
            }

            #If the switch -MasterOnPremise has been used, start processing licenses from the AD-attribute

            if ($MasterOnPremise) {

		    $UsersToActivate = Get-ADUser -filter {$LicenseAttribute -eq $SKU} -Properties $LicenseAttribute,Country -ErrorAction Stop

                if ($UsersToActivate)
			    {
			    $NumUsers = ($UsersToActivate | Measure-Object).Count

			    LogWrite "Info: $NumUsers user(s) to activate with $SKU"
                foreach($user in $UsersToActivate) {

                          trap {
                                $ErrorText = $_.ToString()
		                        LogWrite "Error: $_"
                                $error.Clear()
                                Continue
                            }
                        $UPN = $user.userprincipalname
                        $Country = $user.Country
                        LogWrite "Info: Trying to assign licenses to: $UPN"
                                if (!($country)) {
                                    $Country = $DefaultCountry }

                        if ((Get-MsolUser -UserPrincipalName $UPN -ErrorAction Stop)) {

                                Set-MsolUser -UserPrincipalName $UPN -UsageLocation $country -Erroraction Stop
                                Set-MsolUserLicense -UserPrincipalName $UPN -AddLicenses $SKUID -Erroraction Stop
									#Verify License Assignment
									if (Get-MsolUser -UserPrincipalName $UPN | Where-Object {$_.IsLicensed -eq $true}) {
										Set-ADUser $user -Replace @{$LicenseAttribute=$SKU+' - Licensed at ' + $TimeDate}
										LogWrite "Info: $upn successfully licensed with $SKU"
                                        $i++;
									}
									else
									{
										LogWrite "Error: Failed to license $UPN with $SKU, please do further troubleshooting"

									}
                        }
				    }
			    }
            }
	#If no switch has been used, process users and licenses from MSOnline
            else {
			    $UsersToActivate = Get-MsolUser -UnlicensedUsersOnly -All
				    if ($Userstoactivate)
				    {
				    $NumUsers = $UsersToActivate.Count
				    LogWrite "Info: $NumUsers unlicensed user(s) in tenant: $($SKUID.ToLower().Split(':')[0]).onmicrosoft.com"
				    foreach ($user in $UsersToActivate) {
                                trap {
                                        $ErrorText = $_.ToString()
		                                LogWrite "Error: $_"
                                        $error.Clear()
                                        Continue
                                }

					        $UPN = $user.UserPrincipalName
					        $ADUser = Get-Aduser -Filter {userPrincipalName -eq $UPN} -Properties $LicenseAttribute,Country -ErrorAction Stop
					        $Country = $ADUser.Country
							    if (!($Country)) {
								$Country = $DefaultCountry
							    }
					        if ($ADUser.$LicenseAttribute -eq $SKU) {
						        LogWrite "Info: Trying to assign licenses to: $UPN"
						        Set-MsolUser -UserPrincipalName $UPN -UsageLocation $country -Erroraction Stop
						        Set-MsolUserLicense -UserPrincipalName $UPN -AddLicenses $SKUID -Erroraction Stop

						        #Verify License Assignment
						        if (Get-MsolUser -UserPrincipalName $UPN | Where-Object {$_.IsLicensed -eq $true}) {
							    LogWrite "Info: $upn successfully licensed with $SKU"
                                $i++;
						        }
						   else
						        {

                                LogWrite "Error: Failed to license $UPN with $SKU, please do further troubleshooting"

						        }
				        }
			        }
		        }
	        }
        }

    End{
    LogWrite "Info: $i user(s) was activated with $license ($SKUID)"
	}
}
################################################
#Import modules required for the script to run
Import-MyModule MsOnline
Import-MyModule ActiveDirectory

	#Start logging and check logfile access
	try
	{
		LogWrite -Logstring "**************************************************`r`nLicense activation job started at $timedate`r`n**************************************************"
	}
	catch
	{
		Throw "You don't have write permissions to $logfile, please start an elevated PowerShell prompt or change NTFS permissions"
	}

    #Connect to Azure Active Directory
	try
	{
		$PasswordFile = ($PSScriptRoot + "\$adminuser.txt")
		if (!(Test-Path  -Path $passwordfile))
			{
				Write-Host "You don't have an admin password assigned for $adminuser, please provide the password followed with enter below:" -Foregroundcolor Yellow
				Read-Host -assecurestring | convertfrom-securestring | out-file $passwordfile
			}
		$password = get-content $passwordfile | convertto-securestring -ErrorAction Stop
		$credentials = new-object -typename System.Management.Automation.PSCredential -argumentlist $adminuser,$password -ErrorAction Stop
		Connect-MsolService -credential $credentials -ErrorAction Stop
	}
	catch [system.exception]
	{
        $err = $_.Exception.Message
		LogWrite "Error: Could not Connect to Office 365, please check connection, username and password.`r`nError: $err"
        exit
	}

if (!$licenses) {
    LogWrite "Error: No licenses specified, please specify a supported license`r`nInfo: Supported licenses are: K1,K2,E1,E3,A1S,A2S,A3S,A1F,A2F,A3F!"
}
else
{

#Start processing license assignment
    foreach($license in $Licenses) {

        $SKUID = (Get-MsolAccountSku | Where-Object {$_.AccountSkuId -like "*:$($SupportedSKUs.Get_Item($license))"}).AccountSkuId

            if ($SKUID)
	        {
		        Activate-MsolUsers -SKU $license
	        }
	        else
	        {
		    LogWrite "Error: No $license licenses in your tenant!"
	        }
    }
}
LogWrite -Logstring "**************************************************"

Emails from Messagelabs(Symantec) blocked after running HCW (Hybrid Configuration Wizard)

A couple of my customers have been running in to this issue lately, so I thought it was a good idea to share the issue with you guys.

Note: the issue only applies to those that are using Messagelabs/Symantec as their current spam-provider. (MX-record pointing to messagelabs)

Issue
After running Hybrid Configuration Wizard in Exchange 2010/2013 you experience intermittent issues with incoming emails from the internet (Messagelabs). If you dig further down to the issue you come to the conclusion that it only happens when you receive emails from certain ip subnets that Messagelabs are using.

Cause
As part of the Hybrid Configuration Wizard process, a receive connector named “Inbound from Office 365” is created. The purpose of that receive connector is to enable a secure mail flow directly from Office 365.
For that reason, the connector is configured with the setting RequireTLS set to True .
It also configures a set of remote ip ranges that the connector accepts (public Office 365 IP-ranges).

And it was here I came across the actual cause to this issue.
HCW are adding a remote ip range that overlaps with the public IP-ranges Messagelabs are using. This in combination with the fact that Messagelabs obviously doesn’t fully support TLS, makes this issue happen.
I confirmed this both with the transport logs and in Messagelabs documentation (http://images.messagelabs.com/EmailResources/ImplementationGuides/Subnet_IP.pdf).
The overlapping subnet is 67.219.240.0/20.

See screenshot from the Exchange Server and Symantecs documentation below:
2013-12-25 22-34-08

2013-12-25 22-34-55

Looking further into the documentation Microsoft have on this at http://help.outlook.com/en-us/140/gg263350.aspx, you find out that the subnet 67.219.240.0/20 isn’t there.
That is also confirmed by doing a whois on the subnet (http://www.whois.net/ip-address-lookup/67.219.240.0) – this subnet does not belong to Microsoft.

That means it should be perfectly safe to remove that subnet from the receive connector, and I can confirm that it hasn’t created any problems in the cases I bumped in to.

Solution(or workarounds…)
The quick and dirtly solution to this issue is to to turn off the TLS requirements on the receive connector “Inbound from Office 365” with the PowerShell command as below

Get-ReceiveConnector "Inbound from Office 365" | Set-ReceiveConnector -RequireTLS $false

The better solution is to just remove the subnets from the receive connector, and it should be perfectly safe to do this since no emails from Office 365 will arrive that way.

Hope this helps you out if you are running in to this issue!

/Johan

Office 365 PowerShell Tip – Keeping EmailAddress and UPN in Sync

UPN’s are a nice way for our users to remember their usernames.  A UPN essentially has the same format as an email address.  Rather than having users login to their workstations or intranet resources as CLOUD\Username, they can login as user.lastname@cloud.com which can be the same as their email address.

Problem
When moving to Office 365 and are using DirSync with or without ADFS, your users need to have a UPN with a public routable domain in it. The easiest and most logical way to do that for your users sake is to keep UPN and primary email address the same.

Solution(s)
There are of course a lot of different solutions out there for achieveing the above, many of them include PowerShell and csv-files. My solution is based on PowerShell and are utilizing either Exchange Powershell cmdlets or Active Directory cmdlets.

Solution 1 (Exchange 2007 and above)
The below example is a very quick one that you run in Exchange Management Shell in Exchange 2007 and above. It simply copies the “WindowsPrimaryEmailAddress” for all your user mailboxes to the userPrincipalName attribute, without any question.

Get-Mailbox -ResultSize Unlimited -RecipientTypeDetails UserMailbox | ForEach { Set-Mailbox -Identity $_.Guid.ToString() -UserPrincipalName $_.WindowsEmailAddress.ToString() } 

To verify that the change has been properly done, you can run the below command to list all mailboxes that have different primary email address and UPN:

Get-Mailbox -ResultSize Unlimited -RecipientTypeDetails UserMailbox | Where-Object {$_.UserPrincipalName -ne $_.WindowsEmailAddress.ToString() }

Solution 2 (Exchange 2003 and above)
I had a case where the customer was running Exchange 2003, but had 2008R2 domain controllers. The customer also wanted a log file with the old and the new UPN after the change had been done. The script utilizes the ActiveDirectory module for PowerShell and copies the primary email address from the proxyAddresses attribute.
Running the script without any switches makes it run in test mode and do the AD-changes with the -WhatIf, so no changes will be done here.

2014-01-01 16-09-06

Running the script with the switch -Production makes it do the actual changes.2014-01-01 16-09-22

For backup purposes, the script are also creating a log file with the old and new attribute in the same folder where you run the script.

<#  
.SYNOPSIS 
    Script that copies the primary emailaddress from proxyAddresses to the userPrincipalName attribute.  
    It runs in test mode and just logs the changes that would have bee done without any parameters.  
    It identifies an exchange user with the legacyExchangeDN-attribute.  
.PARAMETER Production 
    Runs the script in production mode and makes the actual changes. 
.NOTES 
    Author: Johan Dahlbom 
    Blog: 365lab.net 
    Email: johan[at]dahlbom.eu 
    The script are provided “AS IS” with no guarantees, no warranties, and they confer no rights.     
#>
param(
[parameter(Mandatory=$false)]
[switch]
$Production = $false
)
#Define variables
$PSScriptRoot = Split-Path -Parent -Path $MyInvocation.MyCommand.Definition
$DateStamp = Get-Date -Format "yyyy-MM-dd-HH-mm-ss"
$Logfile = $LogFile = ($PSScriptRoot + "\ProxyUPNSync-" + $DateStamp + ".log")
Function LogWrite
{
Param ([string]$logstring)
Add-content $Logfile -value $logstring
Write-Host $logstring
}
    try
    {
        Import-Module ActiveDirectory -ErrorAction Stop
    }
    catch
    {
        throw "Module ActiveDirectory not Installed"
    }

#For each AD-user with a legacyExchangeDN, look up primary SMTP: in proxyAddresses
#and use that as the UPN
$CollObjects=Get-ADObject -LDAPFilter "(&(legacyExchangeDN=*)(objectClass=user))" -Properties ProxyAddresses,distinguishedName,userPrincipalName

            foreach ($object in $CollObjects)
            {
                $Addresses = $object.proxyAddresses
                $DN=$object.distinguishedName
                    foreach ($Address In $Addresses)
                    {
                        $ProxyArray=($ProxyArray + "," + $Address)
                        If ($Address -cmatch "SMTP:")
                            {
                                $PrimarySMTP = $Address
                                $UserPrincipalName=$Address -replace ("SMTP:","")
                                    #Found the object validating UserPrincipalName
                                    If ($object.userPrincipalName -notmatch $UserPrincipalName) {
                                        #Run in production mode if the production switch has been used
                                        If ($Production) {
                                            LogWrite ($DN + ";" + $object.userPrincipalName + ";NEW:" + $UserPrincipalName)
                                            Set-ADObject -Identity $DN -Replace @{userPrincipalName = $UserPrincipalName}
                                        }
                                        #Runs in test mode if the production switch has not been used
                                        else {
                                            LogWrite ($DN + ";" + $object.userPrincipalName + ";NEW:" + $UserPrincipalName)
                                            Set-ADObject -Identity $DN -WhatIf -Replace @{userPrincipalName = $UserPrincipalName}
                                        }
                            }
                            else
                            {
                            Write-Host "Info: User $($object.UserPrincipalName) are already OK!"

                            }
                        }
                    }
            }

Hope the above was helpful to you, please let me know if you have any questions!

/Johan

Password never expires for Office 365 users

If you are using Office 365 without federation with your on-premise Active directory you are obligated to change password for your cloud based identity every 90 days.

When using BPOS, this was not a large issue since you had the sign-in client that reminded you to change password in time.

But with Office 365 when you for example only are using SharePoint online, there is not yet a way to get password expiration reminders if the users are accessing SharePoint with the direct url (eg. https://mycompany.sharepoint.com). This means you potentially end up with users that cannot access SharePoint when their password has expired.

Until they’ve come up with a solution for password expiration reminders via email one workaround is to set the users passwords to never expire.

You do this with the Powershell module for Online services (http://onlinehelp.microsoft.com/Office365-enterprises/ff652560.aspx) with the following commands:

$cred = Get-Credentials 
Connect-MsolService -Credential $cred

For one user:

Set-MsolUser -UserPrincipalName user@example.com -PasswordNeverExpires $True

For all users:

Get-MsolUser | Set-MsolUser -PasswordNeverExpires $True


Note that this works for all Office 365 services that are using Azure Active Directory (Exchange Online, Lync Online and Sharepoint Online)

Revert a federated domain to standard domain in Office 365

The idea with federation/ADFS combined with Office 365 is that you don’t have to care about changing/remembering passwords in multiple places.
Of course that is a good thing and the setup of ADFS is quite easy as long as you know your certificates and size the solution for redundancy.

A couple of days ago I ran in to a scenario where I needed to revert/disable federation for an Office 365 domain.

You do it with the Powershell module for Online Services (can be found on http://go.microsoft.com/fwlink/?linkid=236293).

First you connect to remote powershell with the following command where you will provide your administrative credentials for Office 365:

Connect-MsolService

Then to change your domain back to a non-Federated state you simply type the command:

Convert-MsolDomainToStandard -DomainName example.com -PasswordFile c:\Passwords.txt

The command will convert all users to non federated ones and create a new password for them and put it in the file you specified with the “-PasswordFile” flag. It will also set the flag “ForceChangePassword” on the users to $true, so the users will have to change their own password after the first time they log on with the new one you provided from the file.

If something goes wrong with the conversion of the users when running the conversion command above you may have to convert the users manually to non-federated ones with the “Convert-MsolFederatedUser -UserPrincipalName ” cmdlet.