Category Archives: Windows Client

Export legacyExchangeDN from Global Address List in Outlook

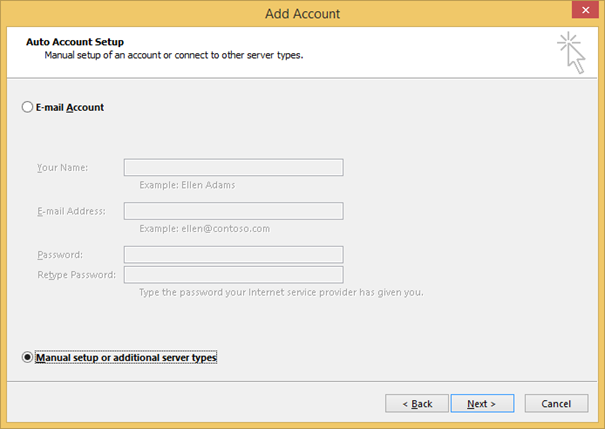
In some migration scenarios it is necessary to export all legacyExchangeDN addresses from your Exchange environment. This is for example the case if you are doing a mail migration with .pst files. If you are migrating from a Hosted Exchange environment this information can sometimes be hard to get. However, there are solutions.

It is quite easy to export all legacyExchangeDN addresses from the Global Address List using Access and Outlook on a client that is connected to the Exchange environment.

Start by opening Access and create a new empty database.
On the External Data tab select Outlook Folder

legacydn-access_1

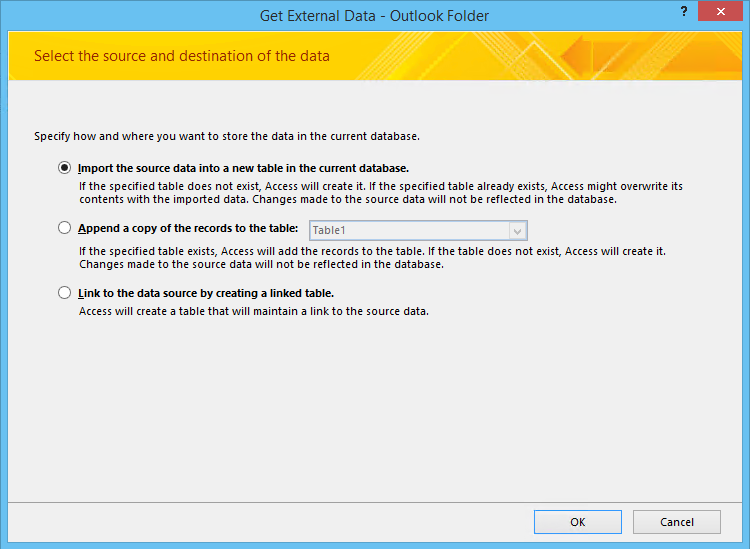
In the Import Guide select to import data into a new table, and click OK

legacydn-access_2

Select your Outlook profile

legacydn-access_3

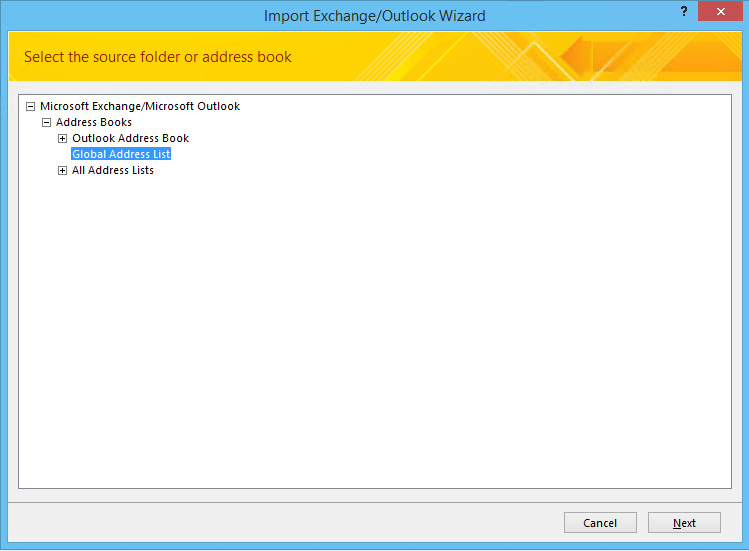
Now select the address list to export from, in this case I select the Global Address List to get all addresses.

legacydn-access_4

In the next step it is possible to adjust the data, just click Finish.

legacydn-access_5

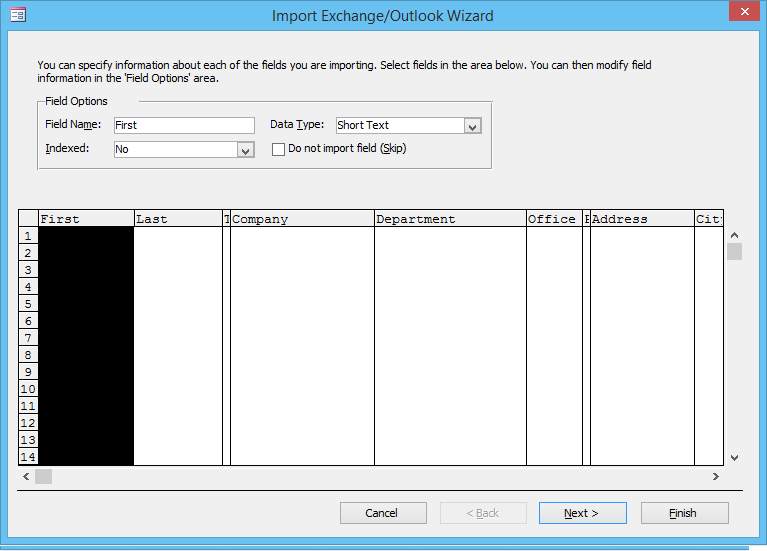
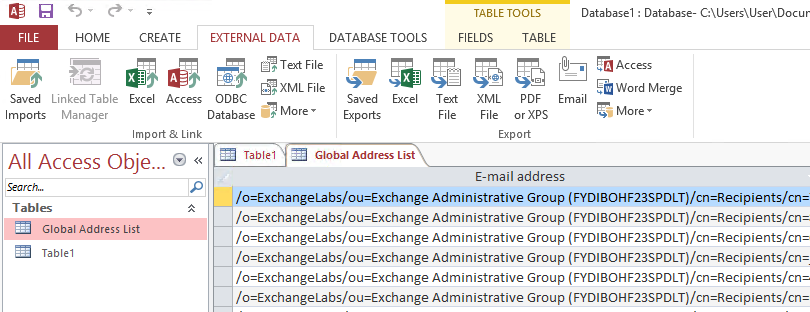
Now we’re done! A new table has been added to the database, and in the E-mail address column you will see the legacyExchangeDN for all users

legacydn-access_6

Now it is easy to add these addresses as a x500 alias addresses in your migrated mailboxes.

/ Andreas

Advertisement

How to manually configure an Outlook profile for Office 365

Manually configuring Outlook for Office 365 can be tricky. That’s what Autodiscover is for. But in some situations you have to be able to do a manual configuration in for example a pilot deployment. Here are the steps required.

The nice thing with this method is that we will be able configure Outlook without changing our Autodiscover DNS records. That means we can do a full Office 365 test deployment without affecting users in an on-premises Exchange environment.

The first step is to establish a remote PowerShell session to Exchange Online. Here we need the ExchangeGuid attribute from our mailbox. Copy this value and save it for later.

exguid

The next step is to launch the New Profile Wizard in Outlook. We will go for the option to do a Manual setup.

outlookprofile1

In the next screen we select that we have a Microsoft Exchange Server.

outlookprofile2

Now it’s time to enter the exchange server name. Here we need the ExchangeGuid from the first step. Write the Guid followed by @ and the email domain. The user name is our Office 365 user name.
Now click More Settings.

outlookprofile3

On the Security tab we select Anonymous Authentication.

outlookprofile4

On the Connection tab check the box to connect using HTTP and click Exchange Proxy Settings

outlookprofile5

Fill in all values as below

outlookprofile6

Click OK to close all windows. You will be asked for credentials, fill in your Office 365 username and password.

outlookprofile7

Now our Outlook Profile is ready to use and Outlook is configured for Exchange Online, without using Autodiscover.

/ Andreas

Logging on as Domain Admin to end user workstations? Think again!

We’ve all been there.
An end user has a problem with their computer or needs manual installation of some software. Either we elevate with an admin account logged on as the end user, or we switch user and are logging on with our admin account.
Far too often, the admin accounts used to help out end users, are very privileged accounts, 2/5 times I see this at my customers those accounts are Domain Admins.

Why is this a problem? Well, first of all, you should never expose very privileged credentials to “non trusted” computers. Secondly, at the time you log on, your credentials are exposed and can with Benjamin “gentilkiwi” Delpy’s tool mimikatz be extracted in clear text through the lsass process.

Ok, but the user is not local admin, so they will not be able to do it anyway? That is true, but far too many let end users be local admins, and of course there are ways to get around that if you’re a non admin user as well.

Example:
The end user Aaron that has been privileged enough to get local admin rights on his computer. He puts the powershell-script Invoke-Mimikatz.ps1 as a task to run at logon for all users.
2014-03-12 13-33-19

2014-03-12 13-44-04
In this example, I’ve just put in the row below in at the end of the script to dump the credentials to a file on the c-disk. This could of course be dumped anywhere if you wanted to.

Invoke-Mimikatz -dumpcreds | 
    Out-File -Append  c:\evilplace\$env:computername.txt

Effect:
Now, when his fellow administrator logs on to his computer to help him with some software installation, the admin credentials will be dumped to a file and Aaron is from now on Domain Admin!

2014-03-12 13-54-02

Scary? Yes!
Lesson learned: Think both once and twice before logging on with privileged credentials to non trusted computers.

This is of course nothing new, it’s been out for quite a while. Look in to the following matrix that clarifies when this is an issue or not (in most cases it is…:( )

/Johan

Fix broken shortcuts during file server migrations

During a file server migration several problems arise. Most of them are eliminated by using DFS Namespaces. With DFS all paths are kept the same even though the file server itself is changed. Having that in mind, I really hope that everyone is using DFS for file servers.

In scenarios where UNC paths that points directly to the file server are used we have to find a way to minimize problems for the end users when the paths are changed.

It is very common that end users have shortcuts on their desktops that point to folders and documents on the server. I will give you a simple script that will replace the path for you.

This script is written in VBScript. The first two lines defines the old path, and what to replace it with.

'Define paths
strFind = "\\oldserver\share1\"
strReplace = "\\newserver\share2\"

Set objWsh = CreateObject("WScript.Shell")
Set objWshSysEnv = objWsh.Environment("PROCESS")
strProfilePath = objWshSysEnv("USERPROFILE")

Set objFSO = CreateObject("Scripting.FileSystemObject")
Set objFolder = objFSO.GetFolder(strProfilePath & "\Desktop")

'Loop through all files on the desktop
For Each file In objFolder.Files
	if right(file.Name,3)="lnk" then
		'If a shortcut is found
		Set objLink = objWsh.CreateShortcut(file.Path)

		objLink.Arguments = Replace(objLink.Arguments,strFind,strReplace,1,-1,1)
		objLink.TargetPath = Replace(objLink.TargetPath,strFind,strReplace,1,-1,1)
		objLink.WorkingDirectory = Replace(objLink.WorkingDirectory,strFind,strReplace,1,-1,1)

		objLink.Save
	end if
Next

Run this script as a login script on your clients and you will have one problem less the day after your file server migration.

/ Andreas

Offline Domain Join and Direct Access – A real life example

A few days ago I got a new computer at work. I took it home to install it, but to finish the installation and log on with my domain account I needed access to the corporate network.

I had to find a solution to finalize the installation without going back to the office. Luckily we have Direct Access configured at my company, and all I need to connect is a domain joined computer. A perfect opportunity to use the Offline Domain Join feature.

For this to work we need some prerequisites in place:

  • A Windows Server 2012 or newer Direct Access server
  • A domain controller with at least Windows Server 2008 R2
  • At least Windows 8 on the client computer

Note: Offline Domain Join works in Windows 7 as well, but these are the minimum requirements to use it in conjunction with Direct Access

This process is performed in two steps: First we have to provision the computer in Active Directory. We create a computer account, and store metadata about the computer in a file. The metadata file is then used on the computer to finish the process.

The information we have to provide during the provisioning is:

  • The name of the domain that we want to join the new computer to
  • The name of the computer
  • Where to save the metadata file
  • The Direct Access Group Policy, to get all settings to connect using Direct Access
  • We also need to issue a computer certificate for Direct Access, so we have to specify what Certificate Template to use.

Let’s use Djoin.exe to provision the new computer. This command must run on a machine that is already a member of the domain, and you need rights to add workstations to the domain:

Djoin.exe /provision /domain corp.tailspintoys.com /machine PC5441 /savefile c:\OfflineDomainJoin.txt /policynames "DirectAccess Client Settings" /policypaths "\\corp.tailspintoys.com\SYSVOL\corp.tailspintoys.com\Policies\{GUID}\Machine\Registry.pol" /certtemplate Machine

Now, I copy OfflineDomainJoin.txt to the new computer and run Djoin.exe again to insert the metadata into the computer. Please be aware that this file contains sensitive information and should not be sent unencrypted.

Djoin.exe /requestODJ /loadfile C:\OfflineDomainJoin.txt /windowspath %systemroot% /localos 

Finally, a restart is required. After the restart I’m connected with Direct Access and it is possible to log on with my domain credentials.

/ Andreas

Quick Tip: Why are you still using nslookup?

Still using nslookup when troubleshooting and verifying DNS records?
Since Windows 8 and Windows Server 2012 arrived, I’ve been switching to the cmdlet Resolve-DnsName instead.
Two of the benefits are:

  • It gives ju way nicer and much more structured data that easily can be used in scripting scenarios.
  • It’s faster to write, just type Reso<tab> in your Powershell window.

Examples on output below:

2014-02-08 21-08-09

/Johan

Quick Tip: Still using ipconfig? Use gip instead!

Since you more or less are never using cmd.exe any longer, why not go away from other classic toolsets you’ve been using forever?

In Windows 8 and Windows Server 2012 and later, you can use the cmdlet Get-NetIPConfiguration or the alias gip to get your ip addresses instead of using ipconfig. Good stuff! (and nicer output)

2014-01-26 21-55-31/Johan

Geek tip: Top 10 shortcut commands to remember!

In the shadow of all PowerShell stuff, I’d like to share some old, but very good information with you guys.

I like knowing exactly where I’m going and I like getting there fast. Therefore, I’ve learned the file names of the most common OS utilities I use. (And yes, I might be a bit reactionary 🙂 )

Many of them are nowdays in the Win+X menu, but sometimes its nice just typing where you want to go.

  1. ncpa.cpl – Network Connections – This was once very easy to find, but in Vista and above they made it very hard to get there.
  2. certlm.msc – Local Computer Certificates – as this is something I use every day, it’s very nice to actually get there directly (only works in 8/2012 and above) (certmgr.msc for User Certificates)
  3. lusrmgr.msc – Access Local users and Groups directly
  4. appwiz.cpl – Add remove programs (turn Windows features on or off is optionalfeatures.exe)
  5. firewall.cpl – Windows Firewall
  6. compmgmt.msc –  Computer management
  7. sysdm.cpl – System Properties (change computer name, join domain etc. (but please, use POSH for that if possible)
  8. wuapp.exe – Windows Update (very useful in 8/2012 and above)
  9. eventvwr.exe – Event Viewer
  10. mstsc.exe – Remote Desktop Client (everyone knows about this one, I hope).
    In Windows 8 and above, you have to start it with <shift>+<enter> instead of just <enter> if opening more than one window.

/Johan

Dealing with drive letters in PowerShell

Have you ever wondered why the newly installed disk gets a drive letter in the middle of the alphabet even though E: is free? Why that network drive refuses to connect with the drive letter you want? The reason is most probably that the drive letter you want has been reserved for removable drives even though no media is inserted. This has been an problem for some time now since many computers are shipped with built-in multimedia card readers.

W8-storage-management

In the above example, if you for example try to map a network drive as F: it will fail because it is already reserved by a SD card reader, even when no card is inserted. The solution: change the drive letters to something that you know will never conflict.

Here’s a PowerShell script that automatically reassigns drive letters on removable drives to a predefined set of “approved” drive letters. The script uses the standard mountvol tool, so it also works in older Windows versions.

Replace-DriveLetters.ps1

$ForbiddenDrives = @("E:","F:","G:","H:")
$AllowedDrives = @("W:","X:","Y:","Z:")

$RemovableDrives = Get-WmiObject -Class Win32_Volume -Filter "DriveType=2"
$DrivesToReassign = $RemovableDrives | Where-Object { $ForbiddenDrives -contains $_.DriveLetter }
$i=0

foreach ($Drive in $DrivesToReassign) {
     &mountvol $Drive.DriveLetter /D
     &mountvol $AllowedDrives[$i++] $Drive.DeviceID
}

In an Enterprise Environment this is easy to implement in for example Microsoft Deployment Toolkit. That way your clients will never fail mapping network drives.

MDT

/ Andreas

Quick Tip: Self signed certificates made easy with PowerShell!

Most solutions today require certificates in some way, which means we need them even when setting up a lab/test environment.
If you for some reason don’t have a PKI/CA infrastructure in your lab environment you will most likely end up with a self signed certificates for web sites or other parts of your environment.

Since Windows 8/8.1 or Server 2012/2012 R2 there is a really nice PowerShell cmdlet that does that for us, without no hassle.
It can even handle multiple SAN’s.
It’s just to use the New-SelfSignedCertificate cmdlet from an elevated PowerShell window.

Example 1: Create and export one certificate with the name test.365lab.net:

New-SelfSignedCertificate -DnsName test.365lab.net -CertStoreLocation cert:\LocalMachine\My
#Export certificate to c:\test_365lab_net.pfx with the password 'Password'. (the thumbprint is found in the output from the New-SelfsignedCertificate command.)
Export-PfxCertificate -Cert cert:\LocalMachine\My\5D46460D29FE8E0C3F644D8ABA3C707AA83AFC79 -FilePath c:\test_365lab_net.pfx -Password (ConvertTo-SecureString -String "Password" -Force -AsPlainText)

2014-01-04 15-57-46

Example 2: Create self signed SAN certificate with the names test.365lab.net,sts.365lab.net and 365lab.net:

New-SelfSignedCertificate -DnsName test.365lab.net,sts.365lab.net,365lab.net -CertStoreLocation cert:\LocalMachine\My

2014-01-04 16-06-34

To check out your newly create certificates in the GUI, fire up the Computer Certificates Store mmc, which from Windows 8 / Server 2012 and above can be started with ‘certlm.msc‘ (OH YES!).
2014-01-04 16-10-55

Note that I generally never recommend doing self signed certificates in production environments, they are only for testing purposes!

/Johan