Monthly Archives: July 2014

Dirsync installation error – “The user name or password is incorrect”

Implementing DirSync is most times pretty straight forward, as long as you have the proper AAD and AD permissions on your accounts. From experience, it might get a bit more complicated is when you have multi-domain forests in your environment.

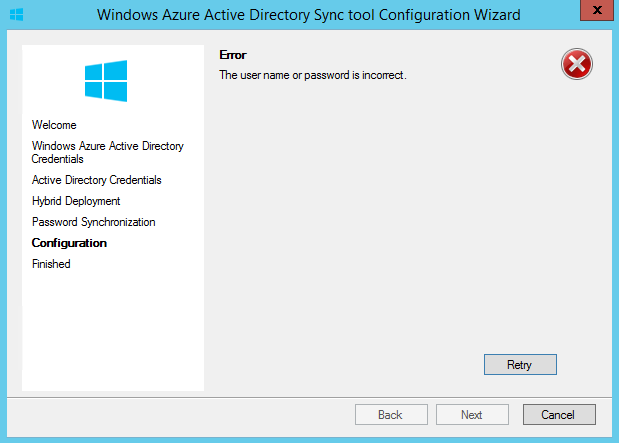
A while ago while going through DirSync Configuration Wizard in a multi-domain environment, I got a the error “The user name or password is incorrect“. The DirSync server was installed in the root domain.

2014-07-08 19-40-41

Since the wizard is validating both the AD and AAD credentials while going through the wizard, I found the error very strange.

Cause
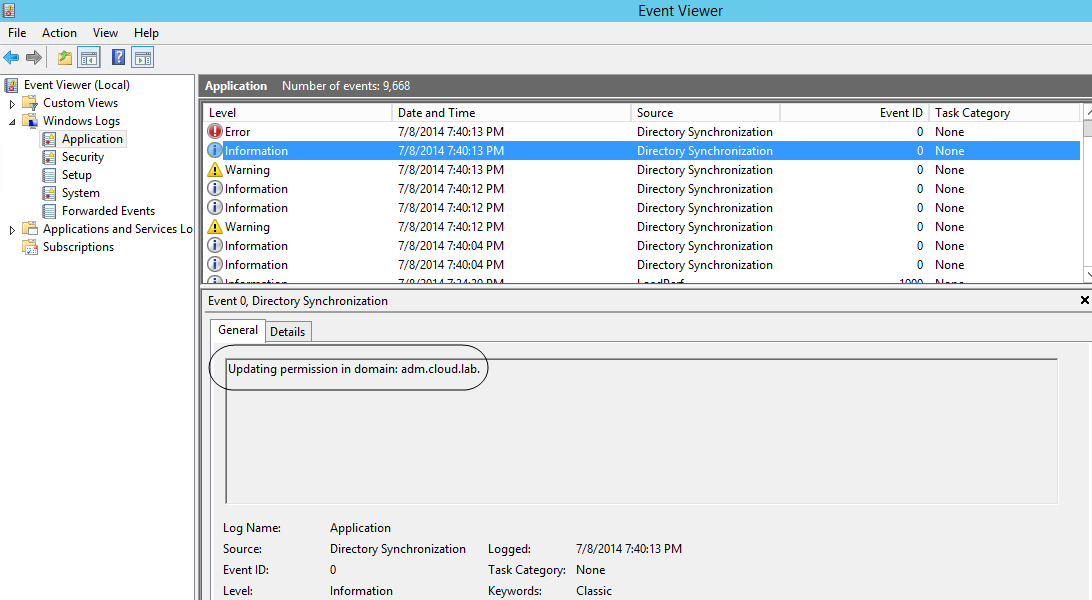
Looking in to the event log, I found that the last event before the error was an informational one – “Updating permissions in the domain “child.domain.com”. Looking in the root domain, the wizard had updated the permissions for the AAD-account there, but not in the child domain.

2014-07-08 19-44-15

Apparently, the solution to the problem was very easy and somewhat logical (depending on how you see it).

The Enterprise Admin AD account used in the wizard, was existing with the same samAccountName in both the root and the child domain. After using an account that was not present in the child domain, the wizard went through fine. Another “solution” that would have worked had been to make sure the password was the same on the accounts. I do however not like synchronizing passwords between accounts, so I chose to use another account.

2014-07-08 20-19-18
Good luck with your DirSync installations!

/Johan

Advertisement

Creating a Catch-all Mailbox using Transport Rules

There are as many reasons to use catch-all mailboxes as there are against, and of course spam is one of the biggest concern. Nevertheless people are still asking for this feature, and therefore I want to show that it is possible also using Exchange Online in Office 365.

I will achieve this by using Transport Rules to control our mail flow. Transport Rules are a very flexible and powerful solution, yet easy to maintain. We have previously here at 365lab.net written a few posts of Transport Rules, but I still think that they deserve a little more attention.

Now to my demo. After establishing a PowerShell session to Exchange Online the first thing we have to do is to change our domain type to Internal Relay.

$domain = '365lab.net'
Set-AcceptedDomain -Identity $domain -DomainType InternalRelay

Next we need a distribution list that contains all our mailboxes. The idea is to redirect all messages sent to unknown addresses, and this distribution list will contain all known addresses, which mean we have something to use in our Transport Rule. Here I prefer to use a Dynamic Distribution List since they don’t require any maintenance after the initial configuration. Maybe you already have a distribution list that you want to re-use instead. If you want to this distribution list can be hidden from the Global Address List.

New-DynamicDistributionGroup `
	-Name 'Everyone' `
	-PrimarySmtpAddress "everyone@$domain" `
	-IncludedRecipients AllRecipients

Finally we create the Transport Rule that will do the actual redirection of the Mail Flow. In my example I want to redirect all emails to an already existing mailbox, $targetAddress.

$targetAddress = "contact@$domain"
New-TransportRule `
	-Name "Catch-all $domain" `
	-RecipientDomainIs $domain `
	-ExceptIfSentToMemberOf "everyone@$domain" `
	-RedirectMessageTo $targetAddress

All emails sent to the domain $domain is hit by this rule, as specified by the RecipientDomainIs parameter. I am also using the Everyone Distribution List in the ExceptIfSentToMemberOf parameter, so that my rule doesn’t hit existing mailboxes. It would also create a loop if messages addressed to the target mailbox were processed, they would be forwarded to the mailbox itself infinitely.

Now we are all set. All messages sent to non-existent addresses in the domain $domain will now be delivered to the mailbox $targetAddress.

/ Andreas