Category Archives: Active Directory

Beyond the supported – Cross forest style Exchange Online Migration

Migration and consolidation projects always put our skills to the test and in some cases forces us to do things that are not fully supported. But sometimes, the end justifies the means.

Some time ago, I did an Exchange Online onboarding project in a quite complex scenario, at least in terms of the identities. 10+ Active Directories and almost as many Exchange environments. On top of that, due to several reasons, it was not possible to create trusts between the different directories. Not the easiest starting point…
Looking at all different options we agreed upon to synchronize one of the directories to Azure AD. This meant that all users not in that directory were to get new accounts, effectively taking the first step towards a common environment.

– Identites – check!

The next step were to determine the migration strategy for the Exchange environments that was ranging from Exchange 2007 -> 2013. Given the quite complex scenario without trusts between the environments, our minds were set to use a third-party tool to do all the migrations. I always like challenging the obvious path, so I wanted to see if it was possible to do native mailbox moves even though there was no possibility to use the regular Hybrid Configuration Wizard.

Guess what – following cross-forest migration principals and copying the relevant attributes between the environments worked great! Cutting $100k in third-party software licensing costs from the project budget is never a bad thing either 🙂

A little simplified, we ended up with a scenario / environment looking like below:

fakehybrid

Remember that this is a quite complex scenario where you have to do most preparations “manually”, so don’t try this unless you really need this kind of scenario. Also note that the same approach works in a staged migration scenario from Exchange 2003/2007.

Assumptions:

  • You have a way to match users between the different environments when moving the attributes.
  • The target directory/forest has been prepared with the Exchange server schema.
  • SMTP/Port 25 is open from the source Exchange environments for outgoing coexistence mailflow.
  • You are in control of your incoming mailflow as well as AutoDiscover, depending on how your environment/domains look like. 🙂
  • This method will be used to migrate mailboxes, not for long-term coexistence. If you have separate SMTP domains per environment, free/busy sharing can be configured if needed.

Preparation steps: 
Source Exchange Environment:

1. Add the tenant routing domain (tenant.mail.onmicrosoft.com) as an accepted domain. Also create a send connector to solve outgoing email in the transition
2. Add the routing email address (smtp:samaccountname@tenant.mail.onmicrosoft.com) to all users in scope for migration.
3. Export the attributes needed to perform the migration from the source Exchange environment. The following attributes are needed for a successful migration. I have used Export-Clixml instead of a CSV-file for simpler handling importing back the Guid Attributes.

  • mail
  • mailNickname
  • proxyAddresses
  • msExchMailboxGuid       
  • msExchArchiveGuid  
  • legacyExchangeDN          
  • msExchRecipientDisplayType
  • msExchRecipientTypeDetails

4. Export mailbox permissions/calendar permissions for users/shared mailboxes if needed.
5. Enable MRSProxy in the Exchange Environment. Also create a service account with at least Recipient Management permissions to use setting up the migration endpoint in Exchange Online.

Target Active Directory / Exchange Online environment:
1. Set up an “Exchange Remote” migration endpoint towards the MRSProxy earlier created.
2. Import the attributes earlier exported in the user directory.
3. After a successful directory synchronization, verify that the users in scope shows up as Mail Users in Exchange Online. If you did the Exchange schema update after you installed AADConnect, don’t forget to refresh the schema there as well, otherwise you won’t synchronize the imported attributes.
4. Perform a test move and verify that everything works as expected. Just as in the case of a “normal” move, the mailbox will be converted to a remote mailbox after the move has been completed.

Migration/post migration steps 
1. Plan and execute your migration batches. Remember that this is not a regular hybrid environment with free/busy etc., so plan your batches accordingly.
2. Import eventual mailbox/calendar permissions after each batch.
3. Switch MX/Autodiscover to Office 365
4. Decommission the source Exchange environment.

Summary
One approach does not fit all and sometimes you have to think a little bit out of the box. I hope this post was interesting and that it might give you some creative ideas running in to similar scenarios. For any questions or feedback, feel free to comment here or ping me on Twitter, @daltondhcp.

/Johan

Advertisement

Create simple PowerBI reports for Intune through the Microsoft Graph

Reporting, playing with data and creating all kinds of charts is always fun. PowerBI is probably the simplest playground doing it.

While doing an O365 / EMS project, management wanted a simple dashboard to keep track of different KPI’s in the project. Example on the data they wanted was number of onboarded users to Exchange Online and enrolled devices in Intune. The Office 365 adoption content pack is in preview and provides lots of insights to how the services are used (in some cases, maybe too much)… In this specific case, we also had an Intune Cloud Only environment, so our reporting as well as delegation possibilites were very limited.

2017-01-03_13-34-12

Luckily enough, some Intune data (and its growing and growing) are nowdays exposed through the Microsoft Graph for us to consume with PowerBI directly with REST and OData.

In my example, I will simply get all registered devices to create my report. To find what possibilites there are, look in to the Microsoft Graph Documentation. If you want to use query parameters, you’ll find the supported ones here.

1. First connect and load the OData feed from Microsoft Graph. In my case I am using the https://graph.microsoft.com/v1.0/devices endpoint. Sign in with an organizational account or app that have appropriate permissions.
2017-01-03_14-36-01

2017-01-03_14-45-102017-01-03_14-45-30
2017-01-03_14-50-39 2017-01-03_14-50-55

2. After the data has been loaded successfully in to PowerBI it’s time to create som nice charts!
2017-01-03_14-54-28
2017-01-03_14-56-41
2017-01-03_14-57-46


Result – My “finished” basic report

2017-01-03_15-06-09
2017-01-03_15-06-30

This was a simple example how to get started with PowerBI and the Microsoft Graph – hopefully you’ve now got some inspiration on what possibilites there are with just five minutes effort. Imagine what you could do if you really put in some time. 🙂

Happy reporting!

/Johan

ADFS Customization – add custom help form to the login page

In the spirit of sharing more “not-so-evergreen” ADFS customizations, I wanted to share another customization request I got a while ago.
The case was very simple, they customer wanted to fit more end-user information in the login flow than the ADFS login page could fit without sending the user to another page.
Onload.js to the rescue again! This time we are using it to simply create an additional form where we present additional information when clicking on the help button.

My example looks like this:
2017-01-01_21-06-44
2017-01-01_21-36-25
2017-01-01_21-36-43

Note that everything is in the JavaScript code, including the help page text. If preferred, that part could be loaded from another location.

Customize ADFS with help page (yes, I should move my content to GitHub)

// Author: Johan Dahlbom
// Blog: 365lab.net
// Twitter: @daltondhcp
// Get DOM elements and save as objects
var loginMessage = document.getElementById('loginMessage'),
    loginArea = document.getElementById('loginArea'),
    loginForm = document.getElementById('loginForm'),
	userNameInput = document.getElementById('userNameInput'),
    helpContent,
    usernameLink,
    passwordResetLink,
	errorText = document.getElementById("errorText"),
	introArea = document.getElementById("introduction"),
	authArea = document.getElementById("authArea");

var showingHelper = false,
    showingLoginform = false;

// CREATE CONTENT FUNCTIONS

function createHelpersForLoginForm() {
  //Create the hyperlink to the help form
  passwordResetLink = document.createElement('a');
  var linkText = "Need help?";
  passwordResetLink.appendChild(document.createTextNode(linkText));
  passwordResetLink.title = linkText;
  passwordResetLink.href = "#";
  passwordResetLink.onclick = toggleHelpContent;

  loginArea.appendChild(passwordResetLink);
}

function createHelpContent() {
  if (!authArea) {
    return;
  }
  helpContent = document.createElement("div");
  helpContent.style.display = 'none';

  helpContent.innerHTML = '\
    <br><br>\
    <h2><strong>What is my username?</strong></h2>\
    <p>Your username is the same as your email address. Example: ann.andersson@365lab.net</p><br>\
    <h2><strong>What is my password?</strong></h2>\
    <p>This is a secret chosen by you. It would not be a secret if we told you. If you forgot your password, you can reset it <a href="https://passwordreset.microsoftonline.com/?whr=365lab.net" target="_blank">here</a><br><br>\
    </p>\
    <h2><strong>Support</strong></h2>\
    <p>If you have any issues or questions, please contact our helpdesk at 555-GET-HELP or <a href="mailto:support@365lab.net">support@365lab.net</a><br><br><br></p>\
    ';

  // Link for close help
  var closeHelpContentLink = document.createElement('span');
  closeHelpContentLink.innerHTML = "Back to the login form";
  closeHelpContentLink.className = "submit";
  closeHelpContentLink.onclick = toggleHelpContent;

  // Duplicate it to have one before the content as well.
  // Uncomment these lines if the help  content grows.
  // var closeHelpContentLinkUpper = closeHelpContentLink.cloneNode(true);
  // closeHelpContentLinkUpper.onclick = toggleHelpContent;
  // helpContent.insertBefore(closeHelpContentLinkUpper, helpContent.firstChild);

  helpContent.appendChild(closeHelpContentLink);

  authArea.appendChild(helpContent);
}

function updateUI() {
  // Check for DOM errors
  if (!loginForm || !helpContent) {
    return;
  }

  if (showingHelper) {
    openHelpContent();
  } else {
    closeHelpContent();
  }
}

function toggleHelpContent() {
  showingHelper = !showingHelper;

  updateUI();
}

function openHelpContent() {
	helpContent.style.display="block";
	loginArea.style.display="none"
}

function closeHelpContent() {
	helpContent.style.display="none";
	loginArea.style.display="block"
}

// Create DOM elements 
createHelpersForLoginForm();
createHelpContent();
updateUI();

As usual, you update onload.js with the Set-AdfsWebTheme cmdlet.
Hope this will be useful for some of you guys! If you have questions, ping me o twitter or email!

Thanks,
/Johan

Create AD Users with help from Azure Automation and SharePoint Online

As a follow up to one of my earlier posts where I Create AD Users with SharePoint Online as frontend, I now wanted to share an extension of this solution where we will utilize Azure Automation with a Hybrid Worker to do the heavy lifting.
So basically, instead of having a script as a scheduled task reading the SharePoint list and perform tasks based on status, we will now have a SharePoint workflow to initiate our runbooks through an Azure Automation Webhook.
I also want to thank Anders Bengtsson for his quite similiar post that finally made me finish this one up. 🙂

OVERVIEW
The post will cover the following steps

  • Create an Azure Automation runbook with a WebHook that executes the runbook on a Hybrid Worker.
  • Create a basic SharePoint workflow in SharePoint Designer with approval steps prior creating the user.
  • End user experience.

PREREQUISITES
I assume that you already have the following in place.

CREATE THE AUTOMATION RUNBOOK AND WEBHOOK
I will use Azure PowerShell create and publish the runbook.

1. First we need to create a credential asset that will be used to write back information to our list.

 
#Login to Azure 
Login-AzureRmAccount
#Define ResourceGroup and Automation Account to be used used for with Automation cmdlets
$PSDefaultParameterValues = @{
    '*-AzureRmAutomation*:ResourceGroupName' = 'ResourceGroup'
    '*-AzureRmAutomation*:AutomationAccountName' = 'MyAutomationAccount'
}
#Create credential object with the SPO service account
$SPOCreds = Get-Credential 
#Create credential asset in Azure Automation
$SPOCredsHt = @{
    Name = 'SPOAdmin'
    Description = 'SharePoint Online Service Account for user onboarding'
    Value = $SPOCreds
}
New-AzureRmAutomationCredential @SPOCredsHt

2. Next up we need to create the actual runbook. Since we are doing everything with PowerShell, we need to save the script to a file and import it to Azure Automation. My example runbook (CreateADUserfromSPO.ps1) can be found below.

$SPORunbookHt = @{
    Path = 'C:\CreateADUserfromSPO.ps1'
    Name = 'Create-ADUsersFromSPO'
    Type = 'PowerShell'
    Published = $true
}
Import-AzureRmAutomationRunbook @SPORunbookHt 

CreateADUserfromSPO.ps1

param ( 
    [object]$WebhookData
)

#SharePoint Connection Info
$SPCredentials = Get-AutomationPSCredential -Name 'SPOAdmin'
$SPConnection = @{
    SharePointSiteURL = "https://threesixfivelab.sharepoint.com"
    Username = $SPCredentials.Username
    Password = $SPCredentials.GetNetworkCredential().Password
}
#Create an object from the webhook request
$UserData = ConvertFrom-Json -InputObject $WebhookData.RequestBody


$TargetOU = "OU=Users,OU=ACME,DC=corp,DC=acme,DC=com"
$ListName = "UserOnboarding"
$PasswordLength = "12"
$UPNSuffix = '365lab.net'
$FirstName = $UserData.FirstName
$LastName = $UserData.LastName
$Title = $UserData.Title
$Manager = $UserData.Manager

#region functions
function Convert-ToLatinCharacters {
    param(
        [string]$inputString
    )
    [Text.Encoding]::ASCII.GetString([Text.Encoding]::GetEncoding("Cyrillic").GetBytes($inputString))
}
  
function Get-JDDNFromUPN {
    param (
        [ValidateScript({Get-ADUser -Filter {UserprincipalName -eq $_}})] 
        [Parameter(Mandatory=$true)][string]$UserPrincipalName
    )
        $ADUser = Get-ADUser -Filter {UserprincipalName -eq $UserPrincipalName} -ErrorAction stop
        return $ADUser.distinguishedname
}
  
function New-JDSamAccountName {
    param (
        [Parameter(Mandatory=$true)][string]$FirstName,
        [Parameter(Mandatory=$true)][string]$LastName,
        [parameter(Mandatory=$false)][int]$FirstNameCharCount = 3,
        [parameter(Mandatory=$false)][int]$LastNameCharCount = 3
    )
    #Construct the base sAMAccountName
    $BaseSam = "{0}{1}" -f (Convert-ToLatinCharacters $FirstName).Substring(0,$FirstNameCharCount),(Convert-ToLatinCharacters $LastName).Substring(0,$LastNameCharCount)
  
    #Add a number until you find a free sAMAccountName
    if (Get-ADUser -Filter {samaccountname -eq $BaseSam} -ErrorAction SilentlyContinue) {
        $index = 0
        do {
            $index++
            $sAMAccountName = "{0}{1}" -f $BaseSam.ToLower(),$index
        } until (-not(Get-ADUser -Filter {samaccountname -eq $sAMAccountName } -ErrorAction SilentlyContinue))
    } else {
        $sAMAccountName = $BaseSam.tolower()
    }
    return $sAMAccountName
}
      
function New-JDUPNAndMail {
    param (
        [Parameter(Mandatory=$true)][string]$FirstName,
        [Parameter(Mandatory=$true)][string]$LastName,
        [Parameter(Mandatory=$true)][string]$UPNSuffix
     )
    #Construct the base userPrincipalName
    $BaseUPN = "{0}.{1}@{2}" -f (Convert-ToLatinCharacters $FirstName).replace(' ','.').tolower(),(Convert-ToLatinCharacters $LastName).replace(' ','.').tolower(),$UPNSuffix
      
    if (Get-ADUser -Filter {userprincipalname -eq $BaseUPN} -ErrorAction SilentlyContinue) {
        $index = 0
        do {
            $index++
            $UserPrincipalName = "{0}{1}@{2}" -f $BaseUPN.Split("@")[0],$index,$UPNSuffix
        } until (-not(Get-ADUser -Filter {userprincipalname -eq $UserPrincipalName} -ErrorAction SilentlyContinue))
  
    } else {
        $UserPrincipalName = $BaseUPN
    }
    return $UserPrincipalName
}
  
function New-JDADUser {
    [CmdletBinding(SupportsShouldProcess=$true)]
    param (
        [Parameter(Mandatory=$true)][string]$FirstName,
        [Parameter(Mandatory=$true)][string]$LastName,
        [Parameter(Mandatory=$true)][string]$UserPrincipalName,
        [Parameter(Mandatory=$true)][string]$sAMAccountName,
        [Parameter(Mandatory=$true)][string]$Title,
        [Parameter(Mandatory=$true)][string]$OU,
        [Parameter(Mandatory=$true)][string]$Manager,
        [Parameter(Mandatory=$true)][int]$PasswordLength = 12
    )
     #Generate a password
     $Password = [System.Web.Security.Membership]::GeneratePassword($PasswordLength,2)
  
     #Construct the user HT
     $ADUserHt = @{
        GivenName = $FirstName
        SurName = $LastName
        ChangePasswordAtLogon = $true
        EmailAddress = $UserPrincipalName
        UserPrincipalName = $UserPrincipalName
        sAMAccountName = $sAMAccountName
        Title = $Title
        Name = "$FirstName $LastName ($sAMAccountName)"
        Displayname = "$FirstName $LastName"
        Manager = $Manager
        Path = $OU
        AccountPassword = (ConvertTo-SecureString -String $Password -AsPlainText -Force)
        Enabled = $true
        OtherAttribute = @{proxyAddresses = "SMTP:$UserPrincipalName"}
     }
     try {
        #Create the user and return a custom object
        New-ADUser @ADUserHt -ErrorAction Stop 
        Write-Verbose "Successfully created the user $($ADUserHt.Name)"
        [pscustomobject] @{
            sAMAccountName = $ADUserHt.sAMAccountName 
            UserPrincipalName = $ADUserHt.UserPrincipalName 
            Password = $Password
        }
     } catch {
        Write-Warning "Error creating the user $($ADUserHt.Name) `r`n$_"
     }
}
#endregion functions
    try {
        $sAMAccountName = New-JDSamAccountName -FirstName $Firstname -LastName $LastName
        $UPNandMail = New-JDUPNAndMail -FirstName $Firstname -LastName $LastName -UPNSuffix $UPNSuffix
        $ManagerDN = Get-JDDNFromUPN -UserPrincipalName $Manager
  
        #Create the user in Active Directory
        $NewAdUserHt = @{
            FirstName = $Firstname
            LastName = $LastName
            Manager = $ManagerDN
            sAMAccountName = $sAMAccountName
            UserPrincipalName = $UPNandMail
            Title = $Title
            OU = $TargetOU
            PasswordLength = $PasswordLength
        }
        Write-Output $NewAdUserHt
        $ADUser = New-JDADUser @NewAdUserHt -ErrorAction Stop
        $UpdateHt = @{
            Status = 'Created'
            UserName = $ADUser.sAMAccountName 
            EmailAddress = $ADUser.UserPrincipalName 
        }
        Update-SPOListItem -SPOConnection $SPConnection -ListItemID $UserData.ID -ListFieldsValues $UpdateHt -ListName $ListName
    } catch {
         $UpdateHt = @{
            Status = 'Error'
        }
        Update-SPOListItem -SPOConnection $SPConnection -ListItemID $UserData.ID -ListFieldsValues $UpdateHt -ListName $ListName
        Write-Warning $_
    }

3. Last step is to create the Webhook that will be used when triggering the runbook from the SharePoint workflow. As notified when running the cmdlet, save the WebhookURI, you will need it later and cannot see it more than on Webhook creation. I have set the Webhook expirytime to 2 years, change it according to your needs.

$SPOWebHookHt = @{
    Name = 'SPOWorkflow'
    RunbookName = 'Create-ADUsersFromSPO'
    IsEnabled = $true
    ExpiryTime = (Get-Date).AddDays(730)
}
New-AzureRmAutomationWebhook @SPOWebHookHt

2016-01-09_15-37-15spoworkflow

CONFIGURE THE SHAREPOINT WORKFLOW
1. Open SharePoint Designer and open your website containing the custom list.
2. Add a new List Workflow to your site and associate the workflow with your custom list.
2016-01-09_15-58-35
3. Click on the workflow and edit the Start Options to kick of the workflow when a new item has been created.
2016-01-09_16-01-54
2016-01-09_16-02-31
4. Edit and customize the workflow to fit your needs. In my case, I will have one stage for manager approval and one stage for executing the automation runbook.

Manager approval stage
a. Create a “Start a task process action” to submit the request to the manager.
2016-01-09_16-31-25
b. Create a condition to Execute the runbook if the request was approved.
2016-01-09_16-44-58

Execute Azure Automation Runbook stage
a. First build a dictionary with the data you want to pass to the automation webhook.
2016-01-09_17-04-39
b. Insert a “Call HTTP Web Service” action and configure it to POST the earlier created dictionary to the Webhook url you saved creating the Webhook.
2016-01-09_17-09-36
c. Our last step before ending the workflow will be to write back the response from the webhook to the SharePoint list item. This makes it easier for us to track if the task was properly submitted to Azure Automation. 2016-01-09_17-15-46
5. Check the workflow for errors before saving and publishing. This is my finished workflow before publishing it.
2016-01-09_17-25-17

IN ACTION
First, we create a new item in the SharePoint list to start the process.2016-01-09_19-04-18
2016-01-09_19-05-38

The manager approval process sends an email to the new users manager as we stated in the workflow.
2016-01-09_19-06-22
2016-01-09_19-07-47

After the manager has approved the request, the workflow will kick off the runbook, create the user in Active Directory and write back the UserName/EmailAddress and status of the newly created user to the list. In this example, a password is generated but not distributed to anyone.
2016-01-09_19-12-56
2016-01-09_19-15-032016-01-09_20-08-01
2016-01-09_19-14-18

My hope is that you with this post have got some inspiration on what you can achieve with Azure Automation in combination with SharePoint (Online or On-Prem). Sky is the limit!

/Johan

Creating AD users with help from SharePoint Online and PowerShell

Creating users in different systems is a common task that in many cases can be quite challenging. It gets even more challenging having migrated email to Office 365, decommisioned the Exchange Servers, still keeping the local Active Directory. Using Directory Synchronization/Password sync, as of today, creating users in the correct way in your local Active Directory is not optional. By the correct way, I mean a user with proper UserPrincipalName, proxyAddresses, mail etc, which usually is where we get problems.

We do of course have lots of tools, like FIM/MIM and others to help us do this in an automated and predictable way. But if we don’t have that, what are the options?

In this post, I will give you an example on how to create a “poor mans solution” on this topic, using tools that you already have if using Office 365. SharePoint Online and PowerShell. If you have System Center Orchestrator in your environment, the integration with SharePoint Online can be handled by an integration pack instead.

OVERVIEW
Overview on that the post will cover:

  • Read list items from an already existing list in SharePoint Online.
  • Create an AD user in a predictable way based on input from SharePoint Online.
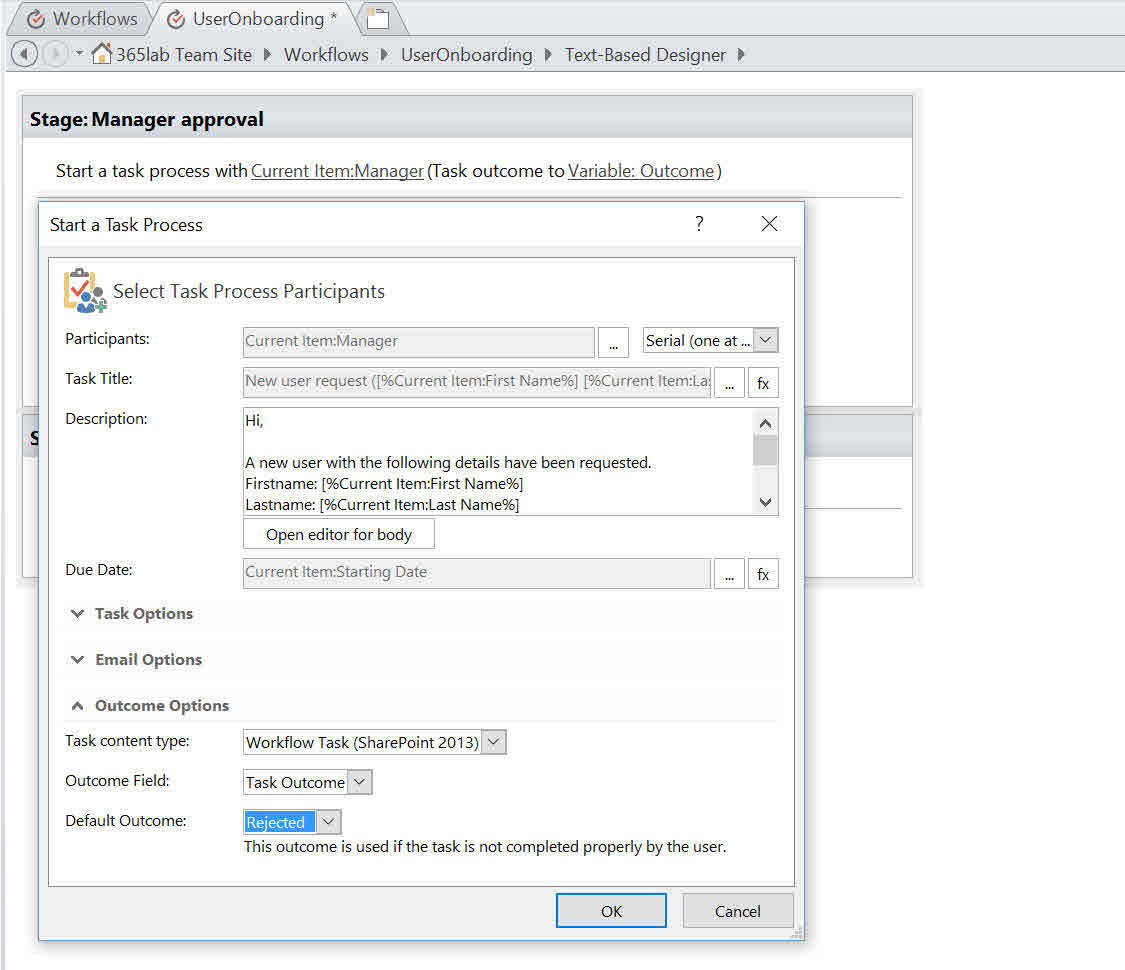
  • Send an email to the new users manager with the account information.
  • Report back status to SharePoint  with status and username/email address to the SharePoint list item.

GETTING STARTED
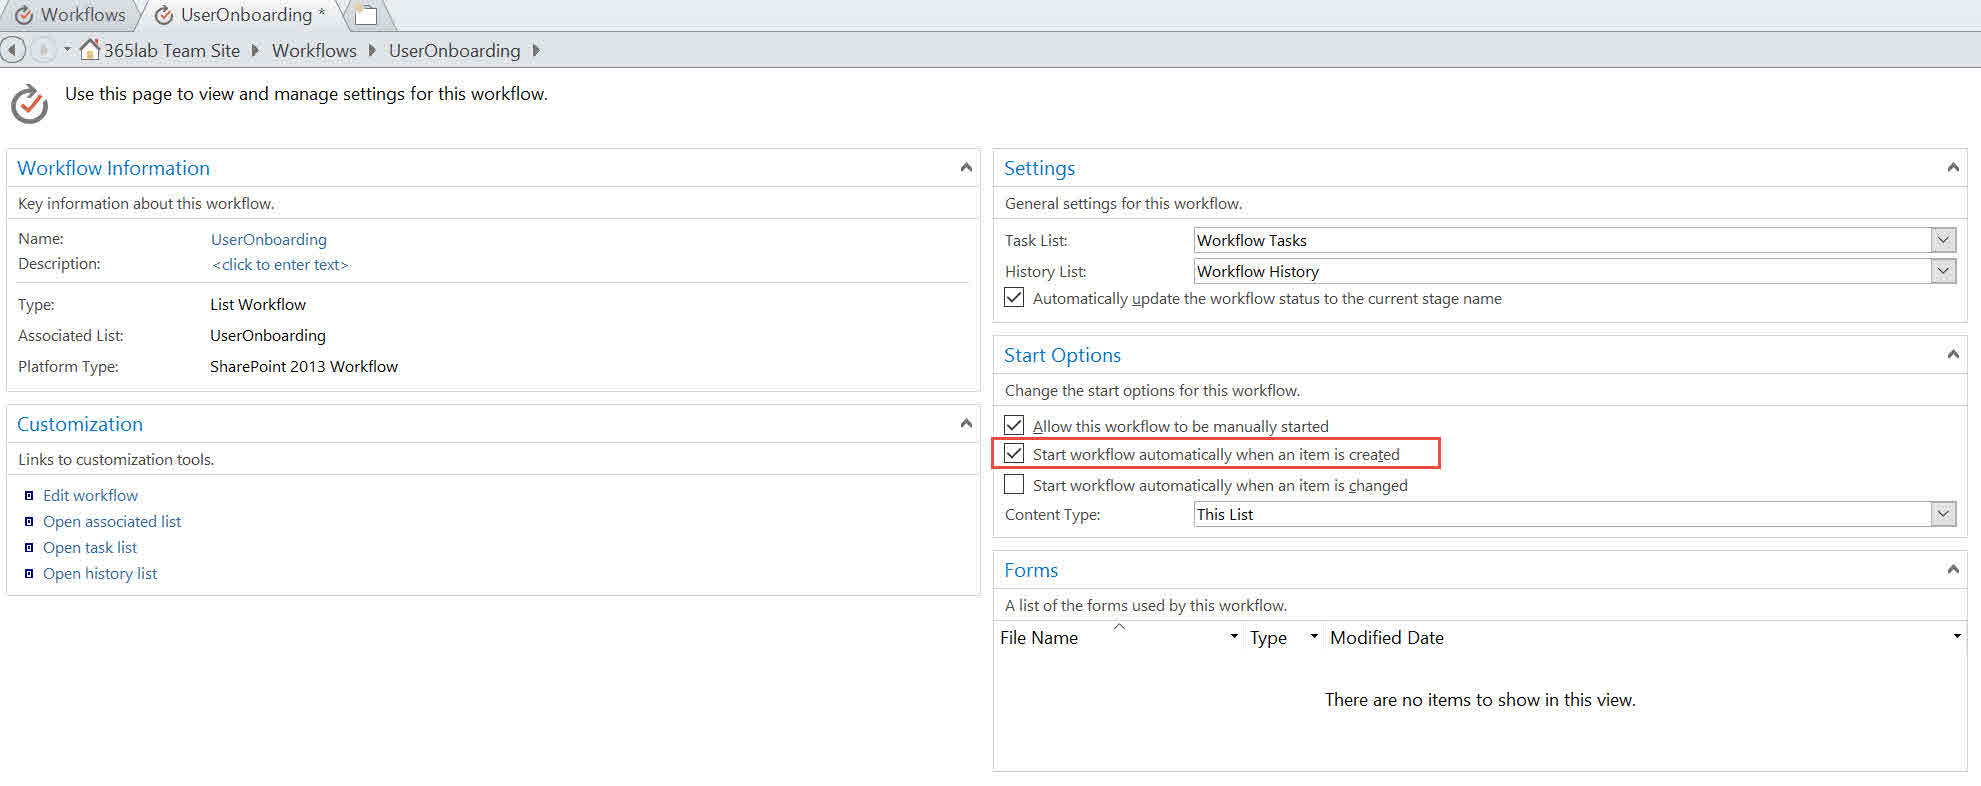
First of all, you need to create a SharePoint list with the columns that you want to use as input for your new users. In my example I have called the list “OnBoarding” and created  the columns as below. The status column will in my case be extra important since I will use that to determine if the user has been created or not. (there are other ways to do that of course).

2015-05-14_13-33-52 2015-05-14_15-07-11

Next up is preparing our “automation server” with the right tools. We will use the Client Side Object Model (CSOM) in SharePoint to integrate with SharePoint Online. For that we need the SharePoint Server 2013 Client Components SDK, which can be downloaded from here.  You also need to have the ActiveDirectory PowerShell module on the machine running the script.

CREATING THE USER / RUNNING THE SCRIPT
First of all, we need input data in the SharePoint list for the user to create. 

2015-05-14_15-50-072015-05-14_15-50-41

Then configure the script to fit your AD Settings, SPO credentials, addresses and the column name mappings in the $SPListItemColumns hashtable. Note that spaces will be replaced by ‘_x0020_’, so for example ‘Last Name’ will be ‘Last_x0020_Name’.
2015-05-14_19-35-10

Apart from the above, the example script consists of the simple functions described below:

  • Convert-ToLatinCharacters – will get rid of all the non-unicode characters and some more creating the username. (Thanks to Johan Akerstrom)
  • Get-JDDNFromUPN – returns distinguishedname of a userprincipalname, to support adding a manager to the AD User.
  • New-JDSamAccountName – Generates a samaccountname for the user, based on firstname + lastname (default 3+3 characters). Will handle duplicates.
  • New-JDUPNAndMail – Generates a userprincipalname and emailaddress based on firstname.lastname. Will also handle duplicates but assumes that UPN and Email are the same in your environment.
  • New-JDADUser  Creates the AD user and returns sAMAccountName, UserPrincipalName and the Password. Password generated by the System.Web GeneratePassword method (there are of course other and better methods)
  • Send-JDWelcomeEmail – Basic function to send a “Welcome Email” to the manager with the account information. Lots of room for design improvement in the email sent out, but it works. The email will contain the users password in clear text, so be careful with the recipient.

CreateADUsersFromSPO.ps1

<#
.SYNOPSIS
    The scripts creates and active directory users based on input from a SharePoint list in SharePoint Online.
    For more details, read at 365lab.net
.EXAMPLE
   .\CreateADUsersFromSPO.ps1 -Verbose
.NOTES
    File Name: CreateADUsersFromSPO.ps1
    Author   : Johan Dahlbom, johan[at]dahlbom.eu
    Blog     : 365lab.net 
    The script are provided “AS IS” with no guarantees, no warranties, and they confer no rights.
    Requires PowerShell Version 3.0!
#>
[CmdletBinding(SupportsShouldProcess=$true)]
param(
    $UPNSuffix = "365lab.net",
    $OrganizationalUnit = "OU=Users,OU=365lab Inc.,DC=ad,DC=365lab,DC=net",
    $PasswordLength = 12
)
#Import the Required Assemblys from the Client components SDK (https://www.microsoft.com/en-us/download/details.aspx?id=35585)
[System.Reflection.Assembly]::LoadWithPartialName("Microsoft.SharePoint.Client") | Out-Null
[System.Reflection.Assembly]::LoadWithPartialName("Microsoft.SharePoint.Client.Runtime") | Out-Null
[System.Reflection.Assembly]::LoadWithPartialName(“System.Web”) | Out-Null
 
#Import Active Directory Module
Import-Module ActiveDirectory -Verbose:$false
 
#Define SharePoint Online Credentials with proper permissions
$User = 'admin@tenant.onmicrosoft.com'
$Pass = ConvertTo-SecureString 'password' -AsPlainText -Force
#SharePoint online address and list name
$SPOUrl = "https://tenant.sharepoint.com/"
$SPOList = "UserOnboarding"
#Column Name mapping in SharePoint 
$SPListItemColumns = @{
        FirstName = "First_x0020_Name"
        LastName = "Last_x0020_Name"
        Title = "Title"
        Manager = "Manager"
        Status = "Status"
        Mail = "EmailAddress"
}

#region functions
function Convert-ToLatinCharacters {
    param(
        [string]$inputString
    )
    [Text.Encoding]::ASCII.GetString([Text.Encoding]::GetEncoding("Cyrillic").GetBytes($inputString))
}
 
function Get-JDDNFromUPN {
    param (
        [ValidateScript({Get-ADUser -Filter {UserprincipalName -eq $_}})] 
        [Parameter(Mandatory=$true)][string]$UserPrincipalName
    )
        $ADUser = Get-ADUser -Filter {UserprincipalName -eq $UserPrincipalName} -ErrorAction stop
        return $ADUser.distinguishedname
}
 
function New-JDSamAccountName {
    param (
        [Parameter(Mandatory=$true)][string]$FirstName,
        [Parameter(Mandatory=$true)][string]$LastName,
        [parameter(Mandatory=$false)][int]$FirstNameCharCount = 3,
        [parameter(Mandatory=$false)][int]$LastNameCharCount = 3
    )
    #Construct the base sAMAccountName
    $BaseSam = "{0}{1}" -f (Convert-ToLatinCharacters $FirstName).Substring(0,$FirstNameCharCount),(Convert-ToLatinCharacters $LastName).Substring(0,$LastNameCharCount)
 
    #Add a number until you find a free sAMAccountName
    if (Get-ADUser -Filter {samaccountname -eq $BaseSam} -ErrorAction SilentlyContinue) {
        $index = 0
        do {
            $index++
            $sAMAccountName = "{0}{1}" -f $BaseSam.ToLower(),$index
        } until (-not(Get-ADUser -Filter {samaccountname -eq $sAMAccountName } -ErrorAction SilentlyContinue))
    } else {
        $sAMAccountName = $BaseSam.tolower()
    }
    return $sAMAccountName
}
     
function New-JDUPNAndMail {
    param (
        [Parameter(Mandatory=$true)][string]$FirstName,
        [Parameter(Mandatory=$true)][string]$LastName,
        [Parameter(Mandatory=$true)][string]$UPNSuffix
     )
    #Construct the base userPrincipalName
    $BaseUPN = "{0}.{1}@{2}" -f (Convert-ToLatinCharacters $FirstName).replace(' ','.').tolower(),(Convert-ToLatinCharacters $LastName).replace(' ','.').tolower(),$UPNSuffix
     
    if (Get-ADUser -Filter {userprincipalname -eq $BaseUPN} -ErrorAction SilentlyContinue) {
        $index = 0
        do {
            $index++
            $UserPrincipalName = "{0}{1}@{2}" -f $BaseUPN.Split("@")[0],$index,$UPNSuffix
        } until (-not(Get-ADUser -Filter {userprincipalname -eq $UserPrincipalName} -ErrorAction SilentlyContinue))
 
    } else {
        $UserPrincipalName = $BaseUPN
    }
    return $UserPrincipalName
}
 
function New-JDADUser {
    [CmdletBinding(SupportsShouldProcess=$true)]
    param (
        [Parameter(Mandatory=$true)][string]$FirstName,
        [Parameter(Mandatory=$true)][string]$LastName,
        [Parameter(Mandatory=$true)][string]$UserPrincipalName,
        [Parameter(Mandatory=$true)][string]$sAMAccountName,
        [Parameter(Mandatory=$true)][string]$Title,
        [Parameter(Mandatory=$true)][string]$OU,
        [Parameter(Mandatory=$true)][string]$Manager,
        [Parameter(Mandatory=$true)][int]$PasswordLength = 12
    )
     #Generate a password
     $Password = [System.Web.Security.Membership]::GeneratePassword($PasswordLength,2)
 
     #Construct the user HT
     $ADUserHt = @{
        GivenName = $FirstName
        SurName = $LastName
        ChangePasswordAtLogon = $true
        EmailAddress = $UserPrincipalName
        UserPrincipalName = $UserPrincipalName
        sAMAccountName = $sAMAccountName
        Title = $Title
        Name = "$FirstName $LastName ($sAMAccountName)"
        Displayname = "$FirstName $LastName"
        Manager = $Manager
        Path = $OU
        AccountPassword = (ConvertTo-SecureString -String $Password -AsPlainText -Force)
        Enabled = $true
        OtherAttribute = @{proxyAddresses = "SMTP:$UserPrincipalName"}
     }
     try {
        #Create the user and return a custom object
        New-ADUser @ADUserHt -ErrorAction Stop 
        Write-Verbose "Successfully created the user $($ADUserHt.Name)"
        [pscustomobject] @{
            sAMAccountName = $ADUserHt.sAMAccountName 
            UserPrincipalName = $ADUserHt.UserPrincipalName 
            Password = $Password
        }
     } catch {
        Write-Warning "Error creating the user $($ADUserHt.Name) `r`n$_"
     }
}
 
function Send-JDWelcomeEmail {
    param (
        [Parameter(Mandatory=$true)][string]$Recipient,
        [Parameter(Mandatory=$false)][string]$Sender = "useronboarding@365lab.net",
        [Parameter(Mandatory=$true)][string]$uUserPrincipalName,
        [Parameter(Mandatory=$true)][string]$usAMAccountName,
        [Parameter(Mandatory=$true)][string]$uPassword
    )
    $message = @"
    Hi,
 
    A user with the following account details was created in Active Directory:
    Username: $usAMAccountName
    EmailAddress: $uUserPrincipalName
    Password: $uPassword (needs to be changed at first logon)
 
    Best Regards
    365lab IT department
"@
    $MailMessageHt = @{
        From = $Sender
        To = $Recipient
        Body = $message
        SmtpServer = "365lab-net.mail.protection.outlook.com"
        Subject = "User $uUserPrincipalName was created"
    }
    Send-MailMessage @MailMessageHt
}
#endregion functions
 
#Connect to SharePoint Online
$Context = New-Object Microsoft.SharePoint.Client.ClientContext($SPOUrl)
$Context.Credentials = New-Object Microsoft.SharePoint.Client.SharePointOnlineCredentials($User, $Pass)
#Get the list
$List = $Context.Web.Lists.GetByTitle($SPOList)
$Query = [Microsoft.SharePoint.Client.CamlQuery]::CreateAllItemsQuery(100) 
$Items = $List.GetItems($Query)
$Context.Load($Items)
$Context.ExecuteQuery()
 
#Loop through list items
foreach($item in $Items) {
    #Get list item for later reference
    $ListItem = [Microsoft.SharePoint.Client.ListItem]$listItem = $List.GetItemById($Item.FieldValues["ID"])
    if ($item.FieldValues[$SPListItemColumns.Status] -eq "New") {
        Write-Verbose "Processing list item $Firstname $LastName with ID=$($item.FieldValues["ID"])"
 
        #Put the fieldvalues in variables.
        $FirstName = $item.FieldValues[$SPListItemColumns.FirstName]
        $LastName = $item.FieldValues[$SPListItemColumns.LastName]
        $Title = $item.FieldValues[$SPListItemColumns.Title]
        $Manager = $item.FieldValues[$SPListItemColumns.Manager].LookupValue
        #Generate Sam, UserPrincipalName/Email and the managers DN
        try {
            $sAMAccountName = New-JDSamAccountName -FirstName $Firstname -LastName $LastName
            $UPNandMail = New-JDUPNAndMail -FirstName $Firstname -LastName $LastName -UPNSuffix $UPNSuffix
            $ManagerDN = Get-JDDNFromUPN -UserPrincipalName $Manager
 
            #Create the user in Active Directory
            $NewAdUserHt = @{
                FirstName = $Firstname
                LastName = $LastName
                Manager = $ManagerDN
                sAMAccountName = $sAMAccountName
                UserPrincipalName = $UPNandMail
                Title = $Title
                OU = $OrganizationalUnit
                PasswordLength = $PasswordLength
            }
            $ADUser = New-JDADUser @NewAdUserHt -ErrorAction Stop
            Write-Verbose "Created the AD user $sAMAccountName with UPN $UPNandMail"
 
            #Update EmailAddress in the SharePoint List
            $ListItem[$SPListItemColumns.Mail] = $ADUser.UserPrincipalName
            $ListItem[$SPListItemColumns.Status] = "Completed"
            Write-Verbose "Updated the SharePoint list item with status=Completed"
 
            #Send information to manager
            Send-JDWelcomeEmail -Recipient $Manager -uUserPrincipalName $UPNandMail -usAMAccountName $sAMAccountName -uPassword $ADUser.Password
            Write-Verbose "Sent account information to $Manager"
        } catch {
            Write-Warning $_
        }
        #Execute the changes
        $ListItem.Update()
        $Context.ExecuteQuery()
    }
}

Having understood all the functions and settings, we are now ready to run the script!
2015-05-14_20-33-46
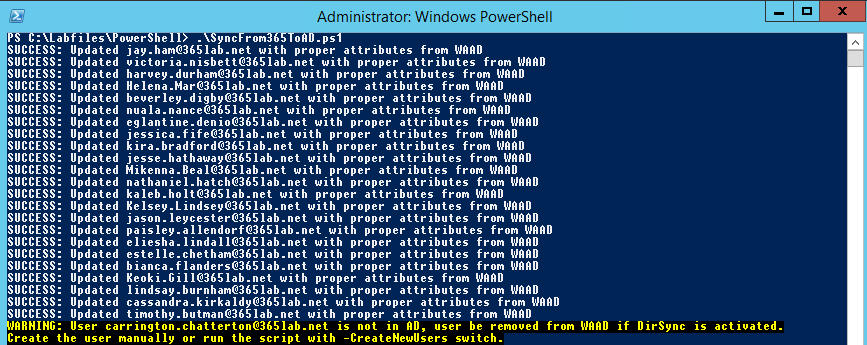
The script executed successfully, which means we should now be able to add the script as a scheduled task to automate the task even further.

RESULTS
We now have a properly created AD user according to my organizations needs, and the manager has got an email with the account information needed. The only thing left now is waiting for the directory synchronization and licensing scripts to kick in, and the user will be all set.

2015-05-14_21-09-06
Created AD user

2015-05-14_20-07-25
Updated SharePoint list item

2015-05-14_20-06-31
Information email sent to manager

Hopefully this has given you some useful information regarding how you can create your simple self service tool with some help from things you already have. Let me know if you have any feedback!

/Johan

Exchange Online: Adding a secondary e-mail domain to all users

I thought that I would share with you a simple script that will add an email domain to your users. This script is handy if you for example would like to add contoso.info to your already existing contoso.com environment. If you are using the email address aaron@contoso.com you want the script to automatically add aaron@contoso.info.

Please note that the domain name that you are adding first has to be added and verified in your Office 365 tenant.

DirSync version (modifying Active Directory using ADSI):

$activeDomain = New-Object DirectoryServices.DirectoryEntry
$domain = $activeDomain.distinguishedName
$searcher = [System.DirectoryServices.DirectorySearcher]"[adsi]LDAP://$domain"
$searcher.filter = '(proxyaddresses=*@contoso.com*)'
$result = $searcher.findall()
$users = $result.Path

$users | ForEach-Object {
    $user = [adsi]"$_"
    $proxyaddresses = $user.proxyaddresses.Value | Where-Object { $_ -like 'smtp:*@contoso.com' }
    foreach ($proxyaddress in $proxyaddresses) {
        $newaddress = ($proxyaddress.split ':')[1] -replace '@contoso.com', '@contoso.info'
        $user.proxyaddresses.add("smtp:$newaddress")
    }
    $user.setinfo()
}

Cloud version:

$cred = Get-Credential -Message 'Please enter your Office 365 admin crendentials'
$O365 = New-PSSession -ConfigurationName Microsoft.Exchange -ConnectionUri 'https://outlook.office365.com/powershell-liveid/' -Credential $cred -Authentication Basic -AllowRedirection 
$importcmd = Import-PSSession $O365 -CommandName @('Get-Mailbox','Set-Mailbox') -AllowClobber

Get-Mailbox -ResultSize Unlimited -Filter { EmailAddresses -like '*@contoso.com' } | Select-Object Identity,EmailAddresses | ForEach-Object {
    $proxyaddresses = $_.EmailAddresses | Where-Object { $_ -like 'smtp:*@contoso.com' }
    foreach ($proxyaddress in $proxyaddresses) {
        $newaddress = ($proxyaddress -split ':')[1] -replace '@contoso.com','@contoso.info'
        Set-Mailbox -Identity $_.Identity -EmailAddresses @{Add="smtp:$newaddress"}    
    }
}

/ Andreas

Automating the creation of an OU structure based on a template

Discussing OU structures in an Active Directory can easily get into a religious matter. 🙂
Anyhow, the reality is that different organizations have different needs. Therefore, you sometimes end up with more or less complex OU structures. In order to make the creation of the ‘more complex structures’ as the one in the screenshot below easier, I’ve created a small function that lets you copy the structure from a template or from an existing, already properly configured site/structure.
2014-11-28_22-10-48

function Copy-JDOrganizationalUnit {
<#
.SYNOPSIS
    The script copies an OU structure from one OU to another. The destination OU must already be created.
.EXAMPLE
    Copy-JDOrganizationalUnit -SourcePath "OU=HAB,OU=SE,OU=Sites,DC=lucernepublishing,DC=local" -DestinationPath "OU=HEL,OU=FI,OU=Sites,DC=lucernepublishing,DC=local" -Verbose
.PARAMETER SourceOU
    Plain name of the source OU to copy the structure from.
.PARAMETER DestinationOU
    Plain name of the destination OU to replicate the structure to.
.PARAMETER ProtectOU
    Sets the flag ProtectOUFromAccidentialDeletion
.NOTES
    File Name: Copy-JDOrganizationalUnit
    Author   : Johan Dahlbom, johan[at]dahlbom.eu
    Blog     : 365lab.net
    The script are provided “AS IS” with no guarantees, no warranties, and they confer no rights.
#>

  [CmdletBinding(SupportsShouldProcess=$true,HelpUri = 'http://www.365lab.net/')]
  param (
    [Parameter(Mandatory=$true,ValueFromPipeline=$true,ValueFromPipelineByPropertyName=$true)]
    [ValidateScript({Get-ADOrganizationalUnit -Identity $_})]
    [string]$SourcePath,
    [Parameter(Mandatory=$true,ValueFromPipeline=$true,ValueFromPipelineByPropertyName=$true)]
    [ValidateScript({Get-ADOrganizationalUnit -Identity $_})]
    [string]$DestinationPath,
    [switch]$ProtectOU
  )
  Write-Verbose "Copying structure from $SourcePath to $DestinationPath..."
  Get-ADOrganizationalUnit -SearchBase $SourcePath -Filter {Distinguishedname -ne $SourcePath} -Properties canonicalname| Select-Object DistinguishedName,canonicalname,Name  | Sort-Object -Property CanonicalName | ForEach-Object {
    try {
      $NewOU = @{
        Path = $_.DistinguishedName.replace("OU=$($Name),",'').Replace("$SourcePath","$DestinationPath")
        Name = $_.Name
        ProtectedFromAccidentalDeletion = $ProtectOU
      }
      New-ADOrganizationalUnit @NewOU -ErrorAction Stop
      Write-Verbose "Created OU OU=$Name,$DestPath"
    } catch {
      Write-Warning "Error with creating OU=$Name,$DestPath`r`n$_"
    }
  }
}

Running the example as below, will copy the entire structure from OU=JKG to OU=BRU. It will not overwrite any existing OU’s.

$OUs = @{
    SourcePath = 'OU=JKG,OU=SE,OU=Sites,DC=365lab,DC=internal'
    DestinationPath = 'OU=BRU,OU=BE,OU=Sites,DC=365lab,DC=internal'
}
Copy-JDOrganizationalUnit @OUs -Verbose -ProtectOU

2014-11-28_23-13-57

As you can see above, the entire structure has now been copied according to the Source OU. Let me know if you have feedback or suggestions on improvements!

/Johan

PowerShell GUI application to set thumbnailPhoto

A while ago I started experimenting with writing GUI applications in PowerShell. This script that updates the thumbnailPhoto attribute of a user was my first attempt, and since it works quite well I thought that I might share it with you.

The thumbnailPhoto attribute is used more and more, and it is now supported by Outlook, SharePoint and Lync. It is also supported by Office 365, and when using DirSync the data is synced to Windows Azure Active Directory.

This script uses Windows Presentation Foundation (WPF) which is part of .Net 3.0. The window form is easily built with Microsoft Visual Studio Express 2013 for Windows Desktop and can be saved as a XAML document, which we can import in our PowerShell script.

Data are saved and retrieved from Active Directory using ADSI, which means no additional PowerShell modules must be installed. The only requirements are PowerShell 2.0 or newer with .Net Framework 3.0. If running PowerShell version 2.0 you also need the -STA parameter to powershell.exe.

The application itself is very simple, just type the username in the search box, and browse for a photo. When clicking Apply the image data is saved to Active Directory. By default all users has permission to change their own thumbnailPhoto. To change other users, permissions needs to be delegated.

There is a limit in picture size, maximum size is 100 kB, but since Office 365 cannot handle that large image I have set the limit in the script to 10 kB. Also recommended resolution is 96×96 pixels.

thumbnailphotoguiapp

Here’s the full script, please note that you need a valid path to the .xaml document.

Set-ThumbnailPhotoGUI-mainform.xaml

<Window x:Class="MainWindow"
    xmlns="http://schemas.microsoft.com/winfx/2006/xaml/presentation"
    xmlns:x="http://schemas.microsoft.com/winfx/2006/xaml"
    Title="Thumbnail photo changer app" Height="350" Width="525" ResizeMode="NoResize">
    <Grid x:Name="list1" Margin="0,0,0,2">
        <Label Content="Username:" HorizontalAlignment="Left" Width="105" Margin="20,23,0,250" />
        <TextBox x:Name="txtSearch" Margin="138,27,0,0" HorizontalAlignment="Left" VerticalAlignment="Top" Width="122"/>
        <Button x:Name="btnSearch" Content="Search" HorizontalAlignment="Left" VerticalAlignment="Top" Width="50" Margin="271,27,0,0"/>
        <Label Content="Surname:" HorizontalAlignment="Left" Height="30" Margin="20,92,0,0" VerticalAlignment="Top" Width="92"/>
        <Label x:Name="lblSn" Content="" Height="30" VerticalAlignment="Top" HorizontalAlignment="Left" Width="315" Margin="134,92,0,0"/>
        <Label Content="UserPrincipalName:" HorizontalAlignment="Left" Height="30" Margin="20,123,0,0" VerticalAlignment="Top" Width="115"/>
        <Label x:Name="lblUPN" Content="" Height="30" VerticalAlignment="Top" HorizontalAlignment="Left" Width="346" Margin="134,123,0,0"/>
        <Label Content="Givenname:" HorizontalAlignment="Left" Height="30" Margin="20,61,0,0" VerticalAlignment="Top" Width="92"/>
        <Label x:Name="lblGivenName" Content="" Height="30" VerticalAlignment="Top" HorizontalAlignment="Left" Width="315" Margin="134,61,0,0"/>
        <Image x:Name="imgThumb" HorizontalAlignment="Left" Height="96" Margin="29,203,0,0" VerticalAlignment="Top" Width="96"/>
        <Button Name="btnImg" Content="Change photo..." HorizontalAlignment="Left" Height="28" Margin="149,267,0,0" VerticalAlignment="Top" Width="111" IsEnabled="False"/>
        <Label Content="DistinguishedName:" HorizontalAlignment="Left" Height="30" Margin="20,156,0,0" VerticalAlignment="Top" Width="126"/>
        <Label x:Name="lblDN" Content="" Height="30" VerticalAlignment="Top" HorizontalAlignment="Left" Width="373" Margin="134,156,0,0"/>
        <Button x:Name="btnApply" Content="Apply" HorizontalAlignment="Left" Height="28" Margin="278,267,0,0" VerticalAlignment="Top" Width="111" IsEnabled="False"/>
    </Grid>
</Window>

Set-ThumbnailPhotoGUI.ps1

if ([threading.thread]::CurrentThread.ApartmentState.ToString() -eq 'MTA') {
    Write-Error "This script requires PowerShell to run in Single-Threaded Apartment. Please run powershell.exe with parameter -STA"
    Exit
}

Add-Type -AssemblyName PresentationFramework 
[xml]$XAML = Get-Content "Set-ThumbnailPhotoGUI-mainform.xaml"
$XAML.Window.RemoveAttribute("x:Class")
 
$global:userinfo = @{
    dn = $null
    photo = [byte[]]$null
}
 
function Invoke-FileBrowser {
    param([string]$Title,[string]$Directory,[string]$Filter="jpeg (*.jpg)|*.jpg")
    [System.Reflection.Assembly]::LoadWithPartialName("System.Windows.Forms") | Out-Null
    $FileBrowser = New-Object System.Windows.Forms.OpenFileDialog
    $FileBrowser.InitialDirectory = $Directory
    $FileBrowser.Filter = $Filter
    $FileBrowser.Title = $Title
    $Show = $FileBrowser.ShowDialog()
    If ($Show -eq "OK") { Return $FileBrowser.FileName }
}
 
function Get-LDAPUsers($sam) {
    $activeDomain = New-Object DirectoryServices.DirectoryEntry
    $domain = $activeDomain.distinguishedName
    $searcher = [System.DirectoryServices.DirectorySearcher]"[ADSI]LDAP://$domain"
    $searcher.filter = "(&(samaccountname=$sam)(objectClass=user)(objectClass=person))"
    $result = $searcher.findall()
     
    if ($result.count -gt 1) {
        Write-Warning "More than one user found. Please refine your search."
    } elseif ($result.count -eq 1) {
        $result = $searcher.findone().getDirectoryEntry()
        [pscustomobject]@{
            UserPrincipalName = $result.userprincipalname[0]
            DistinguishedName = $result.distinguishedname[0]
            samAccountName = $result.samaccountname[0]
            Givenname = $result.givenname[0]
            Surname = $result.sn[0]
            ThumbnailPhoto = $result.thumbnailphoto
        }
    }
}
 
function Update-WPFForm($sam) {
   $selecteduser = Get-LDAPUsers $sam
   if ($selecteduser) {
        $global:userinfo.dn = $selecteduser.DistinguishedName
        $global:userinfo.photo = [byte[]]$($selecteduser.thumbnailphoto)
 
        $lblGivenName.Content = $selecteduser.GivenName
        $lblSN.Content = $selecteduser.SurName
        $lblUPN.Content = $selecteduser.UserPrincipalName
        $lblDN.Content = $global:userinfo.dn
        $txtSearch.Text = $selecteduser.SamAccountName
        $imgThumb.Source = $global:userinfo.photo
        $btnImg.IsEnabled = $true
    }
}
 
#region GUI
    $reader=(New-Object System.Xml.XmlNodeReader $xaml)
    $window=[Windows.Markup.XamlReader]::Load($reader)
 
    $btnSearch = $window.FindName("btnSearch")
    $btnImg = $window.FindName("btnImg")
    $btnApply = $window.FindName("btnApply")
    $txtSearch = $window.FindName("txtSearch")
    $lblGivenName = $window.FindName("lblGivenName")
    $lblSn = $window.FindName("lblSn")
    $lblUPN = $window.FindName("lblUPN")
    $lblDN = $window.FindName("lblDN")
    $imgThumb = $window.FindName("imgThumb")
#endregion GUI
 
#region Events
 
    #region btnSearchClick
        $btnSearch_click = $btnSearch.add_Click
        $btnSearch_click.Invoke({
            Update-WPFForm($txtSearch.Text)
        })
    #endregion btnSearchClick
 
    #region btnImgClick
        $btnImg_click = $btnImg.add_Click
        $btnImg_click.Invoke({
            $file = Invoke-FileBrowser -Title "Choose a thumbnail photo" -Filter "Jpeg pictures (*.jpg)|*.jpg"
            if ($file) {
                if ((Get-Item $file).length -gt 10kB) {
                    Write-Warning "Picture too large. Maximum size is 10 kB."
                } else {
                    $global:userinfo.photo = [byte[]](Get-Content $file -encoding byte)
                    $imgThumb.Source = $global:userinfo.photo
                    $btnApply.IsEnabled = $true
                }
            }
        })
    #endregion btnImgClick
     
    #region btnApplyClick
        $btnApply_click = $btnApply.add_Click
        $btnApply_click.Invoke({
            $user = New-Object DirectoryServices.DirectoryEntry "LDAP://$($global:userinfo.dn)"
            $user.put("thumbnailPhoto", $global:userinfo.photo)
            $user.setinfo()
            $btnApply.IsEnabled = $false
            Write-Verbose "User $($global:userinfo.dn) updated."
        })
    #endregion btnApplyClick
     
    #region textChange
        $txtSearch_Change = $txtSearch.add_KeyDown
        $txtSearch_Change.Invoke({
            if ($_.Key -ieq 'Return') {
                Update-WPFForm($txtSearch.Text)
            }
        })
    #endregion textChange
 
#endregion Events
 
$window.ShowDialog() | Out-Null

This is just an example how a useful script with GUI can be written with quite simple means. Now let’s get the camera and take some photos!

/ Andreas

Office 365: Migrate from Cloud identities to Dirsync

In some scenarios, you may have to transfer the the source of authority for your already cloud-only created user accounts in Office 365. One scenario when this is required, is when changing from cloud only identities to synchronized identities from your local Active Directory. Another scenario is when you migrate your AD users from one domain to another, as described in this post.

To make the transitioning to DirSync as smooth as possible, you have to take a couple of precautions to make sure that existing Office 365 accounts are properly matched with the accounts in your local Active Directory.

This can be done using one of the following two methods:

  • Soft matching of each user. For a soft match to properly work, you need to make sure that the primary email address (both in mail and in proxyaddresses) and userprincipalname in the cloud and in the local Active Directory matches.
  • For the users that are to be matched, construct an ImmutableID for each user in the local AD and synchronize that value to WAAD prior activation and doing the first Directory Synchronization. The ImmutableID is basically a Base64-encoded value of the ObjectGuid attribute.

Solution
To make this transition easier, I have created a script that and copies the required attributes from WAAD to your local Active Directory automatically. The script can use both methods to match the users.

If you run the script without any parameters, the following attributes will be updated for all matching users in your local Active Directory:

  • GivenName
  • sn (SurName)
  • DisplayName
  • mail
  • proxyAddresses

If using the -UpdateImmutableID switch, an ImmutableID will be created for the user and synced back to WAAD. Please note, that process will only work without additional steps if you have not been using DirSync before.

With the -CreateNewUsers switch, you have the possibility to let the script create users that are in WAAD but not in your local AD. The SamAccountname will be “firstname.lastname” and a random password will be generated for the new user.

2014-04-18 20-53-32
2014-04-18 20-56-44
2014-04-18 20-57-41

Note: a pre-requisite for the script to work properly is that you’ve already populated the UserPrincipalName attribute for all users in your local Active directory. Of course this must match with the UPN’s used in Office 365/WAAD.

SyncFrom365toAD.ps1

<#  
.SYNOPSIS 
    Script that synchronizes attributes from users in WAAD to the local active directory.
.PARAMETER UpdateImmutableID 
    Constructs and inserts the ImmutableID attribute in WAAD.
.PARAMETER TargetOU
    OU to create new users in.
.PARAMETER CreateNewUsers
    Creates new users for users that are not matching the WAAD users UPN.
.NOTES 
    Author: Johan Dahlbom 
    Blog: 365lab.net 
    Email: johan[at]dahlbom.eu 
    The script are provided “AS IS” with no guarantees, no warranties, and they confer no rights.     
#>
param(
[parameter(Mandatory=$false)]
[switch]$UpdateImmutableID = $false,
[parameter(Mandatory=$false)]
[switch]$CreateNewUsers = $false,
[parameter(Mandatory=$false)]
[string]$TargetOU = "OU=Users,OU=365Lab,DC=cloud,DC=lab"
)
 
#Load required Modules and Assemblys
Import-Module MSOnline
Import-Module ActiveDirectory
[Reflection.Assembly]::LoadWithPartialName("System.Web") | Out-Null
 
Connect-MsolService
 
$WAADUsers = Get-MsolUser -All | Where-Object {$_.UserPrincipalName -notlike "*.onmicrosoft.com"}
 
foreach ($WAADUser in $WAADUsers) {
    $ADuser = Get-ADUser -Filter {UserPrincipalName -eq $WAADUser.UserPrincipalName}
      
    try {
 
        $Mail = $($WAADUser.ProxyAddresses | Where-Object {$_ -cmatch "^SMTP"}).substring(5)
         
        if ($ADuser) {
        #Update AD user with attributes from WAAD
        Set-ADUser -Identity $ADuser `
            -EmailAddress $Mail `
            -GivenName $WAADUser.FirstName `
            -SurName $WAADUser.LastName `
            -DisplayName $WAADUser.DisplayName `
            -Replace @{ProxyAddresses=[string[]]$WAADUser.ProxyAddresses} `
            -ErrorAction Stop -WarningAction Stop
 
        Write-Output "SUCCESS: Updated $($ADuser.userprincipalname) with proper attributes from WAAD"
         
        } else {
 
            if ($CreateNewUsers) {
 
                     #Generate password for the user aduser
                     $NewUserPassword = [System.Web.Security.Membership]::GeneratePassword(13,0)
 
                     #Generate samaccountname "firstname.lastname"
                     $SAM = [Text.Encoding]::ASCII.GetString([Text.Encoding]::GetEncoding("Cyrillic").GetBytes("$($WAADUser.Firstname).$($WAADUser.Lastname)".ToLower()))
                                           
                     New-ADUser -Path $TargetOU `
                        -Name $WAADUser.DisplayName `
                        -UserPrincipalName $WAADUser.UserPrincipalName `
                        -SamAccountName $sam `
                        -Enabled $true `
                        -EmailAddress $Mail `
                        -GivenName $WAADUser.FirstName `
                        -SurName $WAADUser.LastName `
                        -DisplayName $WAADUser.DisplayName `
                        -OtherAttributes @{ProxyAddresses=[string[]]$WAADUser.ProxyAddresses} `
                        -AccountPassword (ConvertTo-SecureString $NewUserPassword -AsPlainText -force) `
                        -ErrorAction Stop -WarningAction Stop
 
                     Write-Output "SUCCESS: Created user $sam with password $NewUserPassword"

            } else {
                    
                     Write-Warning "User $($WAADUser.UserPrincipalName) is not in AD, user might not be synchronized correctly or become a duplicate user.`r`nCreate the user manually or run the script with -CreateNewUsers switch."
            
            }
        }
               
        #If UpdateImmutableID switch has been used, construct and set ImmutableID for the WAAD user.
        if ($UpdateImmutableID) {
            $ADuser = Get-ADUser -Filter {UserPrincipalName -eq $WAADUser.UserPrincipalName}
            if ($ADuser) {
                $ImmutableID = [system.convert]::ToBase64String($ADuser.ObjectGUID.ToByteArray())
                Set-MsolUser -UserPrincipalName $WAADUser.UserPrincipalName -ImmutableId $ImmutableID -ErrorAction Stop -WarningAction Stop
            }
        }
      
   } catch [Microsoft.Online.Administration.Automation.MicrosoftOnlineException] {
             
            Write-Warning "Error when updating ImmutableID $ImmutableID for $Mail`r`n$_"
 
   } catch {
            
            Write-Warning "Error when creating user $Mail`r`n$_"
        
   }
 
}

Good luck running the script and with your Dirsync implementation!

/Johan