Monthly Archives: November 2014

Automating the creation of an OU structure based on a template

Discussing OU structures in an Active Directory can easily get into a religious matter. 🙂
Anyhow, the reality is that different organizations have different needs. Therefore, you sometimes end up with more or less complex OU structures. In order to make the creation of the ‘more complex structures’ as the one in the screenshot below easier, I’ve created a small function that lets you copy the structure from a template or from an existing, already properly configured site/structure.
2014-11-28_22-10-48

function Copy-JDOrganizationalUnit {
<#
.SYNOPSIS
    The script copies an OU structure from one OU to another. The destination OU must already be created.
.EXAMPLE
    Copy-JDOrganizationalUnit -SourcePath "OU=HAB,OU=SE,OU=Sites,DC=lucernepublishing,DC=local" -DestinationPath "OU=HEL,OU=FI,OU=Sites,DC=lucernepublishing,DC=local" -Verbose
.PARAMETER SourceOU
    Plain name of the source OU to copy the structure from.
.PARAMETER DestinationOU
    Plain name of the destination OU to replicate the structure to.
.PARAMETER ProtectOU
    Sets the flag ProtectOUFromAccidentialDeletion
.NOTES
    File Name: Copy-JDOrganizationalUnit
    Author   : Johan Dahlbom, johan[at]dahlbom.eu
    Blog     : 365lab.net
    The script are provided “AS IS” with no guarantees, no warranties, and they confer no rights.
#>

  [CmdletBinding(SupportsShouldProcess=$true,HelpUri = 'http://www.365lab.net/')]
  param (
    [Parameter(Mandatory=$true,ValueFromPipeline=$true,ValueFromPipelineByPropertyName=$true)]
    [ValidateScript({Get-ADOrganizationalUnit -Identity $_})]
    [string]$SourcePath,
    [Parameter(Mandatory=$true,ValueFromPipeline=$true,ValueFromPipelineByPropertyName=$true)]
    [ValidateScript({Get-ADOrganizationalUnit -Identity $_})]
    [string]$DestinationPath,
    [switch]$ProtectOU
  )
  Write-Verbose "Copying structure from $SourcePath to $DestinationPath..."
  Get-ADOrganizationalUnit -SearchBase $SourcePath -Filter {Distinguishedname -ne $SourcePath} -Properties canonicalname| Select-Object DistinguishedName,canonicalname,Name  | Sort-Object -Property CanonicalName | ForEach-Object {
    try {
      $NewOU = @{
        Path = $_.DistinguishedName.replace("OU=$($Name),",'').Replace("$SourcePath","$DestinationPath")
        Name = $_.Name
        ProtectedFromAccidentalDeletion = $ProtectOU
      }
      New-ADOrganizationalUnit @NewOU -ErrorAction Stop
      Write-Verbose "Created OU OU=$Name,$DestPath"
    } catch {
      Write-Warning "Error with creating OU=$Name,$DestPath`r`n$_"
    }
  }
}

Running the example as below, will copy the entire structure from OU=JKG to OU=BRU. It will not overwrite any existing OU’s.

$OUs = @{
    SourcePath = 'OU=JKG,OU=SE,OU=Sites,DC=365lab,DC=internal'
    DestinationPath = 'OU=BRU,OU=BE,OU=Sites,DC=365lab,DC=internal'
}
Copy-JDOrganizationalUnit @OUs -Verbose -ProtectOU

2014-11-28_23-13-57

As you can see above, the entire structure has now been copied according to the Source OU. Let me know if you have feedback or suggestions on improvements!

/Johan

Advertisement

Change DNS settings on multiple servers

A common change that is required to be done when doing major infrastructure upgrades is changing dns server settings on clients and servers. Something that I often see is that the changes on the servers are handled manually by logging on with RDP, changing DNS and logging of. Therefore I wanted to share a basic script that does this job for you, for all or a set of servers in Active Directory through WMI. It can of course be customized indefinitely according to your DNS topology and site structure.

By default it will target all servers that are not domain controllers, respond to ping and WMI.
If you have a simple environment with example only two or three DNS servers it’s just to change the $NewDNS array to your specific DNS servers and run the script.

ChangeDNSServers.ps1

Import-Module ActiveDirectory
#New DNS Servers in order
$NewDNS = @("10.255.255.4","10.255.255.5")
$NewDNS | ForEach-Object -Begin { Write-Output "The following DNS servers in order will be set on the machines:" ; $index = 1} -Process { Write-Output "#$($index): $_" ; $index++ }
#Get all servers in active directory (excluding domain controllers)
$ServersToChange = (Get-ADComputer -Filter {operatingsystem -like "*Server*" -and enabled -eq $true -and primarygroupid -ne '516'}).Name
#Loop through all servers and change to the new DNS servers
foreach ($Server in $ServersToChange) {
    if (Test-Connection -ComputerName $Server -Count 1 -Quiet -ErrorAction Ignore -WarningAction Ignore) {
        try {
            $wmi = Get-WmiObject -Class win32_networkadapterconfiguration -Filter "ipenabled = 'true'" -ComputerName $Server
            $wmi.SetDNSServerSearchOrder($NewDNS) | Out-Null
            Write-Output "SUCCESS: Changed DNS on $Server"
        } catch {
            Write-Warning "Error changing DNS on $Server"
        }
    } else {
        Write-Warning "Error contacting $Server`r`nDoes it respond to ping/wmi?"
    }
}

2014-11-29_12-25-52
WHAT COULD POSSIBLY GO WRONG?
Changing DNS server settings on a machine is not something that you usually think could break anything. In 11/10 times there are no issues at all. But the 12th time you do it, you might get in trouble. So, if you have Windows Server 2008/2008 R2 machines in your environment, please read KB2520155 make sure to apply proper countermeasure prior to changing DNS servers on those.

/Johan

Exchange Online: “This user’s on-premises mailbox hasn’t been migrated to Exchange Online”

Disclaimer
This blog post is intended for new deployment scenarios, where no mailboxes exist in Office 365. It is written for an old version of DirSync. Since then newer versions has been released with built in functionality to filter what attributes to sync. Always make sure that you have a valid backup before making any changes to existing environments.

Normally you would use the build-in tools to migrate a mailbox from your on-prem environment to Exchange Online. In some scenarios the built-in tools cannot be used, and then you have to be able to create the cloud mailbox while the on-prem mailbox is still available. The problem is that when you assign a license to the cloud user you get a warning that “The user’s on-premises mailbox hasn’t been migrated” and the new mailbox will not be created.

warning_onprem_mailbox

If you are using DirSync and your on-prem Exchange environment is not published to the internet according to best practice you may consider using third party migration tools instead of the built in tools to move your mailboxes to Office 365. This is one example of a scenario where you would encounter this warning message.

To solve this problem we have to exclude attributes from being synced in DirSync. The solution is very similar to a problem with Lync that we described a while ago, and I will use the same solution here. The idea is to exclude the msExchMailboxGuid attribute from DirSync.

Start the Synchronization Service Manager (miisclient.exe) on the DirSync server. In the “Management agents” pane, select properties on the Active Directory connector.

2014-04-06 22-41-04

In the management agent designer, select “Configure attribute flow” and remove the msExchMailboxGuid for both the User and inetOrgPerson Data Source from the attribute flow as below.

2014-04-06 22-44-06

msExchExchangeGuid

Finally we have to delete the Active Directory Connector Space.

2014-04-06 21-42-25

2014-04-06 22-46-58

2014-04-06 22-47-25

2014-04-06 22-47-48

After the connector space has been deleted, run a Full DirSync again, wait a few minutes and now you will be able to create mailboxes by assigning an Exchange Online license.

Happy provisioning!

/ Andreas

Office 365: Deploying your SSO Identity Infrastructure in Microsoft Azure – Part 2

This is part 2 of 3 in a series where we go through how to create a highly available SSO infrastructure for Office 365 in Microsoft Azure. In this part we will deploy all infrastructure components such as virtual machines and load balancers, all with help from PowerShell!
Part 1 of the series can be found here.
Part 3 of the series can be found here.

As mentioned, in order to automate the process of creating the SSO-infrastructure in Azure, I’ve created a PowerShell script/Hydration Kit that does that for you. Based on input from a CSV file, the Machines will not only be provisioned, they will also be configured based on their specific role as follows:

All Machines will

  • Join the domain specified in the $DomainName parameter. If you for example would like to exclude the WAP-servers from getting AD-joined, that’s something for a later version of the script.
  • Get the Telnet-Client Installed (Important 🙂 ).
  • Get an Azure static ip assignment/subnet and InstanceSize based on the input from the CSV file.
  • Be placed in the correct cloud service, availability set (if not set to ‘None’) and subnet as specified in the CSV file.
  • Get the Operating System specified in the $ImageFamily parameter installed.

Domain Controller

  • One 60gb extra DataDisk with HostCaching will be added to the machine (will be initialized and formatted)
  • The role AD-Domain-Services will be installed. Note that the Domain Controller will not be promoted automatically by the script.

ADFS Server

  • An Azure Internal Load Balancer will be added with the IP Address specified in the CSV file.
  • Endpoints for HTTPS will be added to the Load Balancer pointing at the servers.
  • The role ADFS-Federation will be installed.

2014-11-26 14-47-53

Web Application Proxy

  • An external load balanced HTTPS endpoint will be added.
  • The role Web-Application-Proxy will be installed.

2014-11-26 14-39-03
2014-11-26 14-44-26
2014-11-26 14-38-45

GETTING STARTED

Assumptions
In order for the script to work properly, you need to have the base infrastructure (AffinityGroups, Virtual Networks/Subnets/DNS) in place prior to running the script. Since the script is automatically joining the VM’s to the domain specified, you need to have connectivity to your local domain as well.
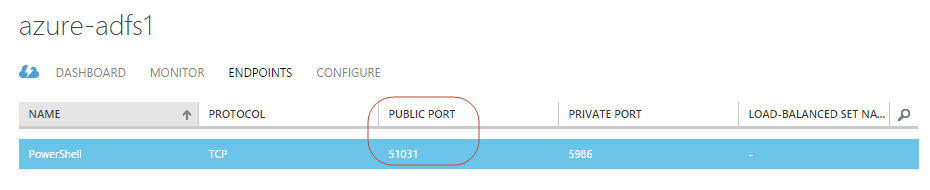
The Default WinRM Endpoint is used to configure the machines, which means you might get issues if your firewall is blocking high ports, such as in the screenshot below.
2014-11-26 14-05-59

The Azure PowerShell module do of course need to be installed on the machine you are running the script.

RUNNING THE SCRIPT
1. First, download the script and the csv sample file from here.
2. Edit the csv file according to your needs, make sure that you put the related servers (WAP, ADFS) in the same CloudService, Subnet and Availabilityset etc. For the ADFS servers, you also need to add the Internal Load Balancer IP in the InternalLB column.
2014-11-26 15-08-14
3. Run the script. Remember to change the parameters to match your Azure tenant configuration.If you haven’t already added your Account to the session, you will be prompted to do so. You will find screenshots of the steps below. If you lose your Azure session (internet problems etc.) while running, the script can safely be restarted, and will pickup where it stopped after some verification steps.

.\CreateO365AzureEnvironment.ps1 -Verbose -InputFile .\AzureMachines.csv

a. Prompted for domain join credentials
2014-11-26 12-59-23
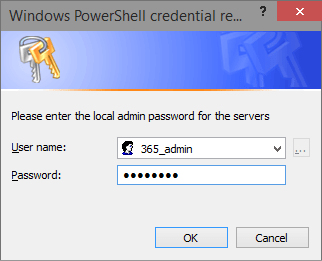
b. Prompted to set local admin credentials for the new servers
2014-11-26 12-59-57
c. Prompted for Azure tenant credentials
2014-11-26 15-28-03
4. Grab some coffee and watch PowerShell do the magic. The entire deployment has taken between 35-45 minutes when I’ve been running it. If you don’t like having the WinRM Endpoint on each exposed to the internet, you need to remove them manually after deployment.
2014-11-26 15-00-16

CreateO365AzureEnvironment.ps1

<#
.SYNOPSIS
    The scripts creates and configures virtual machines in Microsoft Azure based on an input CSV file.
.EXAMPLE
   .\CreateO365AzureEnvironment.ps1 -InputFile '.\AzureMachines.csv' -Verbose
.NOTES
    File Name: CreateO365AzureEnvironment.ps1
    Author   : Johan Dahlbom, johan[at]dahlbom.eu
    Blog     : 365lab.net
    The script are provided “AS IS” with no guarantees, no warranties, and they confer no rights.
    Requires PowerShell Version 3.0!
#>
[CmdletBinding(SupportsShouldProcess=$true)]
param (
  [Parameter(Mandatory=$false)][string]$AffinityGroup = '365lab-affinitygroup',
  [Parameter(Mandatory=$false)][string]$DomainName = '365lab.internal',
  [Parameter(Mandatory=$false)][string]$DomainShort = '365lab',
  [Parameter(Mandatory=$false)][string]$ImageFamily = 'Windows Server 2012 R2 Datacenter',
  [Parameter(Mandatory=$false)][string]$VnetName = '365lab-azure',
  [Parameter(Mandatory=$false)][string]$AdminUsername = '365_admin',
  [Parameter(Mandatory=$false)][ValidateNotNullOrEmpty()]$DomainJoinCreds = (Get-Credential -Message 'Please enter credentials to join the server to the domain'),
  [Parameter(Mandatory=$false)][ValidateNotNullOrEmpty()]$VMCredentials = (Get-Credential -Message 'Please enter the local admin password for the servers' -UserName $AdminUsername),
  [Parameter(Mandatory=$false)][ValidateScript({Import-Csv -Path $_})]$InputFile =  '.\AzureMachines.csv'
)
#Check that script is running in an elevated command prompt
if (-not([Security.Principal.WindowsPrincipal] [Security.Principal.WindowsIdentity]::GetCurrent()).IsInRole("S-1-5-32-544")) {
  Write-Warning "You need to have Administrator rights to run this script!`nPlease re-run this script as an Administrator in an elevated powershell prompt!"
  break
}
#region functions
function Connect-Azure {
  begin {
      try {
          Import-Module Azure
      } catch {
          throw "Azure module not installed"
      }
  } process {
    if (-not(Get-AzureSubscription -ErrorAction Ignore).IsCurrent -eq $true) {
      try {
        Add-AzureAccount -WarningAction stop -ErrorAction Stop
      } catch {
        throw "No connection to Azure"
      }
    }
  } end {
    $AzureSubscription = Get-AzureSubscription -Default -ErrorAction Ignore
    Set-AzureSubscription -SubscriptionId $AzureSubscription.SubscriptionId -CurrentStorageAccountName (Get-AzureStorageAccount -WarningAction Ignore).StorageAccountName
    Write-Verbose "Connected to Azure"
  }
}
function Configure-JDAzureVM {
  [CmdletBinding(SupportsShouldProcess=$true)]
  Param(
    [Parameter(Mandatory=$true)][ValidateNotNullOrEmpty()][string]$Role,
    [Parameter(Mandatory=$false)][ValidateNotNullOrEmpty()]$VMCredentials,
    [Parameter(Mandatory=$true)][ValidateNotNullOrEmpty()][string]$VM,
    [Parameter(Mandatory=$true)][ValidateNotNullOrEmpty()][string]$CloudService,
    [Parameter(Mandatory=$true)][ValidateNotNullOrEmpty()][string]$VMUri,
    [Parameter(Mandatory=$false)][ValidateNotNullOrEmpty()][string]$InternalLBIP,
    [Parameter(Mandatory=$true)][ValidateNotNullOrEmpty()][string]$Subnet
  )
  begin {
    Write-Verbose "Starting to configure $VM..."
  }
  process {
    #Install mandatory features
    $AzureVM = Get-AzureVM -ServiceName $CloudService -Name $VM
    #Establish a PS Session to the AzureVM
    $SessionOptions = New-PSSessionOption -SkipCACheck -SkipCNCheck
    $VMSessionConfig = @{
      ConnectionUri = $VMUri
      SessionOption = $SessionOptions
      Credential = $VMCredentials
    }
    $VMSession = New-PSSession @VMSessionConfig -ErrorAction Stop
    #Install mandatory features
    Write-Verbose "Installing mandatory features on $VM"
    Invoke-Command -Session $VMSession -ScriptBlock {
      #Install the MOST IMPORTANT FEATURE of them all!
      Add-WindowsFeature -Name Telnet-Client -IncludeManagementTools -WarningAction Ignore
    }
    #Install features per role
    Write-Verbose "$VM is $Role."
    switch ($Role) {
    'Domain Controller' {
      #Add additional data disk to the domain controller, with host caching disabled
      if (-not(Get-AzureDataDisk -VM $AzureVM)) {
        Write-Verbose "Adding additional data disk..."
        Add-AzureDataDisk -CreateNew -DiskSizeInGB 60 -DiskLabel "ADDB" -HostCaching None -LUN 0 -VM $AzureVM | Update-AzureVM -ErrorAction Stop
      }
      Write-Verbose "Installing role 'AD-Domain-Services'"
      Invoke-Command -Session $VMSession -ScriptBlock {
        #Initialize and format additional disks
        Get-Disk | Where-Object {$_.PartitionStyle -eq 'raw'} | Initialize-Disk -PartitionStyle MBR -PassThru | New-Partition -AssignDriveLetter -UseMaximumSize |
            Format-Volume -FileSystem NTFS -NewFileSystemLabel "ADDB" -Confirm:$false
        #Install Role specific features
        Add-WindowsFeature -Name AD-Domain-Services -IncludeManagementTools -WarningAction Ignore
      }
    } 'ADFS Server' {
      #Create Internal Load Balancer for the ADFS farm if not already created
      if (-not(Get-AzureInternalLoadBalancer -ServiceName $CloudService) -and $InternalLBIP) {
        Write-Verbose "Creating/adding $vm to Internal Load Balancer $($AzureVM.AvailabilitySetName) ($InternalLBIP)"
        Add-AzureInternalLoadBalancer -ServiceName $CloudService -InternalLoadBalancerName $azurevm.AvailabilitySetName -SubnetName $Subnet -StaticVNetIPAddress $InternalLBIP
      }
      #Add the server to the Internal Load Balanced set and add 443 as endpoint
      if (-not((Get-AzureEndpoint -VM $AzureVM).InternalLoadBalancerName -eq $AzureVM.AvailabilitySetName)) {
        Write-Verbose "Adding Internal Load Balanced endpoint on port 443 to $VM"
        Add-AzureEndpoint -Name HTTPS -Protocol tcp -LocalPort 443 -PublicPort 443 -LBSetName $AzureVM.AvailabilitySetName -InternalLoadBalancerName $AzureVM.AvailabilitySetName -VM $AzureVM -DefaultProbe | Update-AzureVM -ErrorAction Stop
      }
      Write-Verbose "Installing role 'ADFS-Federation'"
      Invoke-Command -Session $VMSession -ScriptBlock {
        #Install Role specific features
        Add-WindowsFeature -Name ADFS-Federation -IncludeManagementTools -WarningAction Ignore
      }
    } 'Web Application Proxy' {
      #Add the server to the Cloud Service Load Balanced set and add 443 as endpoint
      if (-not((Get-AzureEndpoint -VM $AzureVM).LBSetName -eq $AzureVM.AvailabilitySetName)) {
        Write-Verbose "Adding Load Balanced endpoint on port 443 to $CloudService.cloudapp.net"
        Add-AzureEndpoint -Name HTTPS -Protocol tcp -LocalPort 443 -PublicPort 443 -LBSetName $AzureVM.AvailabilitySetName -VM $AzureVM -DefaultProbe -LoadBalancerDistribution sourceIP | Update-AzureVM -ErrorAction Stop
      }
      Write-Verbose "Installing role 'Web-Application-Proxy'"
      Invoke-Command -Session $VMSession -ScriptBlock {
        #Install Role specific features
        Add-WindowsFeature -Name Web-Application-Proxy -IncludeManagementTools -WarningAction Ignore
      }
    }
   }
  }
  end {
    Write-Verbose "Finished configuring $VM" 

  }
}
function New-JDAzureVM {
  [CmdletBinding(SupportsShouldProcess=$true)]
  Param(
    [Parameter(Mandatory=$true)][ValidateNotNullOrEmpty()][string]$VMName = '',
    [Parameter(Mandatory=$true)][ValidateNotNullOrEmpty()][string]$CloudService,
    [Parameter(Mandatory=$true)][ValidateNotNullOrEmpty()][string]$IPAddress,
    [Parameter(Mandatory=$true)][ValidateNotNullOrEmpty()][string]$Size,
    $VMCredentials,
    $DomainJoinCreds,
    [Parameter(Mandatory=$true)][ValidateNotNullOrEmpty()][string]$SubnetName,
    [Parameter(Mandatory=$true)][ValidateNotNullOrEmpty()][string]$OperatingSystem,
    [Parameter(Mandatory=$true)][ValidateNotNullOrEmpty()][string]$VnetName,
    [Parameter(Mandatory=$true)][ValidateNotNullOrEmpty()][string]$AvailabilitySet,
    [Parameter(Mandatory=$true)][ValidateNotNullOrEmpty()][string]$AffinityGroup
  )

  if (-not(Get-AzureVM -ServiceName $CloudService -Name $VMName -WarningAction Ignore))  {
    #region VM Configuration
    #Get the latest VM image based on the operating system choice
    $ImageName = (Get-AzureVMImage | Where-Object {$_.ImageFamily -eq $OperatingSystem} | Sort-Object -Property PublishedDate -Descending | Select-Object -First 1).ImageName
    #Construct VM Configuration
    $VMConfigHash = @{
      Name =  $VMName
      InstanceSize = $Size
      ImageName = $ImageName
    }
    if ($AvailabilitySet -ne 'None') {
      $VMConfigHash["AvailabilitySetName"] = $AvailabilitySet
    }
    #VM Provisioning details
    $VMProvisionHash = @{
      AdminUsername = $VMCredentials.UserName
      Password = $VMCredentials.GetNetworkCredential().Password
      JoinDomain = $DomainName
      DomainUserName = $DomainJoinCreds.UserName.split("\")[1]
      DomainPassword = $DomainJoinCreds.GetNetworkCredential().Password
      Domain = $DomainShort
    }
    #Create VM configuration before deploying the new VM
    $VMConfig = New-AzureVMConfig @VMConfigHash | Add-AzureProvisioningConfig @VMProvisionHash -WindowsDomain -NoRDPEndpoint |
                    Set-AzureStaticVNetIP -IPAddress $IPAddress | Set-AzureSubnet -SubnetNames $SubnetName |
                        Set-AzureVMBGInfoExtension -ReferenceName 'BGInfo'
    #endregion VM Configuration
    #region Create VM
    Write-Verbose "Creating $VMName in the Cloud Service $CloudService"
    $AzureVMHash = @{
      ServiceName = $CloudService
      VMs = $VMConfig
      VnetName = $VnetName
      AffinityGroup  = $AffinityGroup
    }
    New-AzureVM @AzureVMHash -WaitForBoot -ErrorAction Stop -WarningAction Ignore
    #endregion Create VM
  } else {
    Write-Warning "$VMName do already exist..."
  }
}
 #endregion functions
 #Connect with Azure PowerShell
  Connect-Azure
  $AzureMachines = Import-Csv -Path $InputFile
  Write-Verbose "Starting deployment of machines at: $(Get-date -format u)"
foreach ($Machine in $AzureMachines) {
  Write-Verbose "Starting to process $($Machine.Name)"
  #Create VM Configuration hashtable based on input from CSV file
  $VirtualMachine = @{
    VMName = $Machine.Name
    CloudService = $Machine.CloudService
    IPAddress = $Machine.IP
    VMCredentials = $VMCredentials
    DomainJoinCreds = $DomainJoinCreds
    SubnetName = $Machine.SubnetName
    AvailabilitySet = $Machine.AvailabilitySet
    AffinityGroup = $AffinityGroup
    Size = $Machine.Size
    VnetName = $VnetName
    OperatingSystem = $ImageFamily
  }
  try {
    #Create virtual machine
    New-JDAzureVM @VirtualMachine -ErrorAction Stop
    #Wait for machine to get to the state "ReadyRole" before continuing.
    while ((Get-AzureVM -ServiceName $Machine.CloudService -Name $Machine.Name).status -ne "ReadyRole") {
      Write-Verbose "Waiting for $($Machine.Name) to start..."
      Start-Sleep -Seconds 15
    }
    $VMUri = Get-AzureWinRMUri -ServiceName $machine.CloudService -Name $Machine.Name
    #Create VM Role configuration
    $VMRoleConfiguration = @{
      Role = $Machine.Role
      VMUri = $VMUri
      VMCredentials = $VMCredentials
      VM = $Machine.Name
      CloudService = $Machine.CloudService
      Subnet = $machine.SubnetName
    }
    #Add internal load balancer IP to the role configuration
    if ($Machine.InternalLB) {
      $VMRoleConfiguration["InternalLBIP"] = $Machine.InternalLB
    }
    #Role specific configuration of the virtual machine
    Configure-JDAzureVM @VMRoleConfiguration -ErrorAction Stop
  } catch {
    Write-Warning $_
  }
}
Write-Verbose "Finished deployment of machines at: $(Get-date -format u)"
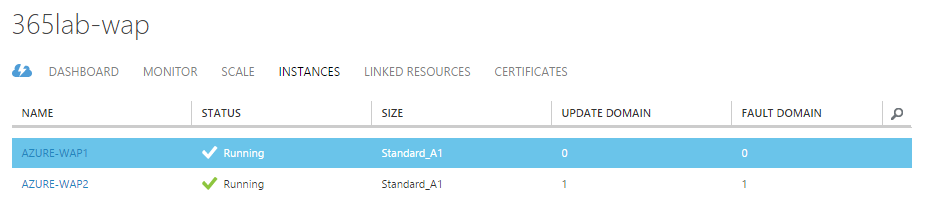
RESULTS
After some waiting for the provisioning, we now have the infrastructure in place in order to complete the configuration of our SSO infrastructure for Office 365 in Microsoft Azure. In the next part of this series we will put all the pieces together and finish AADSync, ADFS and WAP configuration against Office 365 / Azure Active Directory.
2014-11-26 15-54-05

Enjoy, let me know if you have any feedback!

/Johan

Office 365: Deploying your SSO Identity Infrastructure in Microsoft Azure – Part 1

This is part 1 of 3 in a series where we go through how to create a highly available SSO infrastructure for Office 365 in Microsoft Azure.
Part 2 of the series can be found here.
Part 3 of the series can be found here.

Implementing SSO infrastructure with ADFS is something many customers want in order to reduce the amount of logins for their end users. Soon we will even get single sign on in the Outlook client! (YAY 🙂 ) The biggest challenge implementing the infrastructure is that you get dependent on your local server infrastructure and internet connection.
When it’s not possible to make the solution redundant with you own infrastructure, but still need single signon, my recommendation is to deploy the SSO infrastructure in Microsoft Azure.

THE OPTIONS
Microsoft has provided a white paper on the topic that gives you an idea on what options you have and important things to consider. The White paper describes two deployment options implementing the infrastructure in Azure.

  1. All Office 365 SSO integration components deployed in Azure. This is cloud-only approach; you deploy directory synchronization and AD FS in Azure. This eliminates the need to deploy on-premises servers.
  2. Some Office 365 SSO integration components deployed in Azure for disaster recovery. This is the mix of on-premises and cloud-deployed components; you deploy directory synchronization and AD FS, primarily on-premises and add redundant components in Azure for disaster recovery.

Option 1 to put the entire Identity Infrastructure in the cloud has been the choice for most of the implementations I’ve been involved in. This gives you a very flexible solution that will provide you a highly available SSO infrastructure, yet putting the infrastructure near the services you are providing.

SETTING IT UP – NETWORK AND STORAGE
In order to set it up in a highly available SSO infrastructure in Azure, the following components/servers must be deployed in Azure. Recommendations on the high-level architecture is also described on http://technet.microsoft.com/en-us/library/dn509538.aspx.

First of all, if you’re setting up your Azure Infrastructure from scratch, you need a virtual network and a storage account in the region that is closest/best for you (in my case, North Europe). See the following tutorials on how to create a virtual network, a storage account and an affinity group.

In my example – the virtual network in Azure is configured as follows:

2014-11-22 13-42-09

The network 10.255.255.0/24 is divided into two subnets except for the gateway subnet. One “Internal” subnet and one “Perimeter” subnet in order to filter traffic based on the source/destination IP, that is now possible through Network Security Groups (NSG’s) in Azure. A local network has also been added for on-premises connectivity.

SETTING IT UP – VIRTUAL MACHINES
In my example, I will deploy six(6) virtual Machines with the following roles:

Name Role IP Size Cloud Service Availability Set
AZURE-DC1 Domain Controller 10.255.255.4 Small 365lab-azr01
AZURE-AADSYNC1 DirSync/AADSync 10.255.255.5 Medium 365lab-azr01
AZURE-ADFS01 ADFS Server 10.255.255.6 Small 365lab-sts sts-365lab
AZURE-ADFS02 ADFS Server 10.255.255.7 Small 365lab-sts sts-365lab
AZURE-WAP01 Web Application Proxy 10.255.255.132 Small 365lab-wap wap-365lab
AZURE-WAP02 Web Application Proxy 10.255.255.133 Small 365lab-wap wap-365lab

In this case, I’m choosing to deploy only one domain controller in Azure, and configure that one as the primary dns for the virtual network, and the local network domain controllers as secondary dns servers. Note that the ADFS and WAP servers are placed in separate cloud services/availability sets in order to make them highly available.
You will find a reference regarding machine sizing here. Estimated costs per month for the above setup will with list pricing be around $500 including network traffic and storage. The exact pricing will of course be depend on your Azure agreement and network traffic.


The overall high level design of the setup will be as in the following sketch:
Azure-Reference-Test

In the next part of the series, we will deploy the virtual Machines with the proper configuration using Azure PowerShell.

Until next time!

/Johan

Exchange Online: Dynamically add mailbox permissions through groups

Managing shared and resource mailbox permissions can be more or less a pain depending on how you do it. Adding users directly as delegates to the shared mailboxes gives you a bit more administrative overhead, but makes it possible to utilize the AutoMapping feature that automatically adds the additional mailboxes to the end users Outlook client. If you instead add mail-enabled security groups to the delegate list, you get less administrative overhead, but not the AutoMapping feature.

Even though this is a really “old” problem, I get questions around it almost every week. Therefore I wanted to share a solution with you that gives you an example on how to solve it still using groups. A script that will use Mail-Enabled Security Groups/Distribution Groups to dynamically populate the delegate list of a shared mailbox.

GETTING STARTED
In order to get started, you need to create one “Shadow Group” per mailbox who’s delegation properties you want to manage automatically. To make it as easy as possible, I’m using a prefix to identify the groups with the mailboxes, like Prefix-MailboxName. In my example below, the prefix is SM-. See the screenshot below for the correlation between them.
2014-11-16 11-39-45
It could of course be possible to use another attribute on the groups to store the mailbox name, but I thought this was an easier approach.

RUNNING THE SCRIPT
After editing the credentials in the Connect-ExchangeOnline function, you simply run the script as below:

.\SharedMailboxViaGroups.ps1 -Prefix 'SM-'

2014-11-16 12-10-56
As seen in the screenshot above it will process adds and removals of permissions for all mailboxes/groups in scope. Please note that both FullAccess and SendAs-permissions are added for each delegate.
SharedMailboxViaGroups.ps1

<#
.SYNOPSIS
    The script will automatically assign mailbox and recipient permissions on shared mailboxes based on groups.
.EXAMPLE
   .\SharedMailboxViaGroups.ps1 -Prefix 'SM-'
.PARAMETER Prefix
    Prefix of the groups that will manage permissions on the shared mailboxes.
.NOTES
    File Name: SharedMailboxViaGroups.ps1
    Author   : Johan Dahlbom, johan[at]dahlbom.eu
    Blog     : 365lab.net
    The script are provided “AS IS” with no guarantees, no warranties, and they confer no rights.
    Requires PowerShell Version 3.0!
#>
param (
  [string]$Prefix = 'SM-'
)

function Connect-ExchangeOnline {
  param(
    [string]$Username = 'admin@tenant.onmicrosoft.com',
    [string]$Password = 'password'
  )
  #Clean up existing PowerShell Sessions
  Get-PSSession | Remove-PSSession
  $CloudCred = New-Object –TypeName System.Management.Automation.PSCredential –ArgumentList $Username, (ConvertTo-SecureString $Password -AsPlainText -Force)
 
  #Connect to Exchange Online
  $Session = New-PSSession –ConfigurationName Microsoft.Exchange -ConnectionUri https://outlook.office365.com/powershell-liveid/ -Credential $CloudCred -Authentication Basic -AllowRedirection
  $Commands = @("Add-MailboxPermission","Add-RecipientPermission","Remove-RecipientPermission","Remove-MailboxPermission","Get-MailboxPermission","Get-User","Get-DistributionGroupMember","Get-DistributionGroup","Get-Mailbox")
  Import-PSSession -Session $Session -Prefix "Cloud" -DisableNameChecking:$true -AllowClobber:$true -CommandName $Commands | Out-Null
}
function Add-JDMailboxPermission {
  param(
    [string]$Identity,
    [string]$SharedMailboxName
  )
  try {
    Add-CloudMailboxPermission -Identity $SharedMailboxName -User $Identity -AccessRights FullAccess -ErrorAction stop | Out-Null
    Add-CloudRecipientPermission -Identity $SharedMailboxName -Trustee $Identity -AccessRights SendAs -Confirm:$False -ErrorAction stop | Out-Null
    Write-Output "INFO: Successfully added $Identity to $SharedMailboxName"
  } catch {
    Write-Warning "Cannot add $Identity to $SharedMailboxName`r`n$_"
  }
}
function Remove-JDMailboxPermission {
  param(
    [string]$Identity,
    [string]$SharedMailboxName
  )
  try {
    Remove-CloudMailboxPermission -Identity $SharedMailboxName -User $Identity -AccessRights FullAccess -Confirm:$False -ErrorAction stop -WarningAction ignore | Out-Null
    Remove-CloudRecipientPermission -Identity $SharedMailboxName -Trustee $Identity -AccessRights SendAs -Confirm:$False -ErrorAction stop -WarningAction ignore  | Out-Null
    Write-Output "INFO: Successfully removed $Identity from $SharedMailboxName"
  } catch {
    Write-Warning "Cannot remove $Identity from $SharedMailboxName`r`n$_"
  }
}
function Sync-EXOResourceGroup {
  [CmdletBinding(SupportsShouldProcess=$true)]
  param(
    [string]$Prefix = 'SM-'
  )
  #Get All groups to process mailboxes for
  $MasterGroups = Get-CloudDistributionGroup -ResultSize Unlimited -Identity "$Prefix*"
  foreach ($Group in $MasterGroups) {
    #Remove prefix to get the mailbox name
    $MbxName = $Group.Name.Replace("$Prefix",'')
    $SharedMailboxName =  (Get-CloudMailbox -Identity $MbxName -ErrorAction ignore -WarningAction ignore).WindowsLiveID
    if ($SharedMailboxName) { 
      Write-Verbose -Message "Processing group $($Group.Name) and mailbox $SharedMailboxName"
      #Get all users with explicit permissions on the mailbox
      $SharedMailboxDelegates = Get-CloudMailboxPermission -Identity $SharedMailboxName -ErrorAction Stop -ResultSize Unlimited | Where-Object {$_.IsInherited -eq $false -and $_.User -ne "NT AUTHORITY\SELF" -and $_.User -notmatch 'S-\d-\d-\d+-\d+-\d+-\d+-\w+' -and $_.User -notlike "$Prefix*"} |  Select-Object @{Name="User";Expression={(Get-CloudUser -identity $_.User).WindowsLiveID }}
      #Get all group members
      $SharedMailboxMembers = Get-CloudDistributionGroupMember -Identity $Group.Identity -ResultSize Unlimited
      #Remove users if group is empty
      if (-not($SharedMailboxMembers) -and $SharedMailboxDelegates) {
        Write-Warning "The group $Group is empty, will remove explicit permissions from $SharedMailboxName"
        foreach ($user in $SharedMailboxDelegates.User) {
          Remove-JDMailboxPermission -Identity $user -SharedMailboxName $SharedMailboxName
        }
        #Add users if no permissions are present
      } elseif (-not($SharedMailboxDelegates)) {
        foreach ($user in $SharedMailboxMembers.WindowsLiveID) {
          Add-JDMailboxPermission -Identity $user -SharedMailboxName $SharedMailboxName
        }
        #Process removals and adds
      } else {
        #Compare the group with the users that have actual access
        $Users = Compare-Object -ReferenceObject $SharedMailboxDelegates.User -DifferenceObject $SharedMailboxMembers.WindowsLiveID 
         
        #Add users that are members of the group but do not have access to the shared mailbox
        foreach ($user in ($users | Where-Object {$_.SideIndicator -eq "=>"})) {
          Add-JDMailboxPermission -Identity $user.InputObject -SharedMailboxName $SharedMailboxName
        }
        #Remove users that have access to the shared mailbox but are not members of the group
        foreach ($user in ($users | Where-Object {$_.SideIndicator -eq "<="})) {
          Remove-JDMailboxPermission -Identity $user.InputObject -SharedMailboxName $SharedMailboxName
        }
      }
    } else {
      Write-Warning "Could not find the mailbox $MbxName"
    }
  }
}
#Connect to Exchange Online
Connect-ExchangeOnline
#Start Processing groups and mailboxes
Sync-EXOResourceGroup -Prefix $Prefix -Verbose

SUMMARY
A pretty simple solution on a very common problem in most environments where you have shared mailboxes. Let me know if you have feature requests or if something is not working as intended!

Enjoy!

/Johan