Category Archives: Azure

New module EasyGraph for accessing Microsoft Graph from PowerShell

Microsoft Graph has been an increasingly important tool when working with automation tasks. With its many APIs, Graph has become a gem in the automation toolbox, with one single interface to interact with all sort of data.

To simplify access to Microsoft Graph, I have written a PowerShell module, EasyGraph. The module provides a simple way of connecting and querying Microsoft Graph, in a similar way as for example the AzureAD module. The module works cross-platform and the source code is available on GitHub. It is installed directly from PowerShell Gallery:

Install-Module -Name EasyGraph

The EasyGraph module allows several different types of authentication, both interactive and silent, purposed for automation and background jobs.

  • Certificate based authentication with thumbprint (Windows only)
  • Certificate based authentication with Pfx file
  • Username and password (Windows only)
  • Client credentials
  • Device Code

You also need to register an application in the Azure portal in order to use the module.  In the application you also have to delegate the permissions needed for your script.

Detailed information about the module is available in the EasyGraph repository on GitHub. Below is a simple example on how we for example could update some user attributes of all users in AzureAD.

# Load the module
Import-Module -Name EasyGraph

# We need the ClientId/AppId from the App you created in AzureAD
$MyApp = 'a72b9508-6cbc-4117-b6d7-ff69cf248290'

# Connect using the username+password method
Connect-EasyGraph -AppId $MyApp

# Define whe attributes we want to update
$NewAttributes = @{
    city       = 'Stockholm'
    postalCode = '11130'
}

# Get all users and loop through them
Invoke-EasyGraphRequest -Resource '/users' | Foreach-Object {
    # For each user, get the id ($_.id) and call Graph to set the new attributes
    Invoke-EasyGraphRequest -Resource "/users/$($_.id)" -Method PATCH -Body $NewAttributes
}

# All done, disconnect
Disconnect-EasyGraph

With this simple example it is now up to you to come up with the next big thing, that unleash the power of Microsoft Graph. Happy coding!

/ Andreas

First look at the new Azure Firewall Preview

Until now, third party devices (NVAs) have been required to have a “real” firewall in Azure in addition to the basic functionality provided by Network Security Groups (NSG’s). Yesterday however, Microsoft released their stateful firewall service in Azure in public preview, simply named Azure Firewall.

Does this mean the end for third-party appliances with firewall functionality in Azure? In this post I will try to answer what scenarios Azure’s new firewall covers in this preview and how to get started and try it out in your environment.

The Basics
First of all, it is important to understand that the firewall in this preview is only intended to be used to handle outbound traffic to the Internet. If you want to protect your resources that are published to the internet, you can use for example Application Gateway with WAF and other similar services.
Below capabilities are available in the public preview:
  • Outbound FQDN Filtering
    • FQDN filtering is one of the most common asks that customers have for outbound filtering to the Internet, as it becomes very difficult to maintain lists of IP addresses/subnet for internet-based services. Only for http/https traffic at this time.
  • Network traffic filtering rules
    • Traditional access lists with the ability to control traffic on protocol/ip /subnet/port
  • Outbound SNAT Support
    • Obviously something that needs to be supported to handle outbound traffic in a centralized way 🙂
  • Azure Monitor logging
    • Logging is one of the most important parts when talking about security in general. All new Azure service use Azure Monitor for logging, Azure Firewall is no exception. Accepted and denied connections based on network and application rules are logged.
As you can see, there are quite sparse capabilities in the preview, but as with all other services, I expect more and more features to come over time.

Sizing and cost
Unlike Application Gateway / WAF, where you need to select the number of instances and instance sizes, Azure Firewall is highly available by default and scales automatically based on demand.

NO MORE MANUAL SCALING!!! 🙂

When it comes to charges, a security boundary fee will be charged per logical firewall unit, in addition to a Data Processing fee that is billed based on ingress and egress data transfer. You’ll find updated pricing at https://azure.microsoft.com/en-us/pricing/details/azure-firewall/.

Getting started
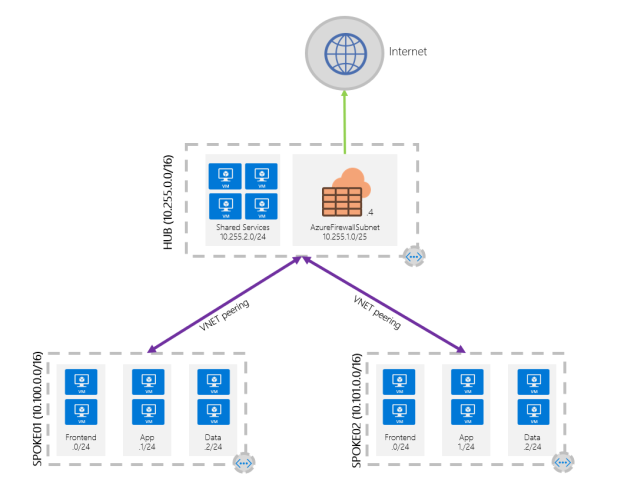
In my test I have chosen to deploy the firewall into the hub in a standard hub and spoke network topology, which I think will be the most common way to deploy the firewall.
2018-07-13_12-53-34
Prerequisites
  • Since it is in preview, you first have to enable the Azure Firewall public preview by registering the feature with the following PowerShell commands. It will take up to 30 minutes for feature registration to complete
Register-AzureRmProviderFeature -FeatureName AllowRegionalGatewayManagerForSecureGateway -ProviderNamespace Microsoft.Network

Register-AzureRmProviderFeature -FeatureName AllowAzureFirewall -ProviderNamespace Microsoft.Network
    • The firewall needs one dedicated subnet, minimum /25 . It is a fairly large subnet, but suppose it’s because it needs address space to scale out without any restrictions. It isn’t very clear in the documentation and it will not complain about this until you actually deploy the firewall. The subnet must be named AzureFirewallSubnet.

Deploying the firewall
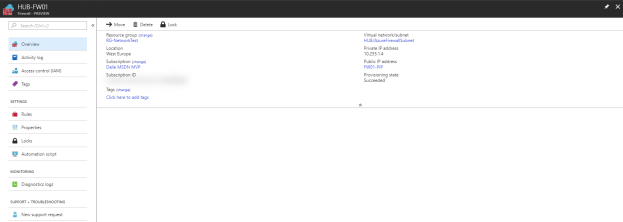
The firewall service integrates nicely directly in the VNet settings context and it i just to fire off a deployment directly from there.As seen above, except for the firewall subnet and the standard SKU public IP address, there are very few things that can be configured during deployment.

It only took 5-6 minutes to deploy the firewall which is significantly faster than my experience is with eg. Application Gateways and VPN Gateways. Good for us stressed consultants 🙂
Putting it to the test

User Defined Routes
To route all outbound internet traffic from the spokes via the hub through Azure Firewall, I first created a User Defined Route (UDR) for 0.0.0.0/0 and associated the spoke subnets to that. Depending on how your traffic flow, you might want another configuration.
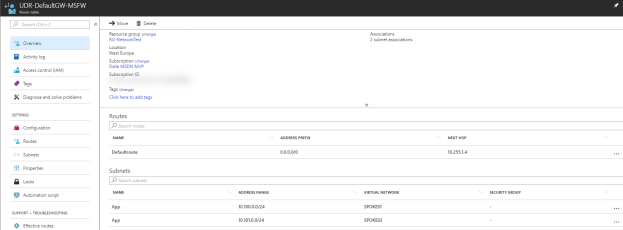
Note that until you have created your default rules in the firewalls, the machines in these subnets will not be able to access anything.

Management experience – creating basic rules
Application and network rules are stored in something called rule collections. A rule collection is a list of rules that share the same action and priority. A network rule collection is a list of network rules and an application rule collection is a list of application rules. Network rule collections are always processed before application rule collections. All rules are terminating, so if a match is found in a network rule collection, the following application rule collections for the session are not be processed.

Except from the built-in collection for infrastructure FQDNs used for Compute, Storage and Diagnostics that are allowed by default, all connections are denied by default, so we are really in full control of our outbound traffic here.

The rule management experience is fairly basic but works well. It takes up to a minute to create/edit a rule, much better then Application Gateway but might still be a bit frustrating if making a lot of changes in the GUI. The other thing I feel is missing is the possibility to create host groups for subnet or vm/host and apply the rules to those instead of ip’s/subnets. That would make it a lot easier to get an overview of whats allowed in a specific rule.

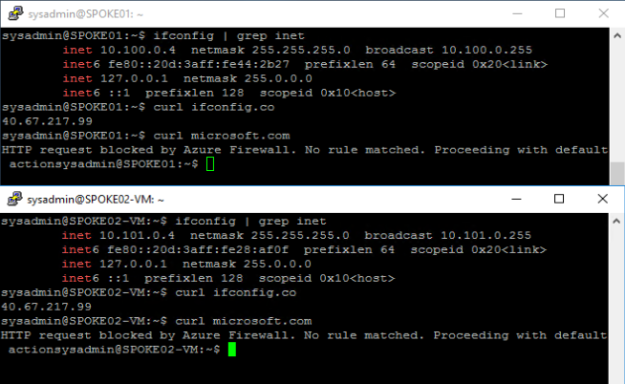
I created one default network rule collection and one application rule to only allow SSH, DNS and HTTP/S traffic to ifconfig.co from my spoke VNets.

As seen in the screenshot below, both machines used the same external ip address when browsing the internet. You can also see that ifconfig.co was allowed but microsoft.com was denied with the message  “HTTP request blocked by Azure Firewall. No rule matched. Proceeding with default actions”. 
Spoke to spoke communication 
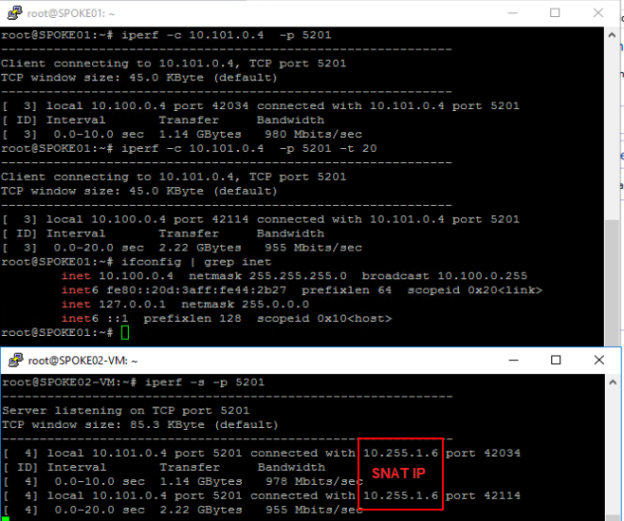
Another common scenario commonly handled by an NVA is spoke two spoke traffic. Obviously it is also possible to solve this with VNet peering, but by routing the traffic through the hub we get a much better and more granular control. To try out this scenario I created an additional rule collection allowing ICMP and TCP 5201 (iPerf) between the subnets and it worked well. It is still doing SNAT and not routing so the connections will come from the firewall and not from the true source ip. I could also see that the connections sometimes came from different ip’s (different load balanced firewall nodes).


Latency became slightly more impacted than I expected routing the traffic through the hub, but generally something that is possible to live with.

Pushing the limits – throughput test
Since it also supposed to unlimited capacity based on demand, I also took the opportunity to do a basic throughput test between the hosts in my environment. Between my lightweight B2s machines, I almost got 1Gbit/s which I consider to be more than acceptable. Your mileage may vary depending on the amount of connections etc. but it looks really promising.
Conclusion 
Even though it is currently a minimal viable product and a first public preview of the service, I have to say that overall, I am pleasantly surprised at how well the firewall actually performed. Obviously, some polishing is required in user interfaces, logging and additional capabilities before it is a full-fledged cloud-native firewall, but it definitely has potential. Definitely a good complement and sometimes even a replacement of the traditional NVAs.

Just ping me on Twitter if you have questions or comments!

/Johan


Create simple PowerBI reports for Intune through the Microsoft Graph

Reporting, playing with data and creating all kinds of charts is always fun. PowerBI is probably the simplest playground doing it.

While doing an O365 / EMS project, management wanted a simple dashboard to keep track of different KPI’s in the project. Example on the data they wanted was number of onboarded users to Exchange Online and enrolled devices in Intune. The Office 365 adoption content pack is in preview and provides lots of insights to how the services are used (in some cases, maybe too much)… In this specific case, we also had an Intune Cloud Only environment, so our reporting as well as delegation possibilites were very limited.

2017-01-03_13-34-12

Luckily enough, some Intune data (and its growing and growing) are nowdays exposed through the Microsoft Graph for us to consume with PowerBI directly with REST and OData.

In my example, I will simply get all registered devices to create my report. To find what possibilites there are, look in to the Microsoft Graph Documentation. If you want to use query parameters, you’ll find the supported ones here.

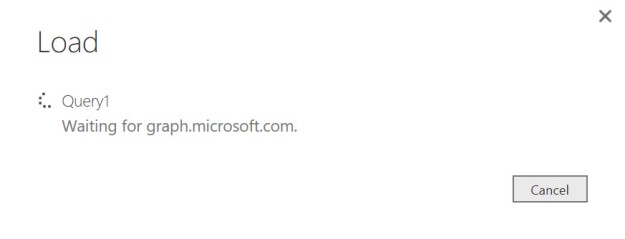
1. First connect and load the OData feed from Microsoft Graph. In my case I am using the https://graph.microsoft.com/v1.0/devices endpoint. Sign in with an organizational account or app that have appropriate permissions.
2017-01-03_14-36-01

2017-01-03_14-45-102017-01-03_14-45-30
2017-01-03_14-50-39 2017-01-03_14-50-55

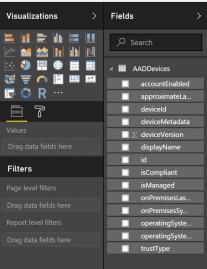
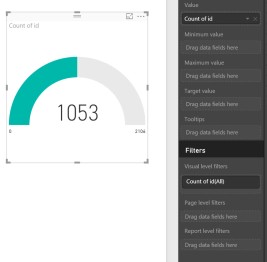
2. After the data has been loaded successfully in to PowerBI it’s time to create som nice charts!
2017-01-03_14-54-28
2017-01-03_14-56-41
2017-01-03_14-57-46


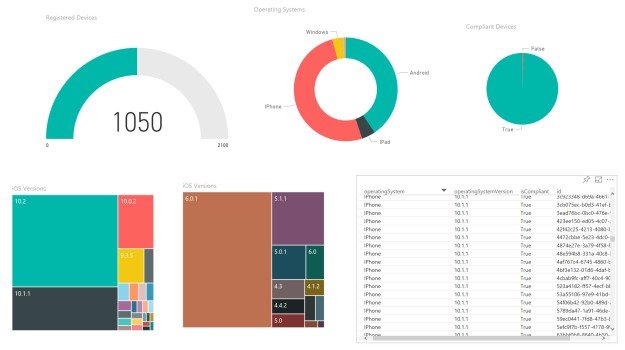
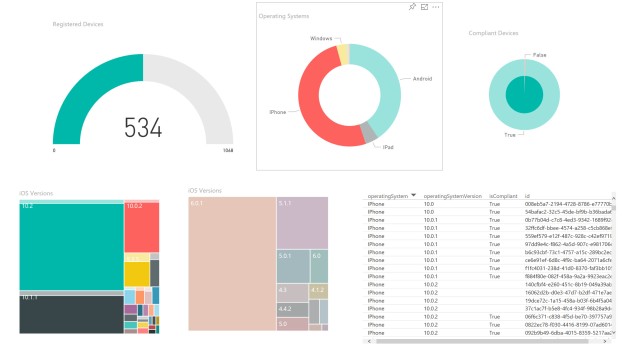
Result – My “finished” basic report

2017-01-03_15-06-09
2017-01-03_15-06-30

This was a simple example how to get started with PowerBI and the Microsoft Graph – hopefully you’ve now got some inspiration on what possibilites there are with just five minutes effort. Imagine what you could do if you really put in some time. 🙂

Happy reporting!

/Johan

Common questions using Office 365 with ADFS and Azure MFA

Azure Multi Factor Authentication (MFA) is a great service that has been included in Office 365 for almost 2,5 years. The adoption has really been great – at least from an admin user perspective where 99% of my customers admins have it enabled (I usually force them).
From an end user perspective we have more technical and informational challenges, which means that the adoption has not been as great as on the admin side. Hopefully the new shiny Conditional access policies for specific workloads will boost the adoption a bit.

The purpose of this post is to share the most common questions I get from customers about using Azure MFA included in Office 365 (in most cases in combination with ADFS).

Q: Can we pre-stage the MFA authentication methods so the end user doesn’t have to enroll after being enabled for MFA?
2016-07-15_12-56-53
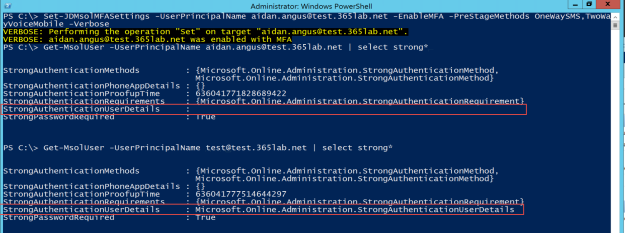
A: As of now, unfortunately no – I tried to build a PowerShell function to pre-populate the authentication methods if the user already had a mobile phone number. I was fooled and thought it worked, but when I tried on a user that never had enrolled MFA before, it failed. Troubleshooting further, the required MFA property “StrongAuthenticationUserDetails” is not possible to pre-populate programmaticly, yet. Maybe the new AzureAD module can help here in the future.
2016-07-15_13-04-332016-07-15_13-10-20
Conclusion – we have to instruct our users to enroll for MFA.

Q: Can we prevent MFA from kicking in when authenticating from our internal network?
A: Absolutely – There are some options depending on if you have Azure AD Premium or not.

With Azure AD Premium
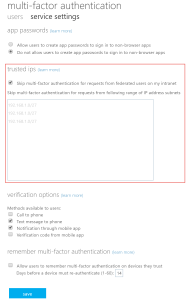
Here you can choose to “white list” your external IP addresses (which of course works with or without ADFS), or check the “Skip multi-factor authentication for requests from federated users on my intranet” checkbox. This will make Azure AD decide about MFA based on the insidecorporatenetwork claims issued by your own ADFS.
2016-07-15_13-32-05
The following PowerShell rows will add the required Issuance Transform Rules to your Azure AD RP.

$ByPassMFAClaims = @"
@RuleName = "Passtrough - InsideCorporateNetwork"
c:[Type == "http://schemas.microsoft.com/ws/2012/01/insidecorporatenetwork"]
 => issue(claim = c);

@RuleName = "Passtrough - PSSO"
c:[Type == "http://schemas.microsoft.com/2014/03/psso"]
 => issue(claim = c);
"@
$AzureADRP = Get-AdfsRelyingPartyTrust -Name "Microsoft Office 365 Identity Platform" 
Set-AdfsRelyingPartyTrust -TargetName $AzureADRP.Name `
                          -IssuanceTransformRules ($AzureADRP.IssuanceTransformRules + $ByPassMFAClaims)

Without Azure AD Premium
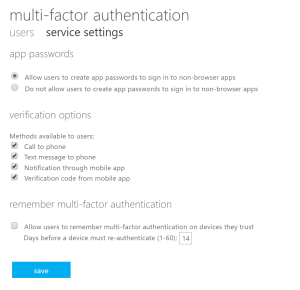
Without Azure AD Premium we don’t have the same choices in service settings.
2016-07-15_13-30-57
We can however achieve the same result, but instead of passing through the insidecorporatenetwork claims, we use it in ADFS and “tell” Azure AD that MFA is already taken care of. This can be done with the claim rules as below.

$ByPassMFAClaims = @"
@RuleName = "Bypass MFA from inside - Without Azure AD Premium"
EXISTS([Type == "http://schemas.microsoft.com/ws/2012/01/insidecorporatenetwork", Value == "true"])
 => issue(Type = "http://schemas.microsoft.com/claims/authnmethodsreferences", Value = "http://schemas.microsoft.com/claims/multipleauthn");

@RuleName = "Passtrough - PSSO"
c:[Type == "http://schemas.microsoft.com/2014/03/psso"]
 => issue(claim = c);
"@
$AzureADRP = Get-AdfsRelyingPartyTrust -Name "Microsoft Office 365 Identity Platform" 
Set-AdfsRelyingPartyTrust -TargetName $AzureADRP.Name `
                          -IssuanceTransformRules ($AzureADRP.IssuanceTransformRules + $ByPassMFAClaims)

Q: Do we really need to use the f****** app passwords?
A: Not really anymore, at least not if you are using ADFS. I usually turn it off.
First of all most rich clients (Including Outlook/SfB on mobile devices) do now support Modern Authentication (ADAL), which means they can handle MFA out of the box. So as long as you have updated clients, you most often only need to handle ActiveSync (native mail clients in all kinds of devices). My approach here is usually to exclude them from MFA to get rid of the app password need, but enable conditional access in order to control the devices.

Below you find a claims rule for the ActiveSync protocol that issues the multipleauthn claim which Azure AD will honor by skipping MFA for the request.

$Claims = @"
@Claims= "Bypass MFA for ActiveSync"
EXISTS([Type == "http://schemas.microsoft.com/2012/01/requestcontext/claims/x-ms-endpoint-absolute-path", Value=="/adfs/services/trust/2005/usernamemixed"]) && 
EXISTS([Type == "http://schemas.microsoft.com/2012/01/requestcontext/claims/x-ms-client-application", Value =~"^(Microsoft.Exchange.(Autodiscover|ActiveSync))$"]) 
=> Issue(Type = "http://schemas.microsoft.com/claims/authnmethodsreferences", Value = "http://schemas.microsoft.com/claims/multipleauthn"); 
"@
$AzureADRP = Get-AdfsRelyingPartyTrust -Name "Microsoft Office 365 Identity Platform" 
Set-AdfsRelyingPartyTrust -TargetName $AzureADRP.Name `
                          -IssuanceTransformRules ($AzureADRP.IssuanceTransformRules + $Claims)

Please note that additional rules may be needed depending on if you have an Exchange or Skype for Business Hybrid environment.

Q: Can we combine Azure MFA with our already implemented on-premises MFA solution?
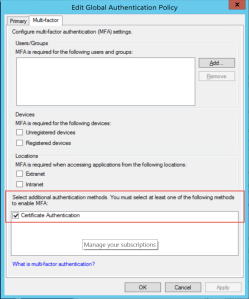
A: It works fine to combine Azure MFA with any MFA solution that integrates with ADFS. The only thing you need to do is issue the authnmethodsreferences on the Azure AD RP to prevent users from getting “Double MFA” like SmartCard + Azure MFA. 🙂 For example, if I have Cert Auth as an enabled MFA provider as below, I only have to authenticate with my VSM/SmartCard even if MFA is enabled on the user.
2016-07-15_14-27-41
The needed claims rule looks like this:

$Claims= @"
@RuleName = "Passthrough - MFA"
c:[Type == "http://schemas.microsoft.com/claims/authnmethodsreferences"]
 => issue(claim = c);
"@
$AzureADRP = Get-AdfsRelyingPartyTrust -Name "Microsoft Office 365 Identity Platform" 
Set-AdfsRelyingPartyTrust -TargetName $AzureADRP.Name `
                          -IssuanceTransformRules ($AzureADRP.IssuanceTransformRules + $Claims)

The above also works with the new Conditional Access policies for Exchange and SharePoint online.

Wrap up
Hopefully this post has given you some good insights what to think about implementing Azure MFA for Office 365. It is not a complete walk in the park, but it’s definately doable for most organizations.
As always, there are lots of if’s and but’s in all different environments. If I have missed something or if you have other, more specific questions, let me know!

/Johan

Domain Join AzureRM VM’s with PowerShell

Until we have decommissioned all ‘legacy’ systems, we are still stuck in the need of joining our on-premises Active Directories for most of our servers. Deploying VM’s in Azure with the recommended deployment model Resource Manager makes it really easy to automate everything including the domain join process using JSON-templates deploying the resources.

In that case, you just define the JsonADDomainExtension for the VM’s that you want to join the domain as below:
2016-02-24_22-58-55
You also find an example on how to use it here

However, a couple of weeks ago, I had a customer that had provisioned over 25 VM’s using AzureRM PowerShell instead of using JSON-templates. This is of course a lot better than if they would have done it manually through the portal, but unfortunately they had missed to join the domain in the deployment script.
To help them avoid doing manual labour, I wrote a small function that uses the same JsonADDomainExtension to automate the process of joining the already provisioned machines. The function has the join option set to 3 by default, which means it will create the AD object for the machine. It will also reboot the VM automatically.

HOW TO USE IT
If you simply want to join one Azure VM to the domain, you can simply run the function and specify parameters as in the screenshot below. It will automatically prompt for domain join credentials if not specified.
2016-02-25_00-02-38

    Add-JDAzureRMVMToDomain -DomainName corp.acme.com -VMName AMS-ADFS1 `
                            -ResourceGroupName 'ADFS-WestEurope' -Verbose

You can also check out the extension in the portal as below:
2016-02-25_00-03-26
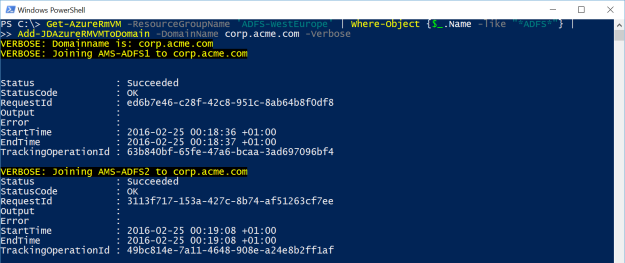
Joining multiple machines is almost as easy, if you want to pick your selection I recommend using Out-GridView with the -PassThru parameter, as also noted in one of the examples.
2016-02-25_00-20-21

Get-AzureRmVM -ResourceGroupName 'ADFS-WestEurope' | Where-Object {$_.Name -like '*ADFS*'} |
    Add-JDAzureRMVMToDomain -DomainName corp.acme.com -Verbose

Add-JDAzureRMVMToDomain

function Add-JDAzureRMVMToDomain {
<#
.SYNOPSIS
    The function joins Azure RM virtual machines to a domain.
.EXAMPLE
    Get-AzureRmVM -ResourceGroupName 'ADFS-WestEurope' | Select-Object Name,ResourceGroupName | Out-GridView -PassThru | Add-JDAzureRMVMToDomain -DomainName corp.acme.com -Verbose
.EXAMPLE
    Add-JDAzureRMVMToDomain -DomainName corp.acme.com -VMName AMS-ADFS1 -ResourceGroupName 'ADFS-WestEurope'
.NOTES
    Author   : Johan Dahlbom, johan[at]dahlbom.eu
    Blog     : 365lab.net
    The script are provided “AS IS” with no guarantees, no warranties, and it confer no rights.
#>

param(
    [Parameter(Mandatory=$true)]
    [string]$DomainName,
    [Parameter(Mandatory=$false)]
    [System.Management.Automation.PSCredential]$Credentials = (Get-Credential -Message 'Enter the domain join credentials'),
    [Parameter(Mandatory=$true,ValueFromPipeline=$true,ValueFromPipelineByPropertyName=$true)]
    [Alias('VMName')]
    [string]$Name,
    [Parameter(Mandatory=$true,ValueFromPipeline=$true,ValueFromPipelineByPropertyName=$true)]
    [ValidateScript({Get-AzureRmResourceGroup -Name $_})]
    [string]$ResourceGroupName
)
    begin {
        #Define domain join settings (username/domain/password)
        $Settings = @{
            Name = $DomainName
            User = $Credentials.UserName
            Restart = "true"
            Options = 3
        }
        $ProtectedSettings =  @{
                Password = $Credentials.GetNetworkCredential().Password
        }
        Write-Verbose -Message "Domainname is: $DomainName"
    }
    process {
        try {
            $RG = Get-AzureRmResourceGroup -Name $ResourceGroupName
            $JoinDomainHt = @{
                ResourceGroupName = $RG.ResourceGroupName
                ExtensionType = 'JsonADDomainExtension'
                Name = 'joindomain'
                Publisher = 'Microsoft.Compute'
                TypeHandlerVersion = '1.0'
                Settings = $Settings
                VMName = $Name
                ProtectedSettings = $ProtectedSettings
                Location = $RG.Location
            }
            Write-Verbose -Message "Joining $Name to $DomainName"
            Set-AzureRMVMExtension @JoinDomainHt
        } catch {
            Write-Warning $_
        }
    }
    end { }
}

I hope that everyone is using properly configured JSON-templates provisioning Azure Resources nowdays, but in case you don’t, I hope this function can be helpful.

As always, let me know if you have suggestions or questions!

/Johan

Create AD Users with help from Azure Automation and SharePoint Online

As a follow up to one of my earlier posts where I Create AD Users with SharePoint Online as frontend, I now wanted to share an extension of this solution where we will utilize Azure Automation with a Hybrid Worker to do the heavy lifting.
So basically, instead of having a script as a scheduled task reading the SharePoint list and perform tasks based on status, we will now have a SharePoint workflow to initiate our runbooks through an Azure Automation Webhook.
I also want to thank Anders Bengtsson for his quite similiar post that finally made me finish this one up. 🙂

OVERVIEW
The post will cover the following steps

  • Create an Azure Automation runbook with a WebHook that executes the runbook on a Hybrid Worker.
  • Create a basic SharePoint workflow in SharePoint Designer with approval steps prior creating the user.
  • End user experience.

PREREQUISITES
I assume that you already have the following in place.

CREATE THE AUTOMATION RUNBOOK AND WEBHOOK
I will use Azure PowerShell create and publish the runbook.

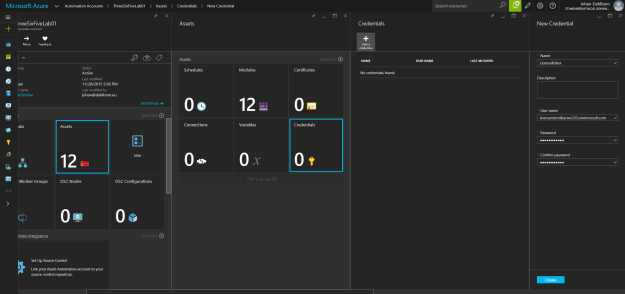
1. First we need to create a credential asset that will be used to write back information to our list.

 
#Login to Azure 
Login-AzureRmAccount
#Define ResourceGroup and Automation Account to be used used for with Automation cmdlets
$PSDefaultParameterValues = @{
    '*-AzureRmAutomation*:ResourceGroupName' = 'ResourceGroup'
    '*-AzureRmAutomation*:AutomationAccountName' = 'MyAutomationAccount'
}
#Create credential object with the SPO service account
$SPOCreds = Get-Credential 
#Create credential asset in Azure Automation
$SPOCredsHt = @{
    Name = 'SPOAdmin'
    Description = 'SharePoint Online Service Account for user onboarding'
    Value = $SPOCreds
}
New-AzureRmAutomationCredential @SPOCredsHt

2. Next up we need to create the actual runbook. Since we are doing everything with PowerShell, we need to save the script to a file and import it to Azure Automation. My example runbook (CreateADUserfromSPO.ps1) can be found below.

$SPORunbookHt = @{
    Path = 'C:\CreateADUserfromSPO.ps1'
    Name = 'Create-ADUsersFromSPO'
    Type = 'PowerShell'
    Published = $true
}
Import-AzureRmAutomationRunbook @SPORunbookHt 

CreateADUserfromSPO.ps1

param ( 
    [object]$WebhookData
)

#SharePoint Connection Info
$SPCredentials = Get-AutomationPSCredential -Name 'SPOAdmin'
$SPConnection = @{
    SharePointSiteURL = "https://threesixfivelab.sharepoint.com"
    Username = $SPCredentials.Username
    Password = $SPCredentials.GetNetworkCredential().Password
}
#Create an object from the webhook request
$UserData = ConvertFrom-Json -InputObject $WebhookData.RequestBody


$TargetOU = "OU=Users,OU=ACME,DC=corp,DC=acme,DC=com"
$ListName = "UserOnboarding"
$PasswordLength = "12"
$UPNSuffix = '365lab.net'
$FirstName = $UserData.FirstName
$LastName = $UserData.LastName
$Title = $UserData.Title
$Manager = $UserData.Manager

#region functions
function Convert-ToLatinCharacters {
    param(
        [string]$inputString
    )
    [Text.Encoding]::ASCII.GetString([Text.Encoding]::GetEncoding("Cyrillic").GetBytes($inputString))
}
  
function Get-JDDNFromUPN {
    param (
        [ValidateScript({Get-ADUser -Filter {UserprincipalName -eq $_}})] 
        [Parameter(Mandatory=$true)][string]$UserPrincipalName
    )
        $ADUser = Get-ADUser -Filter {UserprincipalName -eq $UserPrincipalName} -ErrorAction stop
        return $ADUser.distinguishedname
}
  
function New-JDSamAccountName {
    param (
        [Parameter(Mandatory=$true)][string]$FirstName,
        [Parameter(Mandatory=$true)][string]$LastName,
        [parameter(Mandatory=$false)][int]$FirstNameCharCount = 3,
        [parameter(Mandatory=$false)][int]$LastNameCharCount = 3
    )
    #Construct the base sAMAccountName
    $BaseSam = "{0}{1}" -f (Convert-ToLatinCharacters $FirstName).Substring(0,$FirstNameCharCount),(Convert-ToLatinCharacters $LastName).Substring(0,$LastNameCharCount)
  
    #Add a number until you find a free sAMAccountName
    if (Get-ADUser -Filter {samaccountname -eq $BaseSam} -ErrorAction SilentlyContinue) {
        $index = 0
        do {
            $index++
            $sAMAccountName = "{0}{1}" -f $BaseSam.ToLower(),$index
        } until (-not(Get-ADUser -Filter {samaccountname -eq $sAMAccountName } -ErrorAction SilentlyContinue))
    } else {
        $sAMAccountName = $BaseSam.tolower()
    }
    return $sAMAccountName
}
      
function New-JDUPNAndMail {
    param (
        [Parameter(Mandatory=$true)][string]$FirstName,
        [Parameter(Mandatory=$true)][string]$LastName,
        [Parameter(Mandatory=$true)][string]$UPNSuffix
     )
    #Construct the base userPrincipalName
    $BaseUPN = "{0}.{1}@{2}" -f (Convert-ToLatinCharacters $FirstName).replace(' ','.').tolower(),(Convert-ToLatinCharacters $LastName).replace(' ','.').tolower(),$UPNSuffix
      
    if (Get-ADUser -Filter {userprincipalname -eq $BaseUPN} -ErrorAction SilentlyContinue) {
        $index = 0
        do {
            $index++
            $UserPrincipalName = "{0}{1}@{2}" -f $BaseUPN.Split("@")[0],$index,$UPNSuffix
        } until (-not(Get-ADUser -Filter {userprincipalname -eq $UserPrincipalName} -ErrorAction SilentlyContinue))
  
    } else {
        $UserPrincipalName = $BaseUPN
    }
    return $UserPrincipalName
}
  
function New-JDADUser {
    [CmdletBinding(SupportsShouldProcess=$true)]
    param (
        [Parameter(Mandatory=$true)][string]$FirstName,
        [Parameter(Mandatory=$true)][string]$LastName,
        [Parameter(Mandatory=$true)][string]$UserPrincipalName,
        [Parameter(Mandatory=$true)][string]$sAMAccountName,
        [Parameter(Mandatory=$true)][string]$Title,
        [Parameter(Mandatory=$true)][string]$OU,
        [Parameter(Mandatory=$true)][string]$Manager,
        [Parameter(Mandatory=$true)][int]$PasswordLength = 12
    )
     #Generate a password
     $Password = [System.Web.Security.Membership]::GeneratePassword($PasswordLength,2)
  
     #Construct the user HT
     $ADUserHt = @{
        GivenName = $FirstName
        SurName = $LastName
        ChangePasswordAtLogon = $true
        EmailAddress = $UserPrincipalName
        UserPrincipalName = $UserPrincipalName
        sAMAccountName = $sAMAccountName
        Title = $Title
        Name = "$FirstName $LastName ($sAMAccountName)"
        Displayname = "$FirstName $LastName"
        Manager = $Manager
        Path = $OU
        AccountPassword = (ConvertTo-SecureString -String $Password -AsPlainText -Force)
        Enabled = $true
        OtherAttribute = @{proxyAddresses = "SMTP:$UserPrincipalName"}
     }
     try {
        #Create the user and return a custom object
        New-ADUser @ADUserHt -ErrorAction Stop 
        Write-Verbose "Successfully created the user $($ADUserHt.Name)"
        [pscustomobject] @{
            sAMAccountName = $ADUserHt.sAMAccountName 
            UserPrincipalName = $ADUserHt.UserPrincipalName 
            Password = $Password
        }
     } catch {
        Write-Warning "Error creating the user $($ADUserHt.Name) `r`n$_"
     }
}
#endregion functions
    try {
        $sAMAccountName = New-JDSamAccountName -FirstName $Firstname -LastName $LastName
        $UPNandMail = New-JDUPNAndMail -FirstName $Firstname -LastName $LastName -UPNSuffix $UPNSuffix
        $ManagerDN = Get-JDDNFromUPN -UserPrincipalName $Manager
  
        #Create the user in Active Directory
        $NewAdUserHt = @{
            FirstName = $Firstname
            LastName = $LastName
            Manager = $ManagerDN
            sAMAccountName = $sAMAccountName
            UserPrincipalName = $UPNandMail
            Title = $Title
            OU = $TargetOU
            PasswordLength = $PasswordLength
        }
        Write-Output $NewAdUserHt
        $ADUser = New-JDADUser @NewAdUserHt -ErrorAction Stop
        $UpdateHt = @{
            Status = 'Created'
            UserName = $ADUser.sAMAccountName 
            EmailAddress = $ADUser.UserPrincipalName 
        }
        Update-SPOListItem -SPOConnection $SPConnection -ListItemID $UserData.ID -ListFieldsValues $UpdateHt -ListName $ListName
    } catch {
         $UpdateHt = @{
            Status = 'Error'
        }
        Update-SPOListItem -SPOConnection $SPConnection -ListItemID $UserData.ID -ListFieldsValues $UpdateHt -ListName $ListName
        Write-Warning $_
    }

3. Last step is to create the Webhook that will be used when triggering the runbook from the SharePoint workflow. As notified when running the cmdlet, save the WebhookURI, you will need it later and cannot see it more than on Webhook creation. I have set the Webhook expirytime to 2 years, change it according to your needs.

$SPOWebHookHt = @{
    Name = 'SPOWorkflow'
    RunbookName = 'Create-ADUsersFromSPO'
    IsEnabled = $true
    ExpiryTime = (Get-Date).AddDays(730)
}
New-AzureRmAutomationWebhook @SPOWebHookHt

2016-01-09_15-37-15spoworkflow

CONFIGURE THE SHAREPOINT WORKFLOW
1. Open SharePoint Designer and open your website containing the custom list.
2. Add a new List Workflow to your site and associate the workflow with your custom list.
2016-01-09_15-58-35
3. Click on the workflow and edit the Start Options to kick of the workflow when a new item has been created.
2016-01-09_16-01-54
2016-01-09_16-02-31
4. Edit and customize the workflow to fit your needs. In my case, I will have one stage for manager approval and one stage for executing the automation runbook.

Manager approval stage
a. Create a “Start a task process action” to submit the request to the manager.
2016-01-09_16-31-25
b. Create a condition to Execute the runbook if the request was approved.
2016-01-09_16-44-58

Execute Azure Automation Runbook stage
a. First build a dictionary with the data you want to pass to the automation webhook.
2016-01-09_17-04-39
b. Insert a “Call HTTP Web Service” action and configure it to POST the earlier created dictionary to the Webhook url you saved creating the Webhook.
2016-01-09_17-09-36
c. Our last step before ending the workflow will be to write back the response from the webhook to the SharePoint list item. This makes it easier for us to track if the task was properly submitted to Azure Automation. 2016-01-09_17-15-46
5. Check the workflow for errors before saving and publishing. This is my finished workflow before publishing it.
2016-01-09_17-25-17

IN ACTION
First, we create a new item in the SharePoint list to start the process.2016-01-09_19-04-18
2016-01-09_19-05-38

The manager approval process sends an email to the new users manager as we stated in the workflow.
2016-01-09_19-06-22
2016-01-09_19-07-47

After the manager has approved the request, the workflow will kick off the runbook, create the user in Active Directory and write back the UserName/EmailAddress and status of the newly created user to the list. In this example, a password is generated but not distributed to anyone.
2016-01-09_19-12-56
2016-01-09_19-15-032016-01-09_20-08-01
2016-01-09_19-14-18

My hope is that you with this post have got some inspiration on what you can achieve with Azure Automation in combination with SharePoint (Online or On-Prem). Sky is the limit!

/Johan

License your Office 365/Azure AD users with Azure Automation

A while ago I wrote a post regarding schedule your Office 365 automation jobs in Azure Automation. At that time, the Azure AD PowerShell module did not support Azure Automation due to the Online Services Sign in Assistant dependency.

The preview Azure AD PowerShell module released in september do however use ADAL for authentication which solves this problem.
This is great news for all currently running licensing scripts in regular servers as scheduled tasks!

Since many probably will move from their scheduled tasks to Automation for their licensing scripts, I thought it was a good idea sharing on how to make the switch. I will use the “new” Azure portal and assume that you already have an Automation account.

1. Since the MSOnline module is not included by default in Azure Automation you need to download and install the module on your computer. When that is done you need to add the module folders (MSOnline and MSOnlineExtended) to a zip file each. The easiest way to do that is of course with PowerShell 🙂
The following code assumes that you have installed the modules in the default location and the zip files will be put on your desktop.

Add-Type -AssemblyName 'system.io.compression.filesystem'

Get-ChildItem -Path $PSHOME\Modules\MSonline* | ForEach-Object -Process {
    $Source = $_.FullName
    $Destination = '{0}\Desktop\{1}.zip' -f $env:USERPROFILE,$_.Name  
    [Io.compression.zipfile]::CreateFromDirectory($Source, $Destination) 
}

2. Upload the zipped modules files as assets to your automation account.
2015-11-28_17-38-18
2015-11-28_17-43-302015-11-28_17-42-44
3. Now add your license service account as an asset to your automation account.
If you haven’t created one you can use the below PowerShell lines to do it. Note that the account only needs to have the “User management administrator” role.

#Create the service account
New-MsolUser -UserPrincipalName licenserobot@acme333.onmicrosoft.com `
             -DisplayName "LicenseRobot" `
             -FirstName "License" `
             -LastName "Robot" `
             -Password 'password' `
             -ForceChangePassword $false `
             -PasswordNeverExpires $true 
#Add the user as an "User Account Administrator"
Add-MsolRoleMember -RoleName "User Account Administrator" `
                   -RoleMemberEmailAddress "licenserobot@acme333.onmicrosoft.com"

2015-11-28_18-06-16
4. Create your runbook and import the script. In this case I am using a slight modified version of this script, which you will find if you expand the script below below. This version are using the GroupObjectGuid to identify the groups instead of the DisplayName. Since the script is using Write-Output and Write-Warning for logging, Azure Automation will automatically handle basic logging.

LicenseAzureADUsers

#Connect to Azure AD
$Credentials = Get-AutomationPSCredential -Name 'LicenseRobot'
	
Connect-MsolService -Credential $Credentials

$Licenses = @{
                 'E1' = @{ 
                          LicenseSKU = 'tenant:STANDARDPACK'
                          Group = 'cb41a390-4312-4ecf-896e-086f64652690'
                          DisabledPlans = "SHAREPOINTSTANDARD"
                        }                        
                
                 'E3' = @{ 
                          LicenseSKU = 'tenant:ENTERPRISEPACK'
                          Group = '4549bd70-232a-4b71-8afe-4d431e5464ae'
                          DisabledPlans = "SHAREPOINTENTERPRISE","SHAREPOINTWAC"
                        }
                 'EMS' = @{
                         LicenseSKU = 'tenant:EMS'
                         Group = '9abc1736-049b-4c97-9fb6-8b6b02f9e7d5'
                 }
            
            }
    
$UsageLocation = 'SE'
    
#Get all currently licensed users and put them in a custom object
$LicensedUserDetails = Get-MsolUser -All -Synchronized | Where-Object {$_.IsLicensed -eq 'True'} | ForEach-Object {
    [pscustomobject]@{
                UserPrincipalName = $_.UserPrincipalName
                License = $_.Licenses.AccountSkuId
                DisabledPlans = $_.Licenses.Servicestatus | Where-Object {$_.Provisioningstatus -contains "Disabled"}
    }
}
   
#Create array for users to change or delete
$UsersToChangeOrDelete = @()
    
foreach ($license in $Licenses.Keys) {
      
    #Get current group name and ObjectID from Hashtable
    $GroupID = $Licenses[$license].Group
    $AccountSKU = Get-MsolAccountSku | Where-Object {$_.AccountSKUID -eq $Licenses[$license].LicenseSKU}
    $DisabledPlans =  $licenses[$license].DisabledPlans
    Write-Output "Checking for unlicensed $license users in group $GroupID..."
    #Get all members of the group in current scope
    $GroupMembers = ''
    $GroupMembers = (Get-MsolGroupMember -GroupObjectId $GroupID -All).EmailAddress
    #Get all already licensed users in current scope
    $ActiveUsers = ($LicensedUserDetails | Where-Object {$_.License -eq $licenses[$license].LicenseSKU}).UserPrincipalName 
    $UsersToHandle = ''
    $UsersToAdd = ''

    if ($GroupMembers) {  
        
        if ($ActiveUsers) {  
            #Compare $Groupmembers and $Activeusers
            #Users which are in the group but not licensed, will be added
            #Users licensed, but not, will be evaluated for deletion or change of license 
            $UsersToHandle = Compare-Object -ReferenceObject $GroupMembers -DifferenceObject $ActiveUsers -ErrorAction SilentlyContinue -WarningAction SilentlyContinue
            $UsersToAdd = ($UsersToHandle | Where-Object {$_.SideIndicator -eq '<='}).InputObject
            $UsersToChangeOrDelete += ($UsersToHandle | Where-Object {$_.SideIndicator -eq '=>'}).InputObject  
        } else {  
            #No licenses currently assigned for the license in scope, assign licenses to all group members.
            $UsersToAdd = $GroupMembers
        }
    
    } else {  
        Write-Warning  "Group $GroupID is empty - will process removal or move of all users with license $($AccountSKU.AccountSkuId)"
        #If no users are a member in the group, add them for deletion or change of license.
        $UsersToChangeOrDelete += $ActiveUsers
    }
            
    if ($UsersToAdd -match "[.]") {
  
        foreach ($User in $UsersToAdd){
    
            #Process all users for license assignment, if not already licensed with the SKU in order.  
            $MsolUser = Get-MsolUser -UserPrincipalName $User
           
            #Assign licenses for users
            if ($MsolUser.Licenses.AccountSkuId -notcontains $AccountSku.AccountSkuId) {
                try {  
                    #Assign UsageLocation and License.
                    $LicenseAssignmentHt = @{
                        UserPrincipalname = $User
                        AddLicenses = $AccountSKU.AccountSkuId
                    }
                    #Set custom license options to not enable SharePoint / OneDrive by Default
                    
                    if ($DisabledPlans) {
                        $LicenseOptions = New-MsolLicenseOptions -AccountSkuId $AccountSKU.AccountSkuId -DisabledPlans $DisabledPlans
                        $LicenseAssignmentHt["LicenseOptions"] = $LicenseOptions
                    }
                    Set-MsolUser -UserPrincipalName $user -UsageLocation $UsageLocation -ErrorAction Stop -WarningAction Stop
                    Set-MsolUserLicense @LicenseAssignmentHt -ErrorAction Stop -WarningAction Stop
                    Write-Output "SUCCESS: Licensed $User with $license"
                } catch {  
                    Write-Warning "Error when licensing $User$_"
    
                }
            
            }  
        }
    }
}
    
#Process users for change or deletion
if ($UsersToChangeOrDelete -ne $null) {
        foreach ($User in $UsersToChangeOrDelete) {
          if ($user -ne $null) {
    
            #Fetch users old license for later usage
            $OldLicense = ($LicensedUserDetails | Where-Object {$_.UserPrincipalName -eq $User}).License
                 
             #Loop through to check if the user group assignment has been changed, and put the old and the new license in a custom object.
             #Only one license group per user is currently supported.
             $ChangeLicense = $Licenses.Keys | ForEach-Object {
                  $GroupID = $Licenses[$_].Group
                  if (Get-MsolGroupMember -All -GroupObjectId $GroupID | Where-Object {$_.EmailAddress -eq $User}) {
                     [pscustomobject]@{
                        OldLicense = $OldLicense
                        NewLicense = $Licenses[$_].LicenseSKU
                     }
                  } 
    
              }
    
              if ($ChangeLicense) {
                    #The user were assigned to another group, switch license to the new one.
                    try {  
                          Set-MsolUserLicense -UserPrincipalName $User -RemoveLicenses $ChangeLicense.OldLicense -AddLicenses $ChangeLicense.NewLicense -ErrorAction Stop -WarningAction Stop
                          Write-Output "SUCCESS: Changed license for user $User from $($ChangeLicense.OldLicense) to $($ChangeLicense.NewLicense)"
                    } catch {  
                          Write-Warning "Error when changing license on $User`r`n$_"
                    }
                      
              } else {  
                               
                    #The user is no longer a member of any license group, remove license
                    Write-Warning "$User is not a member of any group, license will be removed... "
                    try {  
                          Set-MsolUserLicense -UserPrincipalName $User -RemoveLicenses $OldLicense -ErrorAction Stop -WarningAction Stop
                          Write-Output "SUCCESS: Removed $OldLicense for $User"
                    } catch {  
                          Write-Warning "Error when removing license on user`r`n$_"
                    }
              }
         }
    }
}

2016-01-03_14-33-11
2016-01-03_15-29-22
5. Verify that the runbook is working as intended by starting it in the test pane. 2016-01-03_14-54-40
Make sure to solve eventual errors before you publish and schedule the runbook. The most common error is login errors for the automation service account.
6. Publish and schedule the runbook. In my case I will run it one time every hour.
2016-01-03_15-21-34
2016-01-03_15-19-28

You are now all set and can hopefully disable a scheduled task in your on premises environment. If thinking about running this in production, keep in mind that the PowerShell module is still in preview (I haven’t experienced any problems, but…).

Let me know if you have any questions or suggestions, and happy automation!

/Johan

From Password Sync to ADFS – Reset the state of Azure AD Connect

Setting up your identity bridge using Azure AD Connect requires you to choose authentication/user sign in methods for your users as in the screenshot below.
(A detailed guide on the entire installation can be found here.)
2015-09-27_15-20-37

If you for example have chosen to use Password Synchronization and later want to reconfigure your solution to get SSO with ADFS, you don’t have the possibility to change authentication mode in the AAD Connect wizard after having it configured once.
2015-09-27_15-09-59
2015-09-27_18-33-33

In this case, we could of course just configure our ADFS servers from outside AAD Connect to achieve our goal with SSO.

If we really want to use AAD Connect, we have to “reset the state” of AAD Connect. How this is done is described in KB3008643. The KB do however refer to an xml file which should be present in %LocalAppData%. Trying to do a “state reset” a while ago, I didn’t manage to find the file there.
I did however find a file named PersistedState.xml in C:\ProgramData\AADConnect. 2015-09-27_18-51-51
Hopefully the KB article will be updated to reflect the reality soon.

Renaming the PersistedState.xml file will make the wizard run as it did in the initial state, where you have the possibility to change the authentication settings. Keep in mind that you will need to reconfigure all other settings again. If you are unsure about the settings, make sure to make a proper backup of your synchronization settings prior to doing any changes.
2015-09-27_18-58-52

Hope this helps if running in to this issue and let me know if you have any questions!

/Johan