I have got many follow up questions regarding my post series on building your SSO infrastructure in Azure. One of the most common questions asked, have the one regarding how to configure the internal firewalls (Network Security Groups) between the perimeter subnet and the internal subnet in the Azure Vnet.
To make it as simple as possible, I am reusing the Vnet configuration from the first post in the ADFS series, as below.

The example below assumes that your WAP servers is not joined to the domain. Please note that after you attach an NSG to a subnet, you will have to create specific rules for each endpoint that you have created (example RDP, WinRM etc.).
See the high level sketch below with the subnets including firewall rules.
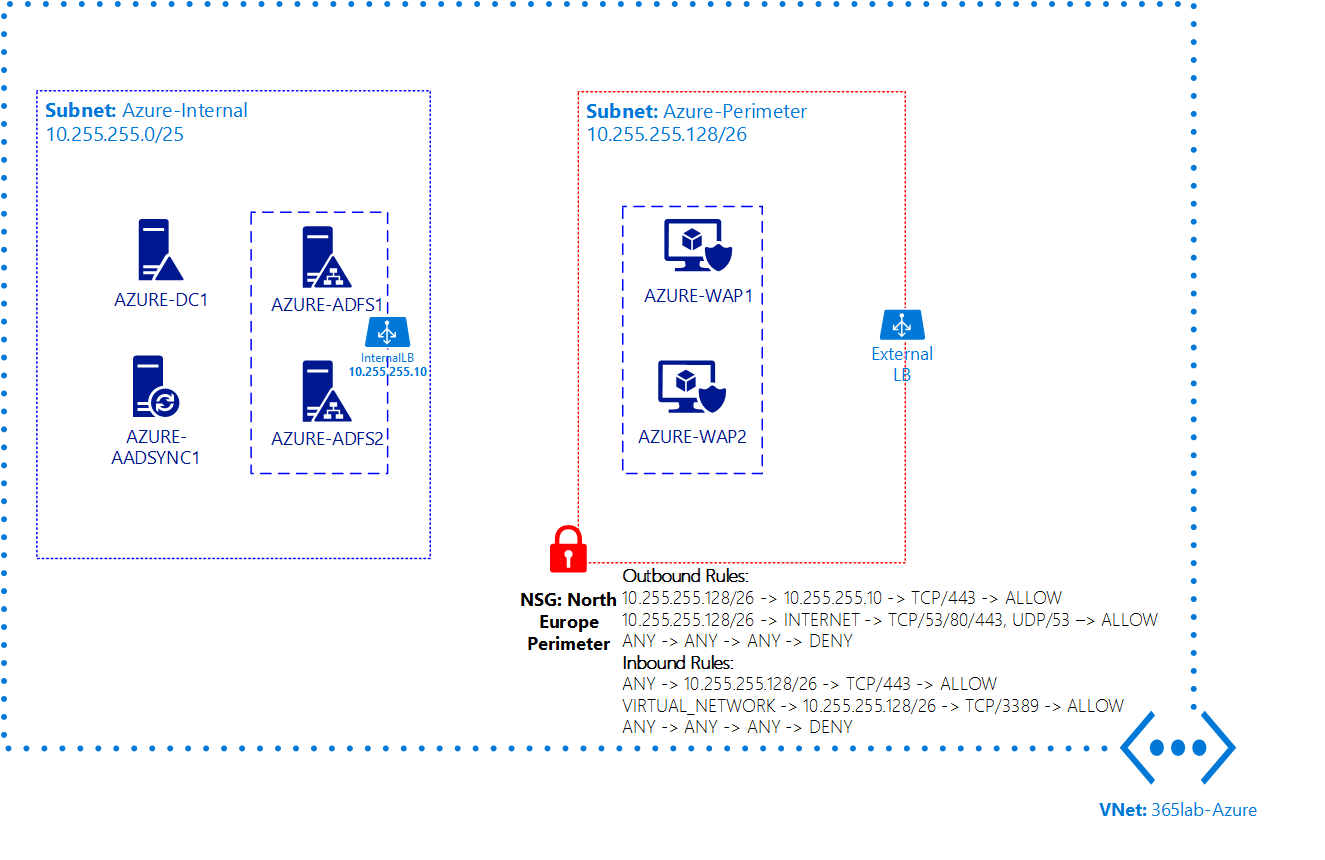
To make the configuration as easy as possible, I’m using the NSG on a subnet level.
Note: As of today, you need to create and configure your Network Security Groups using Azure PowerShell. Prior doing any of the configuration below, you do need to connect to your Azure subscription with PowerShell.
1. Create a new NSG with the command below. They are created on a location basis, which in my case will be North Europe.
New-AzureNetworkSecurityGroup -Name "North Europe Perimeter" -Location "North Europe"
After the NSG has been created, a good way to check out the rule set in detail is by running the following command and redirecting the output to GridView.
(Get-AzureNetworkSecurityGroup -Name "North Europe Perimeter" -Detailed).Rules |
    Select-Object * | Out-GridView

2. Attach the NSG to the subnet with the below command. Note that all inbound endpoints will stop working if you haven’t created a proper rule set at this point.
Set-AzureNetworkSecurityGroupToSubnet -Name "North Europe Perimeter" `
                                      -VirtualNetworkName "365lab-Azure" `
                                      -SubnetName "Azure-Perimeter"
3. Now it is time to configure the rule set. To make it a bit easier to get an overview of the rules, I am using a CSV file as input. Remember that the priority of the rules are very important. You can download an example of the csv file here.

#Get the created NSG
$NSG = Get-AzureNetworkSecurityGroup -Name "North Europe Perimeter"
#Import the csv with the rules
$Rules = Import-Csv .\NSG-Ruleset.csv

foreach ($Rule in $Rules) {
    try {
        Set-AzureNetworkSecurityRule -Name $Rule.Name `
                                     -Type $Rule.Type `
                                     -Priority $Rule.Priority `
                                     -Action $Rule.Action `
                                     -SourceAddressPrefix $Rule.SourceAddressPrefix `
                                     -SourcePortRange $Rule.SourcePortRange `
                                     -DestinationAddressPrefix $Rule.DestinationAddressPrefix `
                                     -DestinationPortRange $Rule.DestinationPortRange `
                                     -Protocol $Rule.Protocol `
                                     -NetworkSecurityGroup $NSG -ErrorAction Stop | Out-Null
        Write-Output "Created rule $($Rule.Name) successfully"
    } catch {
        Write-Warning "Error creating rule $($Rule.Name)`r`n$_"
    }
}
After a little while, you should have simliar output as below in your PowerShell console.

You have now configured a DMZ/Perimeter network subnet in Azure to support your ADFS/WAP setup. The above method can of course be used creating all kinds of rules in NSG’s. Let me know if you have any questions!
/Johan

Hi Johan,
Thank you so much. This was helpful as I needed to migrate my DMZ NSG to a new vNet network. It worked perfect for me 🙂