Tag Archives: Exchange Online

Office 365: Start hybrid migrations and inform users

Lately I’ve been doing quite a few Hybrid setups.
One of the things that cause quite a lot of pain when doing migrations in general is getting information out to your users.
Even if you have a good communication plan, only 20% of your users read the information and only 5% of them reflect and understand it. 🙂

To make this a bit easier, I’ve created a small script that starts Hybrid migration batches and sends out information to the end user.
This is of course just an example, but gives you a good idea of what you are able to do with quite simple means.

HybridMigrationEmail

Getting started:

  • Review all relevant variables in the script
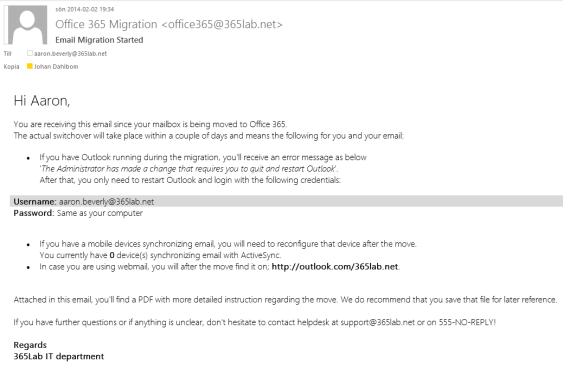
  • Change the text in BodyHybrid.txt to fit in to your needs, the html in that file will be the information sent in the email. The words ActiveSyncDevices,OWAAddress,EmailAddress and Firstname will automatically be replaced by its corresponding variables. (and no the css is not the best 🙂 )
  • Create the PDF Office365Info.pdf and put it in the same folder as the script, that file will be attached to the email.
  • Create input file Prepare-Mailboxes.csv with samAccountNames of the users that you want to migrate. (Note that I am assuming that the users Email Address and UserPrincipalName are the same in the script)
    Also note that the MoveRequest settings in the script might not fit your needs (Baditemlimit, Largeitemlimit).

As we are using the switch -SuspendWhenReadytoComplete in the script, the batches will autosuspend at 95% completion.
That means you’ll have to complete them manually with for example the following line:

Get-CloudMoveRequest | Where-Object {$_.Status -eq "AutoSuspended"} | Resume-CloudMoveRequest. 

Another good option to get in better control of your remote mailbox moves is to use Michael Halls excellent tool based on PowerShell and Excel that does that for you.

Start-HybridMigrations.ps1

<#
.SYNOPSIS
    Starts hybrid migrations based on input (samAccountName) from a csv file.
.DESCRIPTION
    The script starts hybrid migrations and sends out information emails based on the file "BodyHybrid.txt".
    PowerShell V3.0 required
.NOTES
    File Name: Start-HybridMigrations.ps1
    Author   : Johan Dahlbom, johan[at]dahlbom.eu
    The script are provided “AS IS” with no guarantees, no warranties, and they confer no rights.
#>

#Import Required Modules
Import-Module ActiveDirectory

#Define Mail Information and Logging
$Users = Get-Content Prepare-MailboxMoves.csv
$BodyHybrid = Get-Content BodyHybrid.txt -Raw
$OWAAddress = 'http://outlook.com/365lab.net'
$Attachment = Get-Childitem .\Office365Info.pdf
$PSScriptRoot = Split-Path -Parent -Path $MyInvocation.MyCommand.Definition
$Logfile = ($PSScriptRoot + "\HybridMigrations.log")

#Define Exchange Online Variables
$ExchServ = "exchangecas.corp.365lab.net"
$HybridServer = "webmail.365lab.net"
$DeliveryDomain = "365lab.mail.onmicrosoft.com"
$OnPremiseUsername = "cloud\svc_mailmigration"
$OnPremisePassword = ConvertTo-SecureString "password" -AsPlainText -Force
$CloudUsername = "svc-cloudmigration@365lab.onmicrosoft.com"
$CloudPassword = ConvertTo-SecureString "password" -AsPlainText -Force
$CloudCred = New-Object System.Management.Automation.PSCredential $CloudUsername, $CloudPassword
$OnPremCred = New-Object System.Management.Automation.PSCredential $OnPremiseUsername, $OnPremisePassword

#Connect to OnPremise Exchange
    if (!(Get-Command Get-ActiveSyncDeviceStatistics -ErrorAction SilentlyContinue)) {
    try {
        Add-PSSnapin Microsoft.Exchange.Management.PowerShell.E2010
    } catch {
            $Session = New-PSSession -ConfigurationName Microsoft.Exchange -ConnectionUri "http://$ExchServ/powershell" -Authentication Kerberos
            Import-PSSession -Session $Session -CommandName  Get-ActiveSyncDeviceStatistics -FormatTypeName * | Out-Null
        }
    }
#Connect to Exchange Online
    if (!(Get-Command New-CloudMoveRequest -ErrorAction SilentlyContinue))
    {
	    $session = New-PSSession -ConfigurationName Microsoft.Exchange -Authentication Basic -ConnectionUri https://ps.outlook.com/powershell -AllowRedirection:$true -Credential $CloudCred
	    Import-PSSession $session -Prefix Cloud
    }

function LogWrite {
Param ([string]$Logstring)
Add-Content $Logfile -value $logstring -ErrorAction Stop
Write-Host $logstring
}

function Send-MigrationMail {
param(
[Parameter(Mandatory=$true)]
[string]$Message,
[Parameter(Mandatory=$true)]
[string]$Recipient
)
    $emailFrom = "Office 365 Migration <office365@365lab.net>"
    $smtpserver = "smtpyrelay.365lab.net"
    $subject = "Email Migration Started"
    $cc = "migrator@365lab.net"

    Send-MailMessage -From $emailfrom -To $Recipient -Cc $cc -SmtpServer $smtpserver -Subject $subject -Body $Message -BodyAsHtml -Attachments $Attachment

}
LogWrite "$(get-date -Format u)"
foreach($aduser in $users) {
	$emailAddress = (Get-ADuser $aduser -properties UserPrincipalName).UserPrincipalName
	$firstname = (Get-ADuser $aduser).givenname
        #Find the number of Active ActiveSyncDevices that the user have in the local Exchange solution. If not, set to 0.
		$ActiveSyncDevices = (Get-ActiveSyncDeviceStatistics -Mailbox $aduser | Where-Object {$_.LastSuccessSync -gt (Get-Date).AddDays(-30)}).count
        if (!($ActiveSyncDevices)) {
            $ActiveSyncDevices = "0"
        }
	    #Start Email Migration for user
        try {
            New-CloudMoveRequest -Identity $emailaddress -Remote -RemoteHostName $HybridServer -RemoteCredential $OnPremCred -TargetDeliveryDomain $DeliveryDomain -BatchName $emailAddress -SuspendWhenReadyToComplete -BadItemLimit 50 -LargeItemLimit 50
	} catch {
            $err = $_
            Logwrite "ERROR: Failed to start migration on $($emailAddress)`r`n$($err)"
        }

        #Verify that the move request was successful and send information email
        if ((Get-CloudMoveRequest | Where-Object {$_.BatchName -eq $emailAddress} -ErrorAction SilentlyContinue)) {
            LogWrite "INFO: Started migration of user $($emailAddress) $(get-date -format u)"
            Send-MigrationMail -Recipient $emailAddress -Message $BodyHybrid.Replace('firstname',"$firstname").Replace('ActiveSyncDevices',"$ActiveSyncDevices").Replace("emailaddress","$emailaddress").Replace("OWAAddress","$OWAAddress")
        }else{
            LogWrite "ERROR: Could not start migration for user $($emailAddress), please verify that user exists"
        }
}

The script would of course be possible to extend with lots of things like license assignment, watching the mailboxes as they move and lots and lots of other things, but that’s for another day.
Just let me know if you have suggestions on improvements or other things that should be changed.
Download the script complete with the HTML-template and example csv file from here.

Happy migrations!

/Johan
Office 365: Migrating DirSync to new AD domain

Disclaimer
This blog post was written for older versions of Office 365 and Azure AD, and has not been tested in the latest version. Always make sure that you have a valid backup before making any changes to your system.

In a migration scenario you might need to replace the Active Directory domain used to sync your users to Office 365. I will go through the steps you need to change AD domain.

In this scenario I assume that ADFS is not used. If it is, you first have to disable federation. I suggest looking at my previous post where I described how to switch from ADFS to Password Sync.

The steps we have to go through are:

  1. Disable DirSync in old domain
  2. Populate new AD domain with users and attributes
  3. Prepare Office 365 users for new domain
  4. Install DirSync in the new domain.
  5. Verify Sync

First, disabling DirSync is very easy. Just go to the Office 365 admin center and click the Deativate link under users and groups.

dirsync-change-domain-1This will take up to 72 hours. When this process is over all user accounts are managed in the Office 365 portal, and there is no connection to your old domain. This change will not cause any service interruption, all users will be able to use their services as normal.

In the meantime you can uninstall the Azure Active Directory Sync tool on the old DirSync server.

The second step is to populate your new AD domain with all user accounts. It is now important that you copy all information from the old domain, (i.e. phone numbers, titles etc), and for Exchange Online it is especially important that these attributes are copied:

  • userPrincipalName
  • proxyAddresses
  • legacyExchangeDN

UserPrincipalName is your login name to Office 365. I don’t think I have to explain why this attribute is important 🙂 . ProxyAddresses are all your email addresses, both primary and alias. The last attribute, legacyExchangeDN, is used if you previously have migrated from an Exchange on-premises to Office 365. It is used for internal addressing in Exchange. If it is removed you will not be able to reply to old emails, meeting invitations, and your Suggested Contacts will also fail.

I will not go through here how to migrate these attributes here, check out our post on how to sync attributes from cloud identities to active directory.

The third step is where the magic happens. Office 365 uses the ObjectGUID attribute to keep track of the user accounts in in your on-premises Active Directory. It is translated to an ImmutableID in Azure Active Directory. If you rename your users, the ObjectGUID is untouched. Hence the name ImmutableID.

dirsync-change-domain-2The problem is that when you move to a new domain, all ObjectGUIDs are changed, and we need to generate a new ImmutableID.

Office 365 generates these IDs for us, we just have to clear the attribute on all users in Office 365. This is easily done with PowerShell:

Set-MsolUser -UserPrincipalName "aaron.beverly@365lab.net" -ImmutableId "$null"

The next step is to activate DirSync in the Office 365 portal again, and then reinstall the Azure Active Directory Sync tool on a server in the new domain. I strongly recommend using a new server for this step. Re-using the old server (after joining it to the new domain) might break your sync.

After the installation a full sync is done. The Sync tool will identify and match the users in Office 365 and Active Directory by the primary email address. If a match is found a new ImmutableID is created and written to Azure Active Directory.

Finally, after the initial sync is done we can look in Synchronization Service Manager to check that all users were matched and that we don’t have any sync errors.

/ Andreas

Mail flow rules for alias email addresses in Exchange Online

Stumbled upon an ‘issue/feature’ with mail flow rules (transport rules) that I’ve encountered before a couple of days ago and thought it was a good idea sharing.
It’s always good to get a reminder of things from time to time, even if it might be a bit obvious 🙂
The ‘issue’ do of course apply to Exchange On premise environments as well.

Case:
The user Kalle Kula have three email addresses as following:
SMTP:kalle.kula@corp.365lab.net (primary)
smtp:kalle.kula@spam.365lab.net
smtp:kalle.kula@365lab.onmicrosoft.com

If an email is sent to the address kalle.kula@spam.365lab.net (one of the alias email address for the user), we want to append a disclamer that states “This email was sent to the domain spam.365lab.net”

How to do it:
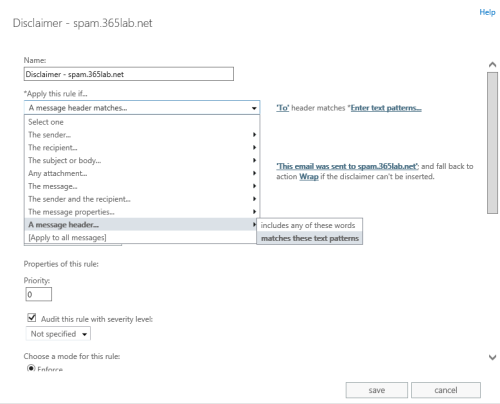
1. In Exchange Admin Center, under mail flow -> rules, create a new dislaimer rule.
2014-01-02 13-18-37
2. To be able to do more granular selection and actions, click “More Options” in the bottom left corner.

2014-01-02 13-22-46
3. Then create your rule with the following options.

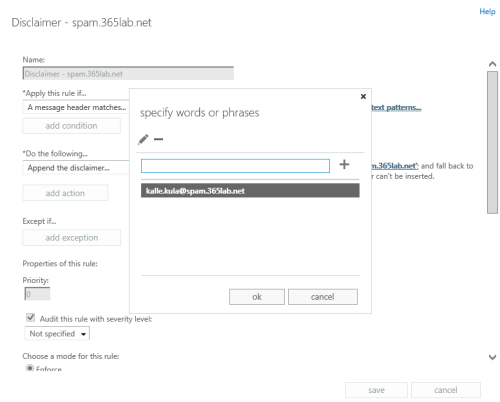
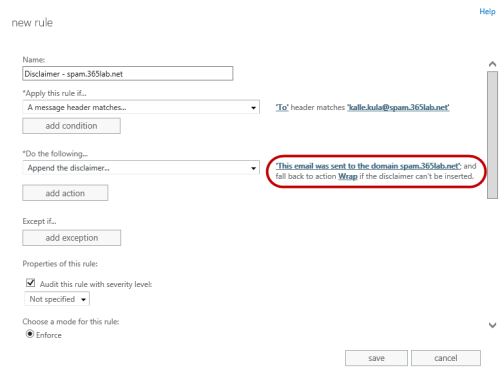
The logical thing here would have been to apply the rule if the recipient address matches my particular address, but that does only work for primary email addresses. So therefore we need to apply it on the header “To” and match the text pattern kalle.kula@spam.365lab.net (the alias address)

2014-01-02 13-36-072014-01-02 13-37-172014-01-02 13-39-00  

Add your disclaimer and set fall back action.
2014-01-02 13-42-27
The only thing you need to do now for the policy to be applied on future emails is to choose mode: Enforce, save it and you’re done!

If you want to check whether a rule has been used or not, you can use EAC as well.
2014-01-02 14-07-11

PowerShell version:
To do the same as above with PowerShell, you can use the following PowerShell lines:

 
#Connect to Exchange Online with PowerShell
$cred = Get-Credential
$O365 = New-PSSession -ConfigurationName Microsoft.Exchange -ConnectionUri https://ps.outlook.com/powershell -Credential $cred -Authentication Basic -AllowRedirection 
$importcmd = Import-PSSession $O365 
#Create the Mail Flow rule (transport rule)
New-TransportRule -Name "Disclaimer - spam.365lab.net" `
                   -HeaderMatchesPatterns {kalle.kula@spam.365lab.net} `
                   -HeaderMatchesMessageHeader To `
                   -ApplyHtmlDisclaimerText "This email was sent to the domain spam.365lab.net" `
                   -ApplyHtmlDisclaimerLocation Append `
                   -ApplyHtmlDisclaimerFallbackAction Wrap `
                   -Mode Enforce 

Further documentation on mail flow rules (transport rules) you find on http://technet.microsoft.com/en-us/library/dd351127(v=exchg.150).aspx.

/Johan

Emails from Messagelabs(Symantec) blocked after running HCW (Hybrid Configuration Wizard)

A couple of my customers have been running in to this issue lately, so I thought it was a good idea to share the issue with you guys.

Note: the issue only applies to those that are using Messagelabs/Symantec as their current spam-provider. (MX-record pointing to messagelabs)

Issue
After running Hybrid Configuration Wizard in Exchange 2010/2013 you experience intermittent issues with incoming emails from the internet (Messagelabs). If you dig further down to the issue you come to the conclusion that it only happens when you receive emails from certain ip subnets that Messagelabs are using.

Cause
As part of the Hybrid Configuration Wizard process, a receive connector named “Inbound from Office 365” is created. The purpose of that receive connector is to enable a secure mail flow directly from Office 365.
For that reason, the connector is configured with the setting RequireTLS set to True .
It also configures a set of remote ip ranges that the connector accepts (public Office 365 IP-ranges).

And it was here I came across the actual cause to this issue.
HCW are adding a remote ip range that overlaps with the public IP-ranges Messagelabs are using. This in combination with the fact that Messagelabs obviously doesn’t fully support TLS, makes this issue happen.
I confirmed this both with the transport logs and in Messagelabs documentation (http://images.messagelabs.com/EmailResources/ImplementationGuides/Subnet_IP.pdf).
The overlapping subnet is 67.219.240.0/20.

See screenshot from the Exchange Server and Symantecs documentation below:
2013-12-25 22-34-08

2013-12-25 22-34-55

Looking further into the documentation Microsoft have on this at http://help.outlook.com/en-us/140/gg263350.aspx, you find out that the subnet 67.219.240.0/20 isn’t there.
That is also confirmed by doing a whois on the subnet (http://www.whois.net/ip-address-lookup/67.219.240.0) – this subnet does not belong to Microsoft.

That means it should be perfectly safe to remove that subnet from the receive connector, and I can confirm that it hasn’t created any problems in the cases I bumped in to.

Solution(or workarounds…)
The quick and dirtly solution to this issue is to to turn off the TLS requirements on the receive connector “Inbound from Office 365” with the PowerShell command as below

Get-ReceiveConnector "Inbound from Office 365" | Set-ReceiveConnector -RequireTLS $false

The better solution is to just remove the subnets from the receive connector, and it should be perfectly safe to do this since no emails from Office 365 will arrive that way.

Hope this helps you out if you are running in to this issue!

/Johan

Password never expires for Office 365 users

If you are using Office 365 without federation with your on-premise Active directory you are obligated to change password for your cloud based identity every 90 days.

When using BPOS, this was not a large issue since you had the sign-in client that reminded you to change password in time.

But with Office 365 when you for example only are using SharePoint online, there is not yet a way to get password expiration reminders if the users are accessing SharePoint with the direct url (eg. https://mycompany.sharepoint.com). This means you potentially end up with users that cannot access SharePoint when their password has expired.

Until they’ve come up with a solution for password expiration reminders via email one workaround is to set the users passwords to never expire.

You do this with the Powershell module for Online services (http://onlinehelp.microsoft.com/Office365-enterprises/ff652560.aspx) with the following commands:

$cred = Get-Credentials 
Connect-MsolService -Credential $cred

For one user:

Set-MsolUser -UserPrincipalName user@example.com -PasswordNeverExpires $True

For all users:

Get-MsolUser | Set-MsolUser -PasswordNeverExpires $True


Note that this works for all Office 365 services that are using Azure Active Directory (Exchange Online, Lync Online and Sharepoint Online)