Emails from Messagelabs(Symantec) blocked after running HCW (Hybrid Configuration Wizard)

A couple of my customers have been running in to this issue lately, so I thought it was a good idea to share the issue with you guys.

Note: the issue only applies to those that are using Messagelabs/Symantec as their current spam-provider. (MX-record pointing to messagelabs)

Issue
After running Hybrid Configuration Wizard in Exchange 2010/2013 you experience intermittent issues with incoming emails from the internet (Messagelabs). If you dig further down to the issue you come to the conclusion that it only happens when you receive emails from certain ip subnets that Messagelabs are using.

Cause
As part of the Hybrid Configuration Wizard process, a receive connector named “Inbound from Office 365” is created. The purpose of that receive connector is to enable a secure mail flow directly from Office 365.
For that reason, the connector is configured with the setting RequireTLS set to True .
It also configures a set of remote ip ranges that the connector accepts (public Office 365 IP-ranges).

And it was here I came across the actual cause to this issue.
HCW are adding a remote ip range that overlaps with the public IP-ranges Messagelabs are using. This in combination with the fact that Messagelabs obviously doesn’t fully support TLS, makes this issue happen.
I confirmed this both with the transport logs and in Messagelabs documentation (http://images.messagelabs.com/EmailResources/ImplementationGuides/Subnet_IP.pdf).
The overlapping subnet is 67.219.240.0/20.

See screenshot from the Exchange Server and Symantecs documentation below:
2013-12-25 22-34-08

2013-12-25 22-34-55

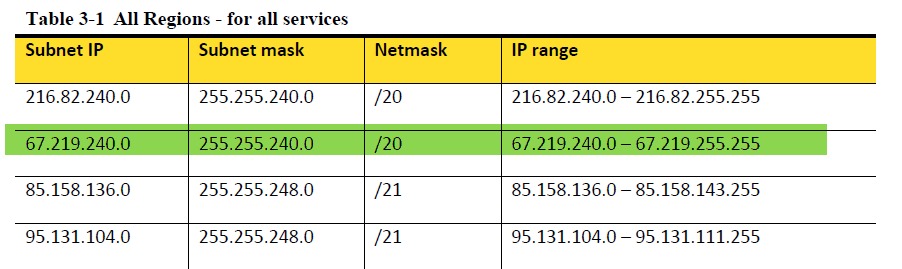
Looking further into the documentation Microsoft have on this at http://help.outlook.com/en-us/140/gg263350.aspx, you find out that the subnet 67.219.240.0/20 isn’t there.
That is also confirmed by doing a whois on the subnet (http://www.whois.net/ip-address-lookup/67.219.240.0) – this subnet does not belong to Microsoft.

That means it should be perfectly safe to remove that subnet from the receive connector, and I can confirm that it hasn’t created any problems in the cases I bumped in to.

Solution(or workarounds…)
The quick and dirtly solution to this issue is to to turn off the TLS requirements on the receive connector “Inbound from Office 365” with the PowerShell command as below

Get-ReceiveConnector "Inbound from Office 365" | Set-ReceiveConnector -RequireTLS $false

The better solution is to just remove the subnets from the receive connector, and it should be perfectly safe to do this since no emails from Office 365 will arrive that way.

Hope this helps you out if you are running in to this issue!

/Johan

Office 365 PowerShell Tip – Keeping EmailAddress and UPN in Sync

UPN’s are a nice way for our users to remember their usernames.  A UPN essentially has the same format as an email address.  Rather than having users login to their workstations or intranet resources as CLOUD\Username, they can login as user.lastname@cloud.com which can be the same as their email address.

Problem
When moving to Office 365 and are using DirSync with or without ADFS, your users need to have a UPN with a public routable domain in it. The easiest and most logical way to do that for your users sake is to keep UPN and primary email address the same.

Solution(s)
There are of course a lot of different solutions out there for achieveing the above, many of them include PowerShell and csv-files. My solution is based on PowerShell and are utilizing either Exchange Powershell cmdlets or Active Directory cmdlets.

Solution 1 (Exchange 2007 and above)
The below example is a very quick one that you run in Exchange Management Shell in Exchange 2007 and above. It simply copies the “WindowsPrimaryEmailAddress” for all your user mailboxes to the userPrincipalName attribute, without any question.

Get-Mailbox -ResultSize Unlimited -RecipientTypeDetails UserMailbox | ForEach { Set-Mailbox -Identity $_.Guid.ToString() -UserPrincipalName $_.WindowsEmailAddress.ToString() } 

To verify that the change has been properly done, you can run the below command to list all mailboxes that have different primary email address and UPN:

Get-Mailbox -ResultSize Unlimited -RecipientTypeDetails UserMailbox | Where-Object {$_.UserPrincipalName -ne $_.WindowsEmailAddress.ToString() }

Solution 2 (Exchange 2003 and above)
I had a case where the customer was running Exchange 2003, but had 2008R2 domain controllers. The customer also wanted a log file with the old and the new UPN after the change had been done. The script utilizes the ActiveDirectory module for PowerShell and copies the primary email address from the proxyAddresses attribute.
Running the script without any switches makes it run in test mode and do the AD-changes with the -WhatIf, so no changes will be done here.

2014-01-01 16-09-06

Running the script with the switch -Production makes it do the actual changes.2014-01-01 16-09-22

For backup purposes, the script are also creating a log file with the old and new attribute in the same folder where you run the script.

<#  
.SYNOPSIS 
    Script that copies the primary emailaddress from proxyAddresses to the userPrincipalName attribute.  
    It runs in test mode and just logs the changes that would have bee done without any parameters.  
    It identifies an exchange user with the legacyExchangeDN-attribute.  
.PARAMETER Production 
    Runs the script in production mode and makes the actual changes. 
.NOTES 
    Author: Johan Dahlbom 
    Blog: 365lab.net 
    Email: johan[at]dahlbom.eu 
    The script are provided “AS IS” with no guarantees, no warranties, and they confer no rights.     
#>
param(
[parameter(Mandatory=$false)]
[switch]
$Production = $false
)
#Define variables
$PSScriptRoot = Split-Path -Parent -Path $MyInvocation.MyCommand.Definition
$DateStamp = Get-Date -Format "yyyy-MM-dd-HH-mm-ss"
$Logfile = $LogFile = ($PSScriptRoot + "\ProxyUPNSync-" + $DateStamp + ".log")
Function LogWrite
{
Param ([string]$logstring)
Add-content $Logfile -value $logstring
Write-Host $logstring
}
    try
    {
        Import-Module ActiveDirectory -ErrorAction Stop
    }
    catch
    {
        throw "Module ActiveDirectory not Installed"
    }

#For each AD-user with a legacyExchangeDN, look up primary SMTP: in proxyAddresses
#and use that as the UPN
$CollObjects=Get-ADObject -LDAPFilter "(&(legacyExchangeDN=*)(objectClass=user))" -Properties ProxyAddresses,distinguishedName,userPrincipalName

            foreach ($object in $CollObjects)
            {
                $Addresses = $object.proxyAddresses
                $DN=$object.distinguishedName
                    foreach ($Address In $Addresses)
                    {
                        $ProxyArray=($ProxyArray + "," + $Address)
                        If ($Address -cmatch "SMTP:")
                            {
                                $PrimarySMTP = $Address
                                $UserPrincipalName=$Address -replace ("SMTP:","")
                                    #Found the object validating UserPrincipalName
                                    If ($object.userPrincipalName -notmatch $UserPrincipalName) {
                                        #Run in production mode if the production switch has been used
                                        If ($Production) {
                                            LogWrite ($DN + ";" + $object.userPrincipalName + ";NEW:" + $UserPrincipalName)
                                            Set-ADObject -Identity $DN -Replace @{userPrincipalName = $UserPrincipalName}
                                        }
                                        #Runs in test mode if the production switch has not been used
                                        else {
                                            LogWrite ($DN + ";" + $object.userPrincipalName + ";NEW:" + $UserPrincipalName)
                                            Set-ADObject -Identity $DN -WhatIf -Replace @{userPrincipalName = $UserPrincipalName}
                                        }
                            }
                            else
                            {
                            Write-Host "Info: User $($object.UserPrincipalName) are already OK!"

                            }
                        }
                    }
            }

Hope the above was helpful to you, please let me know if you have any questions!

/Johan

Enabling Data Deduplication in Windows 8.1

There are several posts about enabling Data Deduplication in Windows 8 out there. I recently upgraded my Windows 8 laptop to 8.1, and did of course want Deduplication enabled after the upgrade as well.
Of course this is not supported in any way, but it is a very nice way to save some precious disk space on your lab machines.

The process is basically the same as in Windows 8, the only difference is that you of course need to use the cab files from Windows Server 2012 R2.

If you don’t have a 2012 R2 box nearby, I’ve uploaded a copy of the cab-files my SkyDrive (http://sdrv.ms/1aZsWgk) so you alternatively can get them from there, if you dare. (NO WARRANTIES! :))
Otherwise you should look after the following files on a Server 2012 R2 machine:
Microsoft-Windows-Dedup-Package~31bf3856ad364e35~amd64~en-US~6.3.9600.16384.cab
Microsoft-Windows-Dedup-Package~31bf3856ad364e35~amd64~~6.3.9600.16384.cab
Microsoft-Windows-FileServer-Package~31bf3856ad364e35~amd64~en-US~6.3.9600.16384.cab
Microsoft-Windows-FileServer-Package~31bf3856ad364e35~amd64~~6.3.9600.16384.cab
Microsoft-Windows-VdsInterop-Package~31bf3856ad364e35~amd64~en-US~6.3.9600.16384.cab
Microsoft-Windows-VdsInterop-Package~31bf3856ad364e35~amd64~~6.3.9600.16384.cab

After you’ve extracted the files from your 2012 R2 box (or downloaded them from my SkyDrive), go ahead and run the commands as below:

dism /online /add-package /packagepath:Microsoft-Windows-VdsInterop-Package~31bf3856ad364e35~amd64~~6.3.9600.16384.cab /packagepath:Microsoft-Windows-VdsInterop-Package~31bf3856ad364e35~amd64~en-US~6.3.9600.16384.cab  /packagepath:Microsoft-Windows-FileServer-Package~31bf3856ad364e35~amd64~~6.3.9600.16384.cab /packagepath:Microsoft-Windows-FileServer-Package~31bf3856ad364e35~amd64~en-US~6.3.9600.16384.cab  /packagepath:Microsoft-Windows-Dedup-Package~31bf3856ad364e35~amd64~~6.3.9600.16384.cab /packagepath:Microsoft-Windows-Dedup-Package~31bf3856ad364e35~amd64~en-US~6.3.9600.16384.cab

dism /online /enable-feature /featurename:Dedup-Core /all

If everything works as intended, you should now have Deduplication enabled on your 8.1 machine.
You can verify this in add/remove Windows features. (optionalfeatures.exe)
2013-09-23 19-57-13

To enable it for a specific volume, run the following command in an elevated PowerShell prompt:

Enable-DedupVolume -Volume D:
Set-DedupVolume -Volume D: -OptimizeInUseFiles

To force a Deduplication job, simply run the PowerShell command as below (deduplications runs well on open files now as well, as long as you’ve provided the “OptimizeInUseFiles”-switch…):

Start-DedupJob -Volume D: -Type Optimization
You can monitor your DedupJop with the cmdlet Get-DedupJob.

To verify that everything looks alright after the first job, you run the cmdlet:
Get-DedupVolume -Volume D:
Hopefully you will also end up with a nice deduplicated data volume as in my screenshots below:
2013-12-26 19-00-08
2013-09-23 19-18-00

Happy Deduplication!

/Johan

Directaccess in Windows 8 and Server 2012 – Hotfix frenzy

Windows Server 2012 DirectAccess includes a number of enhanced features and improvements as below:
⦁ Direct Access and RRAS coexistence
⦁ Simplified Direct Access management/setup for small and medium organization administrators
⦁ Built-in NAT64 and DNS64 support for accessing IPv4-only resources
⦁ Support for Direct Access server behind a NAT device
⦁ Load balancing support
⦁ Support for multiple domains
⦁ Support for OTP (token based authentication)
⦁ Automated support for force tunneling
⦁ Multisite support
⦁ Windows PowerShell support
⦁ User and server health monitoring

I’ve now done a couple of DirectAccess implementations (both small scale and large scale) and I must say that most things works very well and straightforward.

There are however a couple of hotfixes that you may have to apply, if you for example are enabling external load balancing in your implementation.
Below is a summary of the hotfixes that have been useful in my different implementations of DirectAccess

Windows Server 2012 and Windows 8 – DirectAccess Related Hotfixes:
KB2782560: DNS64 does not resolve computer names when you use DirectAccess and external load balancing in Windows Server 2012.

KB2788525: You cannot enable external load balancing on a Windows Server 2012-based DirectAccess server.

KB2769240: You cannot connect a DirectAccess client to a corporate network in Windows 8 or Windows Server 2012.

KB2748603: The process may fail when you try to enable Network Load Balancing in DirectAccess in Window Server 2012.

SCM 3.0 Windows 8 Baseline breaks Direct Access IPHTTPS Connectivity

When playing with SCM 3.0 and Windows 8 in my lab environment recently, I got an unpleasant surprise with my Direct Access connectivity in the Environment.

The Windows 8 client wouldn’t connect with IPHTTPS. When doing the usual troubleshooting with the netsh commands (netsh interface httpstunnel show interfaces) etc. I got the output “IPHTTPS interface not installed”.

Da_mailspintos
That output usually shows up when you’re inside the corporate network.

When troubleshooting further I found out that the system event log were full with error 36874/Schannel as below.

Schannel

The setting causing the problem was “System cryptography: Use FIPS compliant algorithms for encryption, hashing, and signingunder “Computer Configuration\Windows Settings\Security Settings\Local Policies\Security Options” .

The setting was Enabled by SCM and is by default Disabled.

SCM30

After changing back the setting to Disabled I restored the IPHTTPS connectivity in my environment.

I am planning to follow this up as FIPS compliance is important for many organisations.

Logon script that writes Displayname, computer model and serial number to description on computer object

Now you don’t have to look after this information anywhere else than your AD, can be very handy in many situations.
There are of course solutions that do this for you but I like have all information in one place. 🙂


To implement this you have to put the script below as a logon script for all users and delegate control so that Domain Users or any user group of your choice have write permissions to the description attribute of computer objects.

This is easiest done with the delegate control wizard that you find by right clicking to any OU.

Write-Description.vbs

On Error Resume Next

Set objWMIService = GetObject("winmgmts:{impersonationLevel=impersonate}!\\.\root\cimv2")
Set colcomputersystem = objWMIService.ExecQuery("Select * from Win32_computersystem")
Set colBIOS = objWMIService.ExecQuery("Select * from Win32_BIOS")
For each objcomputersystem in colcomputersystem
Getcomputersystem = objcomputersystem.Model
GetComputerManufacturer = objcomputersystem.Manufacturer
Next
For each objBIOS in colBIOS
GetSerialNumber = objBIOS.SerialNumber
Next
Set objSysInfo = CreateObject("ADSystemInfo")
Set objUser = GetObject("LDAP://" & objSysInfo.UserName)
Set objComputer = GetObject("LDAP://" & objSysInfo.ComputerName)

if LCase(GetComputerManufacturer)="lenovo" then
Set colItems = objWMIService.ExecQuery("SELECT * FROM Win32_ComputerSystemProduct")
For Each objItem in colItems
strModel = "Lenovo " & objItem.Version
Exit For
Next
Getcomputersystem = strModel & " (" & Getcomputersystem & ")"
end if

strMessage = objUser.CN & " / " & Getcomputersystem & " / " & GetSerialNumber
objComputer.Description = strMessage
objComputer.SetInfo

Password never expires for Office 365 users

If you are using Office 365 without federation with your on-premise Active directory you are obligated to change password for your cloud based identity every 90 days.

When using BPOS, this was not a large issue since you had the sign-in client that reminded you to change password in time.

But with Office 365 when you for example only are using SharePoint online, there is not yet a way to get password expiration reminders if the users are accessing SharePoint with the direct url (eg. https://mycompany.sharepoint.com). This means you potentially end up with users that cannot access SharePoint when their password has expired.

Until they’ve come up with a solution for password expiration reminders via email one workaround is to set the users passwords to never expire.

You do this with the Powershell module for Online services (http://onlinehelp.microsoft.com/Office365-enterprises/ff652560.aspx) with the following commands:

$cred = Get-Credentials 
Connect-MsolService -Credential $cred

For one user:

Set-MsolUser -UserPrincipalName user@example.com -PasswordNeverExpires $True

For all users:

Get-MsolUser | Set-MsolUser -PasswordNeverExpires $True


Note that this works for all Office 365 services that are using Azure Active Directory (Exchange Online, Lync Online and Sharepoint Online)

Revert a federated domain to standard domain in Office 365

The idea with federation/ADFS combined with Office 365 is that you don’t have to care about changing/remembering passwords in multiple places.
Of course that is a good thing and the setup of ADFS is quite easy as long as you know your certificates and size the solution for redundancy.

A couple of days ago I ran in to a scenario where I needed to revert/disable federation for an Office 365 domain.

You do it with the Powershell module for Online Services (can be found on http://go.microsoft.com/fwlink/?linkid=236293).

First you connect to remote powershell with the following command where you will provide your administrative credentials for Office 365:

Connect-MsolService

Then to change your domain back to a non-Federated state you simply type the command:

Convert-MsolDomainToStandard -DomainName example.com -PasswordFile c:\Passwords.txt

The command will convert all users to non federated ones and create a new password for them and put it in the file you specified with the “-PasswordFile” flag. It will also set the flag “ForceChangePassword” on the users to $true, so the users will have to change their own password after the first time they log on with the new one you provided from the file.

If something goes wrong with the conversion of the users when running the conversion command above you may have to convert the users manually to non-federated ones with the “Convert-MsolFederatedUser -UserPrincipalName ” cmdlet.