Office 365: Migrate from Cloud identities to Dirsync

In some scenarios, you may have to transfer the the source of authority for your already cloud-only created user accounts in Office 365. One scenario when this is required, is when changing from cloud only identities to synchronized identities from your local Active Directory. Another scenario is when you migrate your AD users from one domain to another, as described in this post.

To make the transitioning to DirSync as smooth as possible, you have to take a couple of precautions to make sure that existing Office 365 accounts are properly matched with the accounts in your local Active Directory.

This can be done using one of the following two methods:

  • Soft matching of each user. For a soft match to properly work, you need to make sure that the primary email address (both in mail and in proxyaddresses) and userprincipalname in the cloud and in the local Active Directory matches.
  • For the users that are to be matched, construct an ImmutableID for each user in the local AD and synchronize that value to WAAD prior activation and doing the first Directory Synchronization. The ImmutableID is basically a Base64-encoded value of the ObjectGuid attribute.

Solution
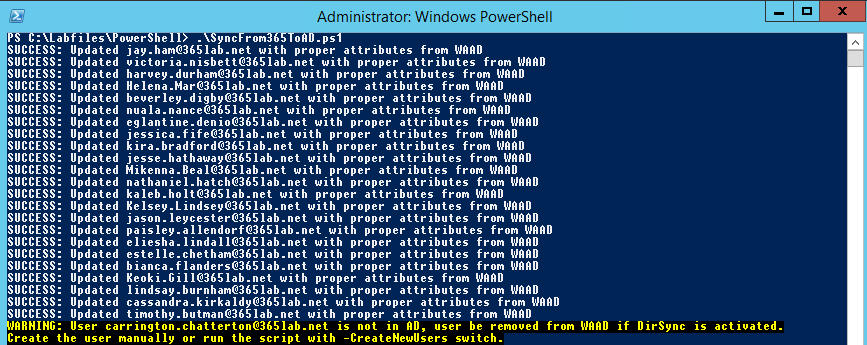
To make this transition easier, I have created a script that and copies the required attributes from WAAD to your local Active Directory automatically. The script can use both methods to match the users.

If you run the script without any parameters, the following attributes will be updated for all matching users in your local Active Directory:

  • GivenName
  • sn (SurName)
  • DisplayName
  • mail
  • proxyAddresses

If using the -UpdateImmutableID switch, an ImmutableID will be created for the user and synced back to WAAD. Please note, that process will only work without additional steps if you have not been using DirSync before.

With the -CreateNewUsers switch, you have the possibility to let the script create users that are in WAAD but not in your local AD. The SamAccountname will be “firstname.lastname” and a random password will be generated for the new user.

2014-04-18 20-53-32
2014-04-18 20-56-44
2014-04-18 20-57-41

Note: a pre-requisite for the script to work properly is that you’ve already populated the UserPrincipalName attribute for all users in your local Active directory. Of course this must match with the UPN’s used in Office 365/WAAD.

SyncFrom365toAD.ps1

<#  
.SYNOPSIS 
    Script that synchronizes attributes from users in WAAD to the local active directory.
.PARAMETER UpdateImmutableID 
    Constructs and inserts the ImmutableID attribute in WAAD.
.PARAMETER TargetOU
    OU to create new users in.
.PARAMETER CreateNewUsers
    Creates new users for users that are not matching the WAAD users UPN.
.NOTES 
    Author: Johan Dahlbom 
    Blog: 365lab.net 
    Email: johan[at]dahlbom.eu 
    The script are provided “AS IS” with no guarantees, no warranties, and they confer no rights.     
#>
param(
[parameter(Mandatory=$false)]
[switch]$UpdateImmutableID = $false,
[parameter(Mandatory=$false)]
[switch]$CreateNewUsers = $false,
[parameter(Mandatory=$false)]
[string]$TargetOU = "OU=Users,OU=365Lab,DC=cloud,DC=lab"
)
 
#Load required Modules and Assemblys
Import-Module MSOnline
Import-Module ActiveDirectory
[Reflection.Assembly]::LoadWithPartialName("System.Web") | Out-Null
 
Connect-MsolService
 
$WAADUsers = Get-MsolUser -All | Where-Object {$_.UserPrincipalName -notlike "*.onmicrosoft.com"}
 
foreach ($WAADUser in $WAADUsers) {
    $ADuser = Get-ADUser -Filter {UserPrincipalName -eq $WAADUser.UserPrincipalName}
      
    try {
 
        $Mail = $($WAADUser.ProxyAddresses | Where-Object {$_ -cmatch "^SMTP"}).substring(5)
         
        if ($ADuser) {
        #Update AD user with attributes from WAAD
        Set-ADUser -Identity $ADuser `
            -EmailAddress $Mail `
            -GivenName $WAADUser.FirstName `
            -SurName $WAADUser.LastName `
            -DisplayName $WAADUser.DisplayName `
            -Replace @{ProxyAddresses=[string[]]$WAADUser.ProxyAddresses} `
            -ErrorAction Stop -WarningAction Stop
 
        Write-Output "SUCCESS: Updated $($ADuser.userprincipalname) with proper attributes from WAAD"
         
        } else {
 
            if ($CreateNewUsers) {
 
                     #Generate password for the user aduser
                     $NewUserPassword = [System.Web.Security.Membership]::GeneratePassword(13,0)
 
                     #Generate samaccountname "firstname.lastname"
                     $SAM = [Text.Encoding]::ASCII.GetString([Text.Encoding]::GetEncoding("Cyrillic").GetBytes("$($WAADUser.Firstname).$($WAADUser.Lastname)".ToLower()))
                                           
                     New-ADUser -Path $TargetOU `
                        -Name $WAADUser.DisplayName `
                        -UserPrincipalName $WAADUser.UserPrincipalName `
                        -SamAccountName $sam `
                        -Enabled $true `
                        -EmailAddress $Mail `
                        -GivenName $WAADUser.FirstName `
                        -SurName $WAADUser.LastName `
                        -DisplayName $WAADUser.DisplayName `
                        -OtherAttributes @{ProxyAddresses=[string[]]$WAADUser.ProxyAddresses} `
                        -AccountPassword (ConvertTo-SecureString $NewUserPassword -AsPlainText -force) `
                        -ErrorAction Stop -WarningAction Stop
 
                     Write-Output "SUCCESS: Created user $sam with password $NewUserPassword"

            } else {
                    
                     Write-Warning "User $($WAADUser.UserPrincipalName) is not in AD, user might not be synchronized correctly or become a duplicate user.`r`nCreate the user manually or run the script with -CreateNewUsers switch."
            
            }
        }
               
        #If UpdateImmutableID switch has been used, construct and set ImmutableID for the WAAD user.
        if ($UpdateImmutableID) {
            $ADuser = Get-ADUser -Filter {UserPrincipalName -eq $WAADUser.UserPrincipalName}
            if ($ADuser) {
                $ImmutableID = [system.convert]::ToBase64String($ADuser.ObjectGUID.ToByteArray())
                Set-MsolUser -UserPrincipalName $WAADUser.UserPrincipalName -ImmutableId $ImmutableID -ErrorAction Stop -WarningAction Stop
            }
        }
      
   } catch [Microsoft.Online.Administration.Automation.MicrosoftOnlineException] {
             
            Write-Warning "Error when updating ImmutableID $ImmutableID for $Mail`r`n$_"
 
   } catch {
            
            Write-Warning "Error when creating user $Mail`r`n$_"
        
   }
 
}

Good luck running the script and with your Dirsync implementation!

/Johan

Office 365: Assign licenses based on groups using PowerShell

Important note: The end of an era with licensing scripts is near… and the beginning of a new one with Azure AD Group Based Licensing is here. Group Based Licensing is now in preview and currently requires a paid Azure AD Subscription. Try it out and give Microsoft your feedback on how they can make it even better! 

Update 2016-01-07: Updated the script with a new function to support nested groups.

As a follow up to my earlier post about assigning Office 365 licenses based on ad attribute, I’ve now created another script that uses another approach to assign the licenses.
Instead of using ad attributes, we are here using security groups to assign the licenses.

Since you want to automate license assignment, I am assuming that you are using DirSync.
In this script, the groups and group members are enumerated directly in Windows Azure Active Directory. This means that the groups you will use to assign licenses, must be synchronized to WAAD. If you are looking for a more advanced script with change and removal functions, check this one out.

Note: Users that already have a license are not processed by the script, nor are licenses removed from users that are not longer member of the groups.

Getting started
Getting started with the script is very easy. In the $Licenses hash table, you define the licenses to assign, the group to use for assignment and the license SKU.
The license SKU id’s for your tenant are found with the Get-MsolLicenseSKU cmdlet, as below:

2014-04-15 22-10-25

Here you will find a good translation table that will help you interpret the License SKU ID to the actual license type. When you have done that, just to put in your O365 credentials and UsageLocation in the script and then you’re all set to schedule the script.

2014-04-15 22-37-53

LicenseO365Users.ps1

#2016-01-07 - Updated the script with a new function to support nested groups.
#Import Required PowerShell Modules
#Note - the Script Requires PowerShell 3.0!
Import-Module MSOnline

#Office 365 Admin Credentials
$CloudUsername = 'admin@tenant.onmicrosoft.com'
$CloudPassword = ConvertTo-SecureString 'password' -AsPlainText -Force
$CloudCred = New-Object System.Management.Automation.PSCredential $CloudUsername, $CloudPassword

#Connect to Office 365
Connect-MsolService -Credential $CloudCred
function Get-JDMsolGroupMember {
    param(
        [CmdletBinding(SupportsShouldProcess=$true)]
        [Parameter(Mandatory=$true, ValueFromPipeline=$true,ValueFromPipelineByPropertyName=$true,Position=0)]
        [ValidateScript({Get-MsolGroup -ObjectId $_})]
        $ObjectId,
        [switch]$Recursive
    )
    begin {
        $MSOLAccountSku = Get-MsolAccountSku -ErrorAction Ignore -WarningAction Ignore
        if (-not($MSOLAccountSku)) {
            throw "Not connected to Azure AD, run Connect-MsolService"
        }
    }
    process {
        $UserMembers = Get-MsolGroupMember -GroupObjectId $ObjectId -MemberObjectTypes User -All
        if ($PSBoundParameters['Recursive']) {
            $GroupsMembers = Get-MsolGroupMember -GroupObjectId $ObjectId -MemberObjectTypes Group -All
            $GroupsMembers | ForEach-Object -Process {
                $UserMembers += Get-JDMsolGroupMember -Recursive -ObjectId $_.ObjectId
            }
        }
        Write-Output ($UserMembers | Sort-Object -Property EmailAddress -Unique) 

    }
    end {

    }
}

$Licenses = @{
                 'E1' = @{
                          LicenseSKU = 'mstlabs:STANDARDPACK'
                          Group = 'E1_Users'
                        }                           

                 'E3' = @{
                          LicenseSKU = 'mstlabs:ENTERPRISEPACK'
                          Group = 'Office 365 E5'
                        }
            }
$UsageLocation = 'SE'

foreach ($license in $Licenses.Keys) {

    $GroupName = $Licenses[$license].Group
    $GroupID = (Get-MsolGroup -All | Where-Object {$_.DisplayName -eq $GroupName}).ObjectId
    $AccountSKU = Get-MsolAccountSku | Where-Object {$_.AccountSKUID -eq $Licenses[$license].LicenseSKU}

    Write-Output "Checking for unlicensed $license users in group $GroupName with ObjectGuid $GroupID..."

    $GroupMembers = (Get-JDMsolGroupMember -ObjectId $GroupID -Recursive | Where-Object {$_.IsLicensed -eq $false}).EmailAddress

    if ($AccountSKU.ActiveUnits - $AccountSKU.consumedunits -lt $GroupMembers.Count) {
        Write-Warning 'Not enough licenses for all users, please remove user licenses or buy more licenses'
      }

        foreach ($User in $GroupMembers) {
          Try {
            Set-MsolUser -UserPrincipalName $User -UsageLocation $UsageLocation -ErrorAction Stop -WarningAction Stop
            Set-MsolUserLicense -UserPrincipalName $User -AddLicenses $AccountSKU.AccountSkuId -ErrorAction Stop -WarningAction Stop
            Write-Output "Successfully licensed $User with $license"
          } catch {
            Write-Warning "Error when licensing $User`r`n$_"
          }

        }

}

Looking for other script options using groups?
Office 365: Assign licenses based on groups using PowerShell – Advanced version – adds and removes licenses for the users as well.
Office 365: Assign individual parts of licenses based on groups using PowerShell – script with the ability to add and remove serviceparts of a license.

There are lots of things that are not in the script that could also be automated, please help us prioritize with the features you’d like to have the most.

/Johan

Using Exchange Online as mail gateway for decentralized email domains

In some scenarios it is useful to have a central email server that forwards messages to different email servers. You might for example have a company with different business units, each having an email server of their own. In this post I will show you how to get started with the mail flow using one domain, but with several different email servers in Exchange Online.

Consider the following scenario. Several email servers exists within a company:

  • In USA an on-premises Exchange environment is using @us.contoso.com addresses
  • In Spain an external hosting provider is delivering an email service based on pop3 using @contosospain.com addresses
  • In Poland Exchange Online is used, but with @contoso.pl addresses

A new corporate policy states that all users must have an email address of the form givenname.surname@contoso.com. Also, a central antispam system must be used. At this point no consolidation of email servers will be done. Exchange Online Protection licenses has been bought by the company.

To take care of the mail flow in Exchange Online we have to create our Office 365 tenant and add the contoso.com domain to it. We also have to change our DNS and let the MX records for contoso.com point to Exchange Online. This will give us the following mail flow for a user in for example Poland:

Mail flow

I have a csv file with all users in each location:

aliasfile

For each user we will create a mail enabled user that holds the alias and target email addresses. I will use PowerShell to create these users:

#Import all users
$users = Import-Csv users.csv

#Create a password for all users
$Password = ConvertTo-SecureString 'Pa$$w0rd' -asPlainText -Force

#Create mail-enabled user
ForEach ($user in $users) {
	$Name = $user.Name
	$Email = $user.Alias
	$Target = $user.Email
	
	New-MailUser -Name $Name -MicrosoftOnlineServicesID $Email -ExternalEmailAddress $Target -Password $Password
}

Now all emails sent to the @contoso.com addresses will be delivered to the current regional email server. The next step would be to configure each email server to use @contoso.com as from address, and only accept incoming emails from Exchange Online.

/ Andreas

Lync Online: “The user is not found or has not yet been provisioned for Lync Online”

This is an issue that I’ve been seeing a couple of times, but a couple of weeks a go, a nice colleague of mine helped me find a more sustainable solution in that particular case.

Issue:
When you are using Dirsync to synchronize your users from your local AD to WAAD, quite a lot of attributes follow your synchronized objects to WAAD.
Having a Lync Server on premise, your Lync activated users has some 7 attributes starting with msRTCSIP-, as below:

    • msRTCSIP-ApplicationOptions
    • msRTCSIP-DeploymentLocator
    • msRTCSIP-Line
    • msRTCSIP-OwnerUrn
    • msRTCSIP-PrimaryUserAddress
    • msRTCSIP-UserEnabled
    • msRTCSIP-OptionFlags

The problem with these attributes are, that they prevent your Lync Online users to be provisioned.
The error you will get when trying to verify settings on a particular lync user, is “The user is not found or has not yet been provisioned for Lync Online. Please verify that the user exists, wait 60 minutes, and then try again. If the problem continues, contact Microsoft Customer Service and Support.”

Solutions:

Option 1. Setup your Lync Server as a Hybrid deployment, as described here.
The problem in my particular case was that the Lync deployment the customer had, did not include an edge server, which is required for a hybrid deployment.

Option 2. Clear the msRTCSIP-* attributes for all Lync users on premise.
This is an option that works very well in smaller environments where you are not required to do some testing before rolling a solution out. 🙂 Since you’re clearing the attributes, Lync for the affected users will stop working on premise.
Clearing the attributes for ALL Lync enabled users on premise, can easily be done with the following PowerShell line using the ActiveDirectory module:

Get-ADUser -Filter {proxyaddresses -like "sip:*"} | 
  Set-ADUser -Clear  msRTCSIP-ApplicationOptions,msRTCSIP-DeploymentLocator,msRTCSIP-Line,msRTCSIP-OwnerUrn,msRTCSIP-PrimaryUserAddress,msRTCSIP-UserEnabled,msRTCSIP-OptionFlags

After clearing the attributes, you first need to force a synchronization of Dirsync, and then you do of course need to repoint your Lync related dns records to Office 365.

Option 3. Exclude the msRTCSIP-* attributes from the Directory Synchronization.
This is something that is needed if you want to try out Lync Online for a couple of users before moving them all to Lync Online.
Note: this requires some ‘major’ Changes in the Synchronization service that Dirsync runs on. Do the steps with caution!

Here is how to do it:
1. Start the Synchronization Service Manager (miisclient.exe) on the DirSync server. In the “Management agents” pane, select properties on the Active Directory connector.

2. In the management agent designer, select “Configure attribute flow” and remove the msRTCSIP for both the User and inetOrgPerson Data Source from the attribute flow as below. Note that you can only remove one attribute at a time.


3. If you have not yet made your first Directory synchronization, you’re now all set to to do that.
If not (which probably is the case since you found this post 🙂 ), you need to to clear the Active Directory Connector space before the problem will be solved. This operation would be equivalent dangerous to installing a new DirSync server in the same domain, e.g. no worries at all.
You will not lose any custom settings as OU or custom attributes that you are using to set your DirSync scope.

Deleting the Active Directory connector space is done with steps as below (it’s safe to click delete):

After the connector space has been deleted, run a Full Dirsync again, wait around 30 minutes and hopefully your Lync Online users have now been provisioned properly.

Hope this helps you if running in to this problem, and remember that it’s always more than one solution to a problem!

/Johan


How to manually configure an Outlook profile for Office 365

Manually configuring Outlook for Office 365 can be tricky. That’s what Autodiscover is for. But in some situations you have to be able to do a manual configuration in for example a pilot deployment. Here are the steps required.

The nice thing with this method is that we will be able configure Outlook without changing our Autodiscover DNS records. That means we can do a full Office 365 test deployment without affecting users in an on-premises Exchange environment.

The first step is to establish a remote PowerShell session to Exchange Online. Here we need the ExchangeGuid attribute from our mailbox. Copy this value and save it for later.

exguid

The next step is to launch the New Profile Wizard in Outlook. We will go for the option to do a Manual setup.

outlookprofile1

In the next screen we select that we have a Microsoft Exchange Server.

outlookprofile2

Now it’s time to enter the exchange server name. Here we need the ExchangeGuid from the first step. Write the Guid followed by @ and the email domain. The user name is our Office 365 user name.
Now click More Settings.

outlookprofile3

On the Security tab we select Anonymous Authentication.

outlookprofile4

On the Connection tab check the box to connect using HTTP and click Exchange Proxy Settings

outlookprofile5

Fill in all values as below

outlookprofile6

Click OK to close all windows. You will be asked for credentials, fill in your Office 365 username and password.

outlookprofile7

Now our Outlook Profile is ready to use and Outlook is configured for Exchange Online, without using Autodiscover.

/ Andreas

Logging on as Domain Admin to end user workstations? Think again!

We’ve all been there.
An end user has a problem with their computer or needs manual installation of some software. Either we elevate with an admin account logged on as the end user, or we switch user and are logging on with our admin account.
Far too often, the admin accounts used to help out end users, are very privileged accounts, 2/5 times I see this at my customers those accounts are Domain Admins.

Why is this a problem? Well, first of all, you should never expose very privileged credentials to “non trusted” computers. Secondly, at the time you log on, your credentials are exposed and can with Benjamin “gentilkiwi” Delpy’s tool mimikatz be extracted in clear text through the lsass process.

Ok, but the user is not local admin, so they will not be able to do it anyway? That is true, but far too many let end users be local admins, and of course there are ways to get around that if you’re a non admin user as well.

Example:
The end user Aaron that has been privileged enough to get local admin rights on his computer. He puts the powershell-script Invoke-Mimikatz.ps1 as a task to run at logon for all users.
2014-03-12 13-33-19

2014-03-12 13-44-04
In this example, I’ve just put in the row below in at the end of the script to dump the credentials to a file on the c-disk. This could of course be dumped anywhere if you wanted to.

Invoke-Mimikatz -dumpcreds | 
    Out-File -Append  c:\evilplace\$env:computername.txt

Effect:
Now, when his fellow administrator logs on to his computer to help him with some software installation, the admin credentials will be dumped to a file and Aaron is from now on Domain Admin!

2014-03-12 13-54-02

Scary? Yes!
Lesson learned: Think both once and twice before logging on with privileged credentials to non trusted computers.

This is of course nothing new, it’s been out for quite a while. Look in to the following matrix that clarifies when this is an issue or not (in most cases it is…:( )

/Johan

Exchange Online: Migrating shared mailboxes and resources

In Exchange 2003 Resource Mailboxes and Shared Mailboxes are often set up as a regular user mailbox. These mailboxes are still possible to migrate using Staged Migration or Cutover Migration, by migrating them as a regular user mailbox. The downside is that they will require an Exchange Online license.

If you are migrating from an Exchange version that supports Hybrid Migration you will be able to migrate resources directly without assigning licenses, but there is a workaround for Cutover and Staged migrations as well.

The process of migrating a Shared Mailbox or Resource Mailbox is as follows:

  1. Migrate mailbox as regular user mailbox
  2. Assign license
  3. Convert mailbox to shared/resource
  4. Remove license

To convert a user mailbox to a shared mailbox we just need one line of PowerShell. Except from changing the type, we also have to modify the mailbox quotas.

Set-Mailbox -Identity "shared@365lab.net" `
	-Type Shared `
	-IssueWarningQuota 9.5GB `
	-ProhibitSendQuota 9.75GB `
	-ProhibitSendReceiveQuota 10GB

The same thing applies to Resource Mailboxes (Rooms and Equipment). The difference here is that we also want to configure AutoAccept policies and set default access rights to the calendar:

Set-Mailbox -Identity "resource@365lab.net" `
	-Type Room `
	-IssueWarningQuota 9.5GB `
	-ProhibitSendQuota 9.75GB `
	-ProhibitSendReceiveQuota 10GB

Set-CalendarProcessing -Identity "resource@365lab.net" `
	-AutomateProcessing AutoAccept 

Add-MailboxFolderPermission "resource@365lab.net:\Calendar" `
	-User Default `
	-AccessRights LimitedDetails

After this is done the license can be removed. You will get a warning that your data will be lost, but it is safe to click Yes on this one.

licensewarning

/ Andreas

Office 365: Monitor and finish remote mailbox moves

A while ago, I posted a script that helps you out informing end users and starting remote mailbox moves in hybrid migration scenarios.
In the script we started our mailbox moves with the -SuspendWhenReadyToComplete switch. That switch means we manually have to go in and resume the mailbox moves with the Resume-MoveRequest cmdlet.

In this follow up script, we automate that process by monitoring active mailbox moves and handle resuming and removing of them. We also have the possibility to send out emails to our end users when the move has been completed (if uncommenting row 78).

Note: The script only works as intended if you have created one moverequest per user, as done in my script that start the migrations.

<#  
.SYNOPSIS 
    Script that monitors remote mailbox moves in Exchange Online and handles resuming, removing of them. 
.NOTES 
    Author: Johan Dahlbom 
    Blog: 365lab.net 
    Email: johan[at]dahlbom.eu 
    The script are provided “AS IS” with no guarantees, no warranties, and they confer no rights.     
#>

#region variables
$CloudUsername = "migration@365lab.net"
$CloudPassword = ConvertTo-SecureString "password" -AsPlainText -Force
$CloudCred = New-Object System.Management.Automation.PSCredential $CloudUsername, $CloudPassword
$PSScriptRoot = Split-Path -Parent -Path $MyInvocation.MyCommand.Definition
$Logfile = ($PSScriptRoot + "\HybridMigrations.log")
$enduserinfo = @"
Hi $($MoveRequest.batchname),<p>

You've just been moved to Office 365, if you have questions regarding the move, or if anything is not working as intended, let us know!
<p>
<strong>Best Regards
IT Department
</strong>
"@
#endregion variables

#region functions
#Function to send out email with defined parameters
function Send-MigrationMail {
param(
    [Parameter(Mandatory=$true)]
    [string]$Message,
    [Parameter(Mandatory=$true)]
    [string]$Recipient
)
$emailFrom = "Office 365 <migration@365lab.net>"
$smtpserver = "mailserver.365lab.net"
$subject = "Migration batch Finished"
$cc = "migrationadmin@365lab.net"
 
Send-MailMessage -From $emailfrom -To $Recipient -Cc $cc -SmtpServer $smtpserver -Subject $subject -Body $Message -BodyAsHtml
 
}
#Function to write information to a log file and to console output
function Write-Log {
Param (
    [Parameter(Mandatory=$true)]
    [string]$Logstring
)
Add-Content $Logfile -value $logstring -ErrorAction Stop
Write-Output $logstring
}
#endregion functions

#Connect to Exchange Online
if (!(Get-Command Get-CloudMoveRequest -ErrorAction SilentlyContinue)) {
    $session = New-PSSession -ConfigurationName Microsoft.Exchange -Authentication Basic -ConnectionUri https://ps.outlook.com/powershell -AllowRedirection:$true -Credential $CloudCred
    Import-PSSession $session -Prefix Cloud -CommandName @("Get-MoveRequest","Resume-MoveRequest","Remove-MoveRequest","Get-MoveRequestStatistics") -AllowClobber
}

#Run the following as long as there are active move requests
while (Get-CloudMoveRequest)
{
	$MoveRequests = Get-CloudMoveRequest
	foreach ($MoveRequest in $MoveRequests) {
		switch ($MoveRequest.status) { 
			"InProgress" 	{ 
				Write-Output "INFO: Move request for $($MoveRequest.Batchname) at $((Get-CloudMoveRequestStatistics -Identity $MoveRequest.BatchName).PercentComplete)% $(Get-date -format u)" 
			}
			"AutoSuspended" {
				Write-Log "INFO: Completing mailbox move for $($MoveRequest.BatchName) at $(get-date -Format u)"
				Resume-CloudMoveRequest -identity $moverequest.batchname
			}
			"Completed" 	{
				Write-Log "INFO: Removing completed MoveRequest $($MoveRequest.Batchname) at $(get-date -Format u)"
                #Uncomment row below to send information to end users when migration has been completed.
                #Send-MigrationMail -Message $enduserinfo -Recipient $moverequest.batchname 
				Remove-CloudMoveRequest -identity $moverequest.batchname -confirm:$false 
			}
		}
	}
	
	Write-Host "------------------------------------------------------------------------------"
	Start-Sleep 60
}

 Write-Log "INFO: All migration batches finished at $(Get-Date -format u)"
 #Send information to admin then the batches are complete.
 Send-MigrationMail -Message "Migration batch finished at $(Get-Date -format u)<br>Logfile attached." -Recipient migrator@365lab.net
 

Hope this is at any help, just let me know if you have suggestions that can improve the script.

/Johan

Quick Tip: Forcing Office 365 Directory Synchronization to run

Disclaimer
This blog post was written for an older version of the Azure AD Connect Synchronization Service. For information regarding the current version please look at the documentation from Microsoft.

Sometimes you need changes in your on-premises Active Directory to sync to Office 365 as soon as possible. You might, for example, have a new employee at your doorstep one morning, and you quickly have to create an account for him. Normally a sync is only done every three hours. With these commands your data is synced immediately.

Depending on your version of DirSync/AADSync the commands are a bit different:

DirSync prior to version 6862.0000

To start a manual sync you launch the DirSyncConfigShell Console File, located at C:\Program Files\Windows Azure Active Directory Sync.

A sync is triggered by the command

Start-OnlineCoexistenceSync

You can also trigger a full sync by using the -FullSync parameter.

If you are using DirSync with Password Sync you can also run a full password sync with the following lines of PowerShell code:

Set-FullPasswordSync
Restart-Service FIMSynchronizationService -Force

The DirSync result can be viewed in the FIM Client, but to see the result of Password Sync you need to look at the Event Viewer in Windows.

DirSync version 6862.0000 and later

Starting with DirSync version 6862.0000 released on June 5 2014 there is no longer a DirSyncConfigShell Console file in the Program Files folder. Instead you just start a normal PowerShell window and run Import-Module DirSync. After that the Start-OnlineCoexistenceSync cmdlet is available.

Forcing a Password Sync uses the same lines of PowerShell code as the previous versions:

Set-FullPasswordSync
Restart-Service FIMSynchronizationService -Force

Azure Active Directory Synchronization Services (AAD Sync)

A Directory Synchronization is triggered by running an exe file:

C:\Program Files\Microsoft Azure AD Sync\Bin\DirectorySyncClientCmd.exe

force_dirsync

DirectorySyncClientCmd.exe accept two parameters, initial and delta. Running DirectorySyncClientCmd.exe initial initiates to a FullSync, and running DirectorySyncClientCmd.exe delta (or without any parameters) initiates an incremental sync.

The delta synchronization is triggered every 3 hours, and it can also be started manually by running the Scheduled Task “Azure AD Sync Scheduler” in the Task Scheduler.

To force a Password Sync the following lines of PowerShell code is needed. Modify the first two lines to match your environment.

$adConnector  = 'ad.contoso.com'
$aadConnector = 'contoso.onmicrosoft.com - AAD'

Import-Module ADSync

$c = Get-ADSyncConnector -Name $adConnector
$p = New-Object Microsoft.IdentityManagement.PowerShell.ObjectModel.ConfigurationParameter 'Microsoft.Synchronize.ForceFullPasswordSync', String, ConnectorGlobal, $null, $null, $null
$p.Value = 1
$c.GlobalParameters.Remove($p.Name)
$c.GlobalParameters.Add($p)
$c = Add-ADSyncConnector -Connector $c
Set-ADSyncAADPasswordSyncConfiguration -SourceConnector $adConnector -TargetConnector $aadConnector -Enable $false
Set-ADSyncAADPasswordSyncConfiguration -SourceConnector $adConnector -TargetConnector $aadConnector -Enable $true 

/ Andreas

Adding .guru domains to Office 365 (Always use PowerShell!)

A couple of weeks ago, general availability for the .guru tld was announced. The new tld means that geeks like me can show off their ‘expertise’ by having a cool domain!

Now to the problem. When trying to add the new cool domain to my Office 365 tenant, I tried to do it in the Admin Center, as I usually do when adding single domain.
Unfortunately they have not yet added support for the new cool .guru tld in Admin Center.
o365.guru-admincenter

Fortunately, when adding the domain with the New-MsolDomain cmdlet, it went through with no problems.
2014-02-27 21-13-59

So, a friendly reminder to all of you geeks out there with .guru domains –
Whenever possible, use PowerShell! 🙂

/Johan